
Viz World Classic User Guide
Version 23.0 | Published December 12, 2023 ©
Creating a Track
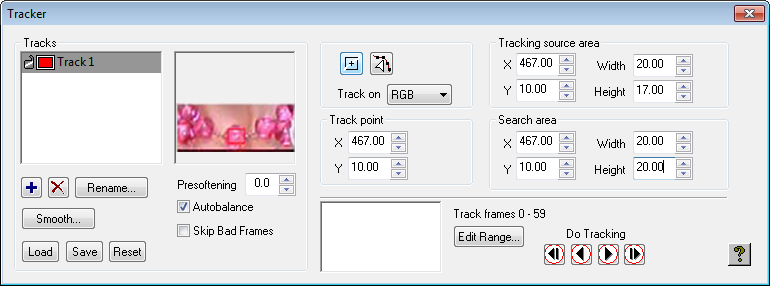
![]() On the Tools menu, click Tracker or click the Tracking button in the toolbar. The Tracker dialog box is displayed to allow you to create one or more tracks.
On the Tools menu, click Tracker or click the Tracking button in the toolbar. The Tracker dialog box is displayed to allow you to create one or more tracks.
To Create a Track
-
Click the + button to create a new track, and select it in the Tracks list.
-
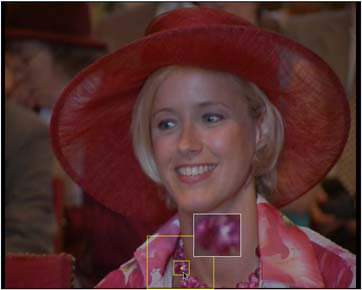
Click the Edit Tracks button to indicate which feature of the image you want to track:
Two concentric squares are drawn in the Viewer with a + at their center. -
Move the mouse pointer over the center square until it changes to a move symbol and drag the squares over the feature you want to track.
-
The center square acts as a magnifying glass to help you locate the feature accurately:
-
If necessary move the central + to the precise position you want to track. This is the pin position that determines the precise offset generated by the track. Usually, you leave this at the center of the inner square. The outer square determines the search area that the tracking tool scans at each frame when looking for the feature you have specified. Its size should be sufficient to cover the maximum movement in any direction from any frame in the sequence to the next frame. It does not need to cover the area occupied by the feature of interest throughout the whole sequence.
-
Adjust the Presoften value to blur the image before matching the target; this helps tracking if the image is noisy, or includes a random feature such the rain.
To Start Tracking
-
Click the Track Next Frame
 button to step forward a frame at a time, tracking the feature.
 -
Click the Track Forward
 button to start automatically tracking the feature from the current frame.
As tracking proceeds the Tracker dialog box plots a graph showing the quality of the track:
![]()
Higher values indicate a good match.
The tracking paths are shown in the Viewer as a white line with red dots at each track position:
![]()
To Correct a Tracking Path
The automatic tracking procedure may occasionally lose the feature being tracked. To correct for this:
-
Go to the last frame where the track was correct (or another earlier frame).
-
Hold down SHIFT and drag the tracking box. This leaves the tracking point itself unchanged, so that the points added to the motion path continue on the same track, but it uses a different area for subsequent detection. It is important to choose a different area which is moving in the same way.
-
Click the Track Forward
button to continue tracking from that point. For example, if the feature being tracked goes out of sight or behind another object, you need to select another feature to track. When tracking an actor’s eye it may be necessary to manually position the tracking tool if the actor blinks. You can also track backwards or track the previous frame using the appropriate controls.
To Lock a Track
![]()
Click the lock icon to the left of the track name in the Tracks list. This is useful once you are satisfied with a track, to protect it from changes during subsequent tracking actions.