
Viz Artist User Guide
Version 5.0 | Published December 20, 2022 ©
Asset View
Viz Artist comes with a new Asset view replacing the old server and items view. It also merges the search functionality and freetext search option of previous versions into a unified search tool.
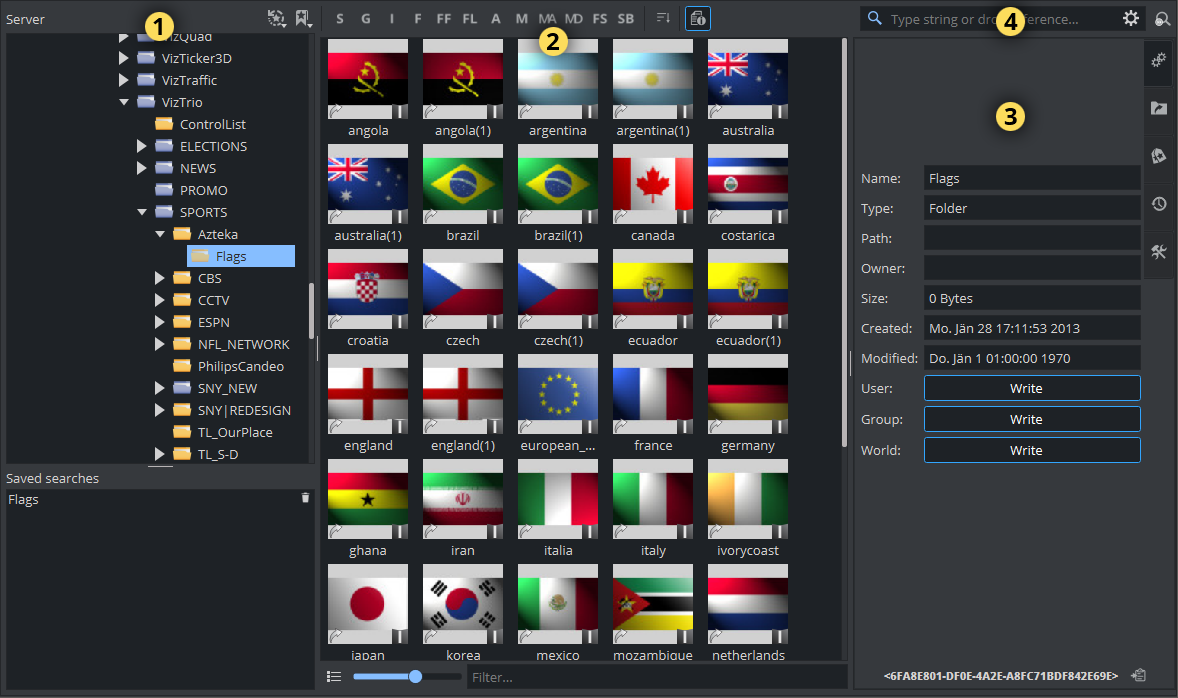
Asset View Window
The Asset View window is split into the following parts:
-
Server Tree (1): Manage files and projects on your Graphic Hub.
-
Items View (2): Browse and view your available items.
-
Properties (3): An even more detailed view on your assets and a set of tools.
-
Search (4): A powerful search tool to find the items on your Graphic Hub.
Server Tree
The Server Tree shows a structured representation of your Graphic Hub. It has the possibility to create projects and folders, so anyone can organize assets matching various needs.
There are two types of folders:
-
Regular folders

-
Project folders

The difference between a regular folder and a project folder is that by defining a working project, the tree can be collapsed so that only the currently selected project and its sub-folders and sub-projects folders are shown. A project can contain various folders, but a folder cannot contain projects. To restrict the view to your current project only, right click on your project folder and select Restrict to Project.
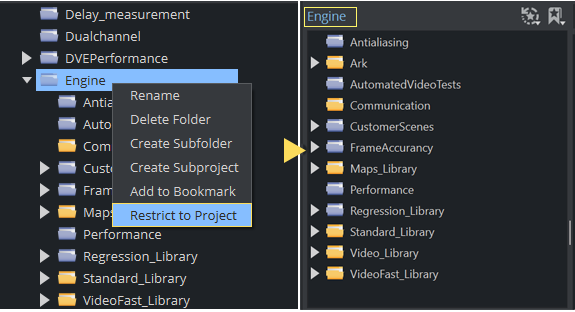
This allows to see only the relevant structure of your project, while search functionality and others are still available. The current select project is shown on the top of the server tree. To switch back to the original view, right click in the scene tree and select Remove restriction or click on the light blue colored project name on top of the tree (Engine in the sample above).
Working with Project/Folders
New folders or projects can be created by right clicking on an existing folder or project in the tree view and selecting Create Subfolder / Create Subproject. The new item is created underneath the selected folder/project. Sub-folders can be added to both regular folders and project folders.
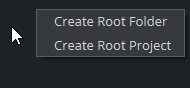
If you click on an empty area, you can choose Create Root Folder or Create Root Project to create new Folders/Project on the root level.
Information: Only Project folders can contain Sub-Project folders.
To rename a folder or project, right click and select Rename. Be aware that not all characters are allowed as names, some reserved ones like * { [, spaces, etc... are not accepted.
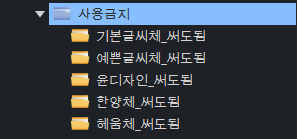
Tip: Folders or projects are not restricted to Latin characters.
Example:
To reorder your structure, both types of folders can be dragged around after being added to the Server Tree. Only Project folders can contain Sub-Project folders; however, sub-folders can be added to both regular folders and project folders. To prevent folders/project being moved by an unwanted drag operation, this operation can be limited in the User Interface option in the Viz Config section:
![]()
This can be either unrestricted (Normal) or only by using the SHIFT key in combination with the drag operation (w/Shift) or can be completely forbidden (No).
Working with Bookmarks
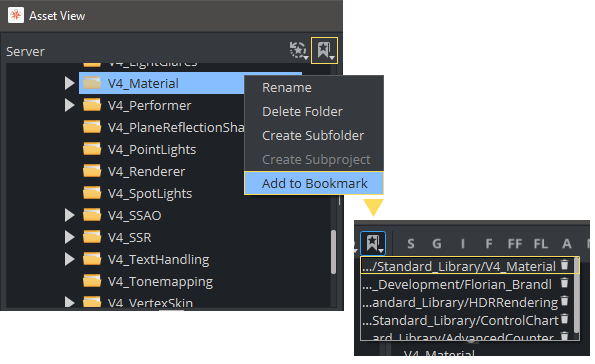
To provide quick access to the most important folders or projects, they can be bookmarked to speed up navigation. Bookmarked folders are added to the Server Tree Bookmark context menu. Right click on a folder or project and select Add to bookmark. This adds your favorite into the bookmark drop menu on top of the server view:
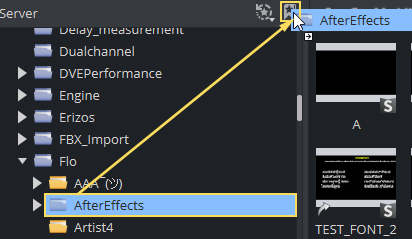
Bookmarks can also be created by dragging a folder to the Bookmarks Icon.
Bookmarks can be deleted by opening the bookmarks menu and clicking on the small trashcan next to the item.
Information: Bookmarks are stored on a per user level on Graphic Hub. If multiple users use the same login (for example, Guest) Bookmarks will be mixed up.
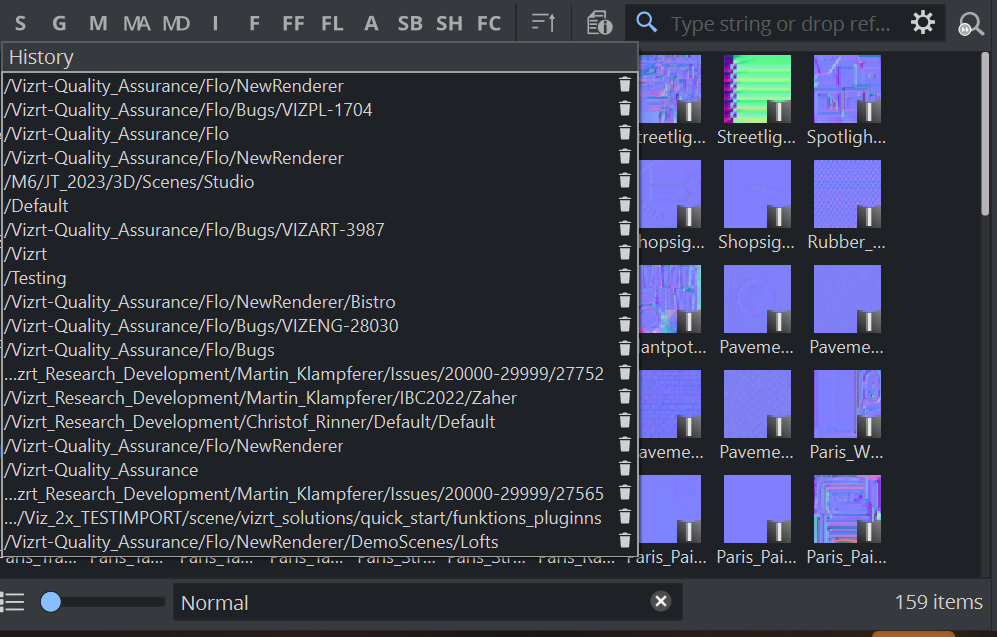
History
The asset view automatically adds up to 20 folders and project locations into a history once an asset has been used from within that folder. This applies to actions (like an item has been deleted or double-clicked, renamed, dragged into the scene tree and so on). Whenever an action happened within a folder or project, it is added to the history list. This history is available at the top of the server tree.
Information: History is stored on a per user level on Graphic Hub. If multiple users use the same login (for example, Guest) history entries are mixed up.
Items View
The content of a selected folder or project is shown in the Items view. Items can be represented as icons or as a list.
|
Small Icon View |
|
|
|
Large Icon View |
|
|

|
List View with Details |
|
|
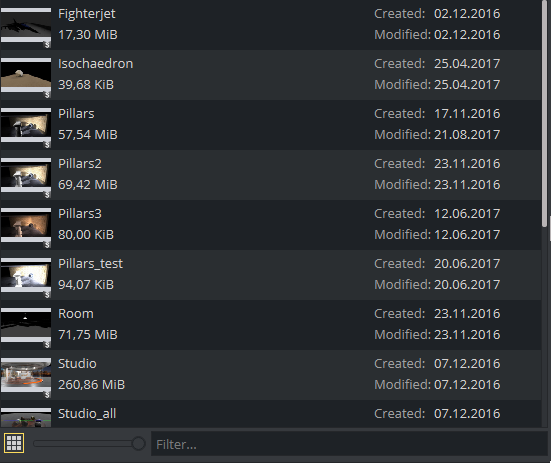
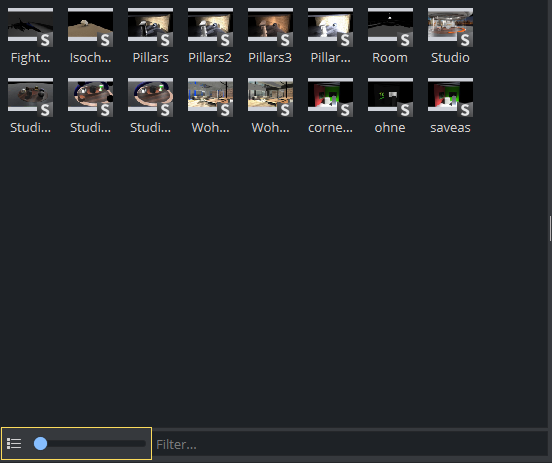
By using the slider on the bottom, you can choose the size of your icons in Icon view. Once you switch to list view, this option is disabled. Since Viz Artist version 4.4, the creation time is also displayed.
Sorting and Filtering Items
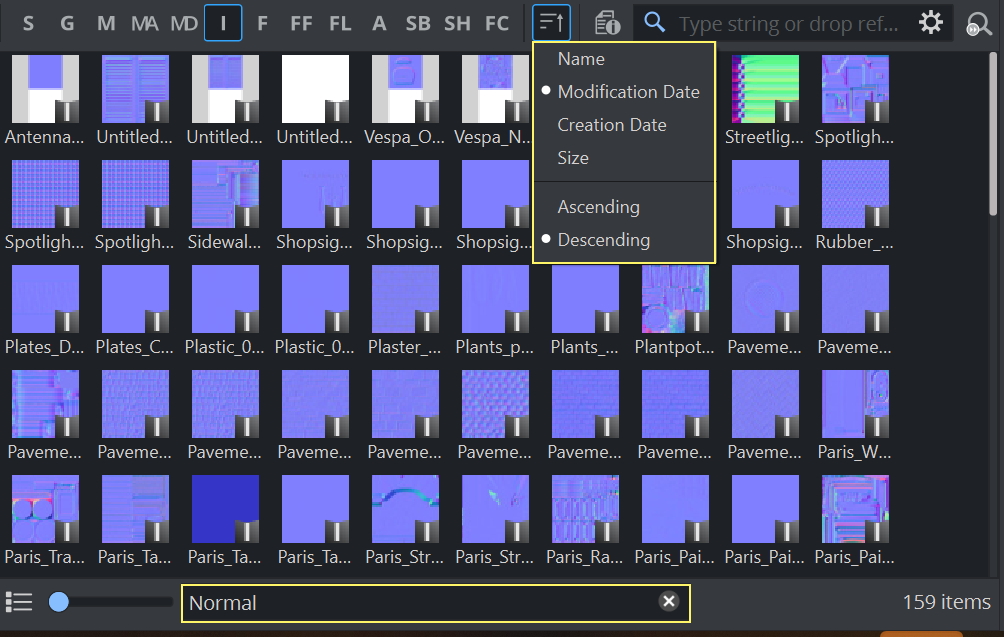
![]() You can sort how items are being displayed by using the sort icon next to the Content switcher. Then you can sort by Name, Modification Date, Creation Date, Size and in both Ascending and Descending order.
You can sort how items are being displayed by using the sort icon next to the Content switcher. Then you can sort by Name, Modification Date, Creation Date, Size and in both Ascending and Descending order.
Underneath the Items view, there is an input field for doing a quick filtering on your items. The filter applies to any part of the filename. As an example, if the content switcher is limited to images and given that your items follow a certain naming convention, you set a filter to "normal", it only shows the normal maps within a folder:
Content Switcher
Folders can contain various types of items. To view only a selected type of items, contained in a folder, click an item type tab from the Content Switcher. This also allows multi-selection while holding the CTRL key while clicking on it. If you want to see all of your items, click on any previous selected item, so no one is selected. This replaces the old All tab.
|
Content Switch to Show only Scenes |
|
|
|
Content Switch to Show All Material Types |
|
|
|
Content Switch to Show All Types |
|
|


Item Types
The various types are represented by a symbol in the content switcher as tabs. Currently all types are shown, independent from the selected render pipeline. This is expected to be improved in future versions.
|
Symbol |
Meaning on Graphic Hub |
|
S |
Scenes |
|
G |
Geometries |
|
I |
Images |
|
F |
Fontstyles (Classic Render Pipeline only) |
|
FF |
Fontface (Viz Engine Render Pipeline only) |
|
FL |
Fontfile (Viz Engine Render Pipeline only) |
|
A |
Audio |
|
M |
Materials (Classic Render Pipeline only) |
|
MA |
Materials Advanced (Classic Render Pipeline only) |
|
MD |
Material Definitions (Viz Engine Render Pipeline only) |
|
SB |
Substances |
|
SH |
Shaders (Viz Engine Render Pipeline only) |
|
FC |
File Collections |
File Collections
File Collections have been introduced in Viz Engine to allow a user to store data from external applications (like Unreal projects) in Graphic Hub. The File Collection holds the information about this data and is usually linked to amount of binary data. This binary data (BINARY_BLOB) is invisible to the Viz Artist user. Deleting File Collections from within Viz Artist always deletes all references too.
Item States
Items on Graphic Hub can have different states, while they are being worked on. Items that are currently in work are active items. Active items are locked or checked out.
|
Overlay Icon |
Meaning |
|
|
Linked Item If this item is being deleted, only the reference counter is being decreased. To delete all references of linked items, choose "With all References" in the confirmation dialog. To create a linked item, press the ALT key and drag it to the destination location. |
|
|
Locked Item |
|
|
Checked out Item Any item can be checked out within Viz Artist by using the context menu and selecting Check out or Check in. The item remains checked out (locked) even if the user closes the item or disconnects from the database. |
|
|
Locked and Checked out Item It can be opened read-only but not modified unless unlocked and checked in again. |
|
n/a |
Expiring Item |
File Operations on Items
Items can be copied, moved, renamed, deleted or linked.
-
 To copy an item, you simply drag the object to its new location. The copy operation is shown within the mouse cursor by a small + sign. As an alternative you can use CTRL + C and to paste CTRL + V within the new location.
 -
 To move an item, keep the SHIFT key pressed while moving to a new location. As an alternative you can Cut (CTRL + X) and paste (CTRL + V) the item.
 -
 To create a link, keep the ALT key pressed while moving to the new location.
 -
Items can be deleted by either selecting Delete... on the context menu or by hitting the DELETE key. In addition, you can drag any item to the trash bin to delete it.
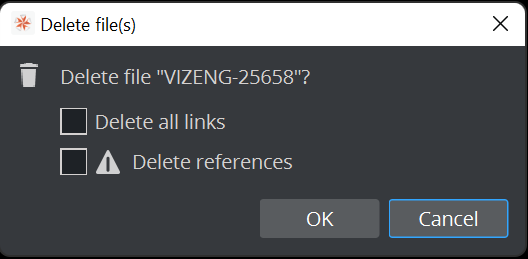
If you perform a delete operation on an referenced item, an additional option With all references is available. This removes all references of this file from Graphic Hub. A regular delete operation only deletes the reference within the current folder.
The Delete all links option also removes all Folder links of this object.
Note: Referenced items are deleted if they are referenced to ONLY the selected item. If they are also referenced to others, then they are not deleted.
File Collections are ALWAYS deleted with all references. As the operation to resolve a lot of references takes some time, please be aware that deleting File Collections can require a lot of time!
Tip: To delete multiple items, select the items to be deleted and drag to the Trash Can.
-
Creating a copy of an item within the same location is currently only possible by selecting Duplicate in the context menu.
-
To create a new scene, open the context menu on either a scene or somewhere in the free space area.
To search for references item, please see Searching for References.
Tip: Files can be imported by dragging them from the filesystem (Windows Explorer) into the Asset View. For details, please see Import of Files and Archives.
To Rename an Item
-
Select the item to be renamed.
-
Open the rename text field:
-
Right-click the item and select Rename from the context menu, or
-
Press F2.
-
-
In the text field that appears, type a new descriptive name.
-
Press ENTER.
Note: Special characters, such as space, are not allowed in item names.
Note: If renaming a linked item, only the name of the selected item changes, not the linked one.
To Lock an Item
An item is automatically locked when a user opens the item. It is not possible to perform this operation manually. Some types offer additional options on the context menu: Add to Container is available for the following types: Geometries, Materials (Classic), Material Advanced, Material Definition, Images, Fonts (Classic), FontFaces and Substances. This requires a container to be selected in the Scene Tree.
Images
There are several options available for images:
-
Export...: Exports the image from Graphic Hub to your hard drive. several formats are available.
Information: The name of the image is taken from the existing name in Graphic Hub, The file dialog is for selection the destination folder only.
-
Prefilter Environment Map: Prepares Cylindric HDR images to be used as Environment maps. This applies to the Viz Engine Render Pipeline only.
Fonts
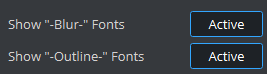
Hide or Show Blur- and Outline- variants of imported fonts. This cleans up the view by hiding those variants from the asset view. Those variants are used for example as a drop shadow effect for your fonts and are not necessarily visible. This can also be set as default in the configuration section:
Audio
-
Export...: Exports the audio as .wav file from Graphic Hub to your hard drive.
Information: The name of the image is taken from the existing name in Graphic Hub, The file dialog is for selection the destination folder only.
To Select Multiple Items
You can select multiple items in the Asset view. To select single items, keep the CTRL Key pressed while choosing the items you want to select. If you want to select a range of items, select the first item and then use the SHIFT key to select the last one. An alternative is to use your mouse to draw your selection.
Tip: Multiple items of the same type can be selected and dragged into the scene tree or scene editor. This is for example useful if you want to animate an image sequence using the OMO plug-in.
The Properties Panel is disabled if multiple items are selected.
Location History
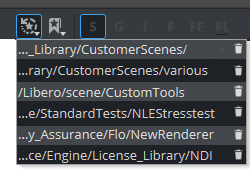
Asset view keeps a history of each location where a certain type has been used. This can be shown by CTRL+ right clicking on one of the tabs. For example, if you CTRL + right-click on the S tab, a history of the last 20 locations where an item of type Scene has been modified are shown.
To remove this browsing history, click on the small trash can next to the entry.
Hot Folders
Hot folders are a kind of history items, but bound to a certain type of item. For example a folder with all your environment maps (images) can be set as Hot Folder. This allows to quickly jump to this folder and set the view to Image. To do so, right click on the folder you want to remember and the type of your item and choose Add as Hot Folder.
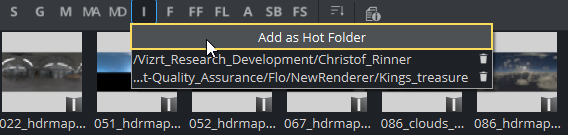
You can then quickly jump to your Environment maps by right clicking on I and select your Hot Folder location.
To remove Hot Folders, click on the small trash can next to the entry.
Information: Hot Folders and Location History are stored on a per user level on Graphic Hub. If multiple users use the same login (for example, Guest) they will be mixed up.
Properties
The Asset view offers a side panel which shows detailed information about an item. Click on the ![]() button to show or hide the panel
button to show or hide the panel
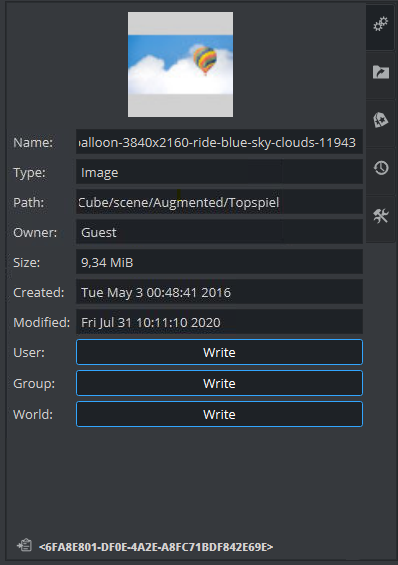
General
The general tab shows basic item properties. On top a large preview icon is shown.
-
Name: Shown underneath it, you can copy the name, but you can not modify it here. To rename an item, see Renaming an Item.
-
Type: Shows what kind of asset you selected.
-
Path: Shown underneath. The location of the item. Please keep in mind, that a linked item can appear in multiple locations. The path shown here is the currently selected one on Graphic Hub. If an asset from the Search result is selected, then it is the first folder link, otherwise the exact path of it.
-
Owner: Shows the active user that owns this item. For more information about user and group management, see User and Group Management in the Database Management section of the Graphic Hub Administrator Guide.
-
Size: Shows the actual size of the selected item in Graphic Hub. Items on Graphic Hub have different sizes than for example the same file on your hard drive (images on Graphic Hub contain additional data like mipmap levels, preview icons, etc.).
The two date items shows when an item has been created and when it was last modified. Since Viz Artist version 4.4, the time is also shown.
Permissions can be changed on User, Group and World level.
-
User: User may overwrite their files and create files.
-
Group rights: User can overwrite files which belong to the group they are a member of.
-
World rights: User may overwrite files which belong to anyone.
On the bottom, the UUID of the item is shown and be copied to the clipboard with the small clipboard icon.
Tip: The UUID of any selected item can also be copied to the Clipboard by using the CTRL+U shortcut.
Links
The Links tab shows the links that are assigned to the selected item. There are two different types of links. References and File links.
-
References: Contains all items an item consists of. For example, a scene contains of various Images, Fonts and Geometries. All of these belong to that scene are references.
-
Used by: Represent the location the item is being used. This can be for example a scene, a merged geometry etc.
-
Folder Links: Represent all locations this item is placed on the Graphic Hub.
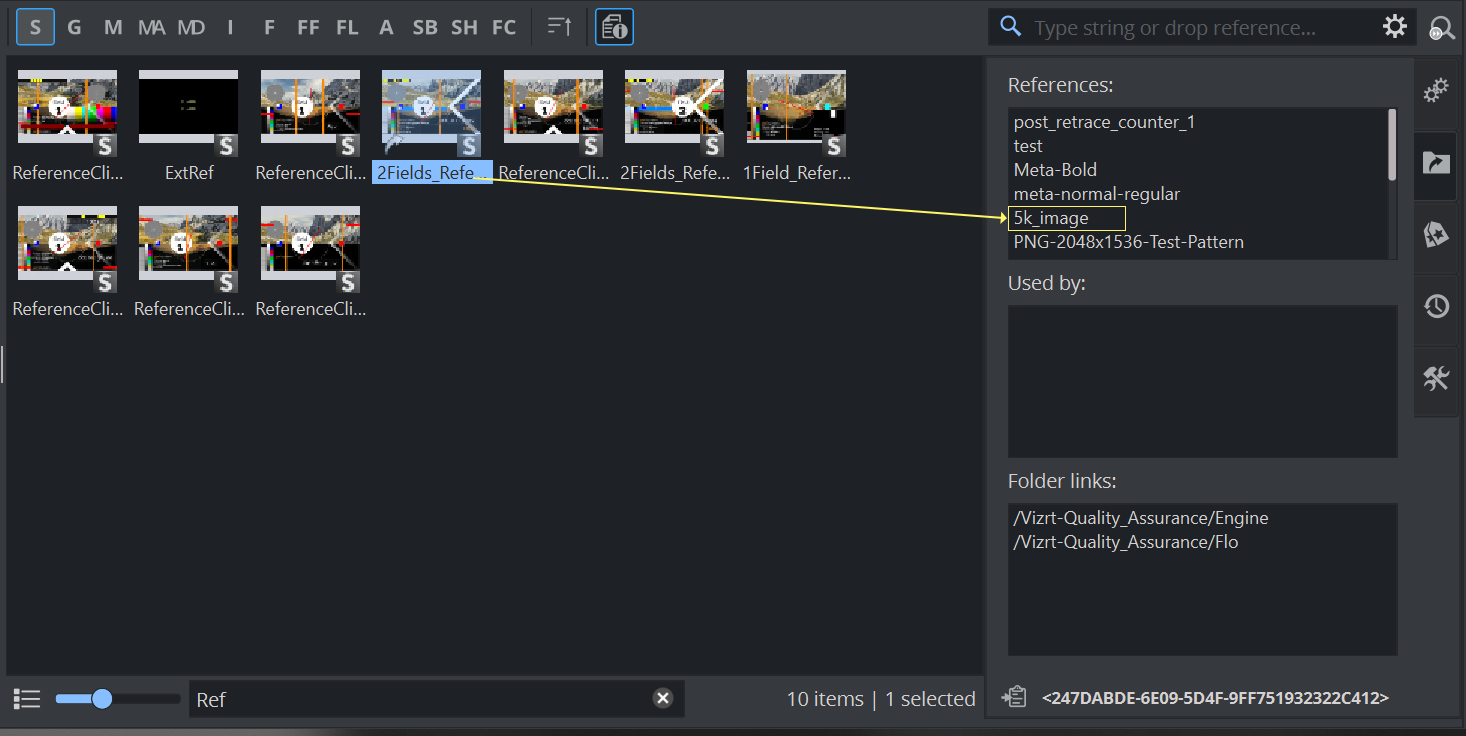
Example: The selected 2Fields_ReferenceClip_16_9 scene has various references. One of them is an image called 5K_image.
If you select the 5K_image entry in the reference list, the asset view jumps to first location (if the image is linked) and shows the file links this image has also be used.
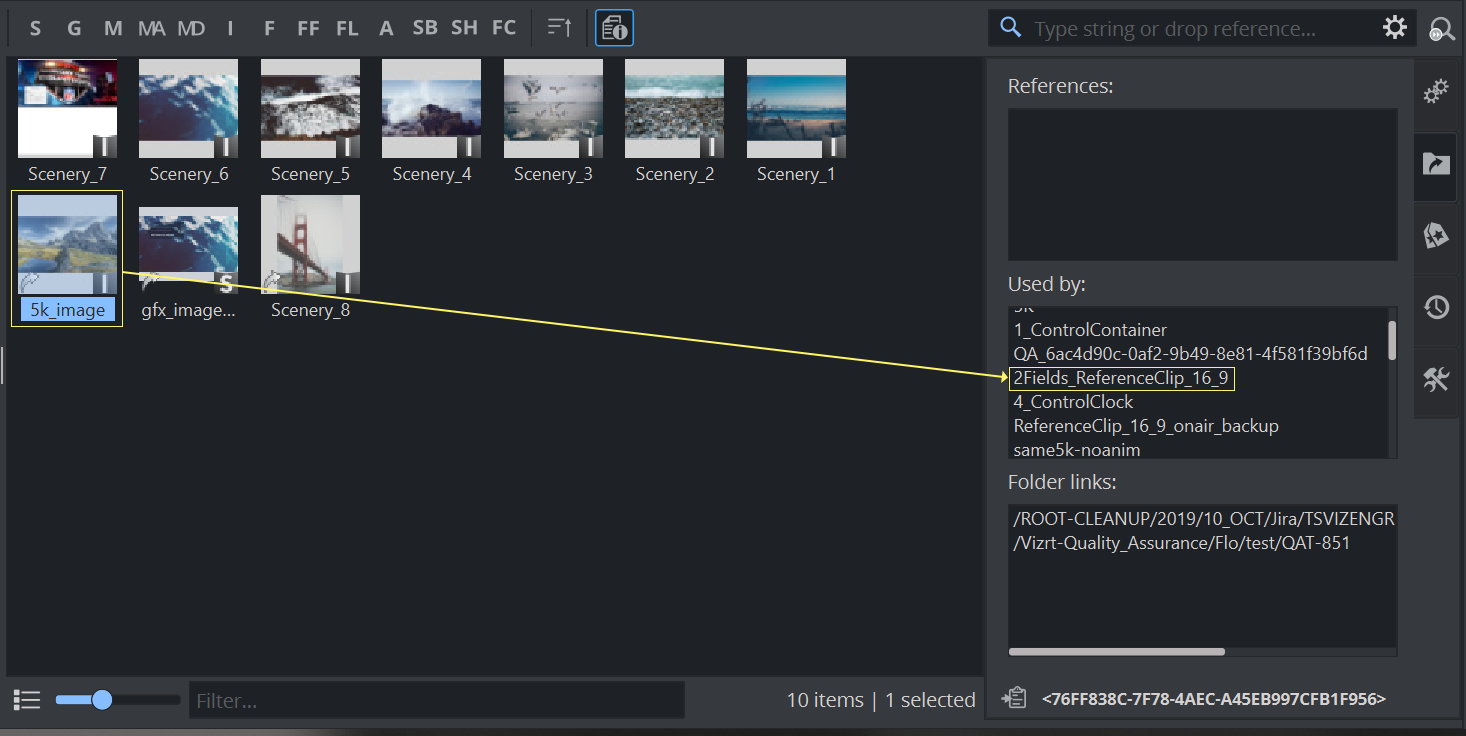
This shows shows all other objects that use this image. One of these File links is the scene ReferenceClip16_9. If you click on ReferenceClip16_9 in the File Links list, the asset view would jump back to the location this scene is stored in or as in this example back to the first explanation image. A detailed explanation on how to search for reference can be found chapter Searching for References.
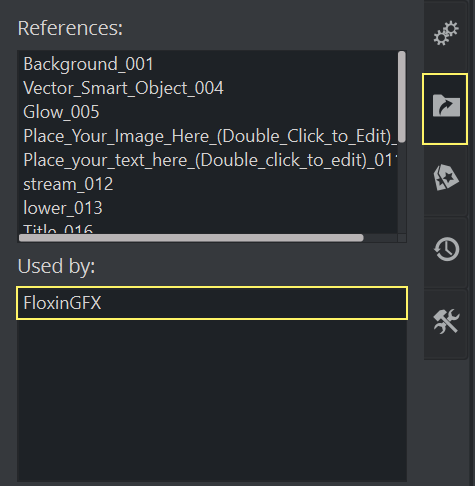
If you get an error message when opening a scene
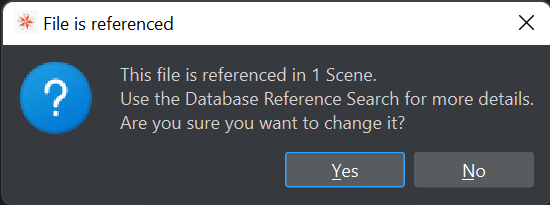
the scene is most probably being used inside a GFX channel or Superchannel within another scene.
Check the File Link properties of this item to check which other files is using this:
Keywords
Keywords can be assigned to all types of items. They can be useful for example to categorize or label your items. Keywords can also be used as a search criteria.
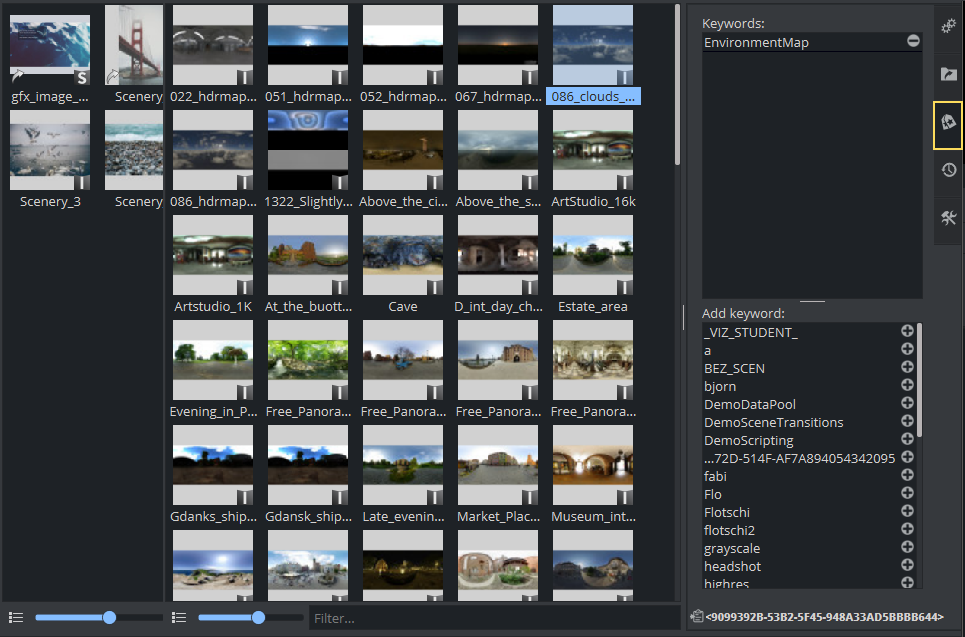
To assign a keyword to your selected item, either double-click on the keyword you want to assign or click the small + sign. To remove it, do the opposite.
Tip: Use Graphic Hub Manager to create and manage your keywords.
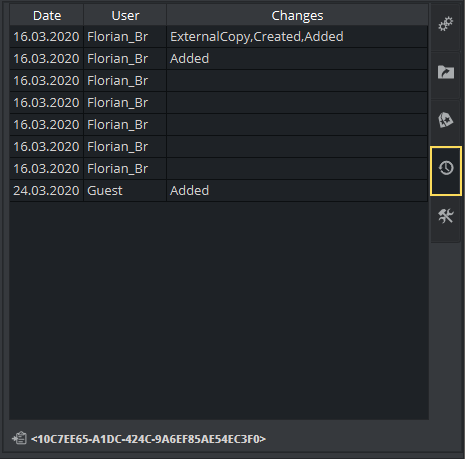
History
Graphic Hub stores a simple history of what has happened with your items. When a assets has been created or imported, modified etc. This is useful if you need to know who modified or imported something.
Advanced
Special tools can be found in the Advanced section.
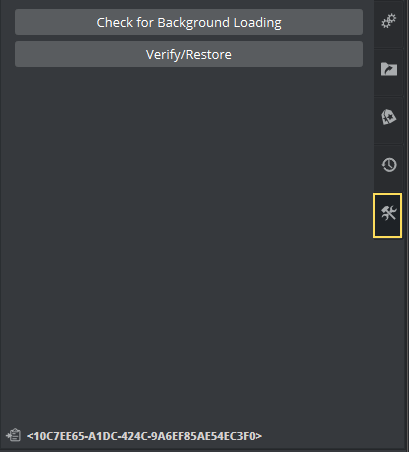
-
Check for Background Loading: Checks if the selected item is suitable for Background Loading. A message box opens and shows if the item is suitable, or shows why the item is not suitable.
-
Verify/Restore: Locates, verifies and attempts to correct a corrupted item.
Search
Searching for items has been unified in Version 4.3. There is no longer a split between normal search and the freetext search and the options have been reduced to a minimum.
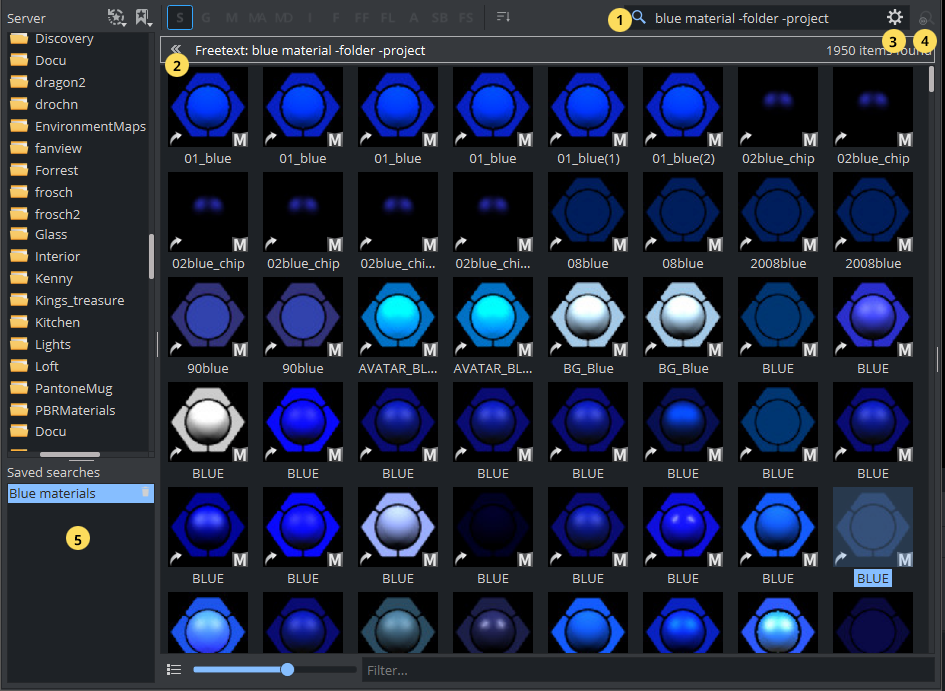
The following widgets are important for finding items on Graphic Hub
-
Search Field (1): Defines the search term.
-
Result Bar (2): Shows what query has been executed and the number of search results.
-
Advanced Properties (3): Displays additional options for more precise queries.
-
Show last search results (4): Allows to quickly jump to the result so your last search.
-
Saved searches (5): Shows a list of saved search queries.
Search results are shown inside the Items View. On top of the view is the results Bar. This shows what search result is being displayed. For example Freetext: or Name: followed by the search term. On the right side, the number of search results is shown.
|
|
To switch back to the basic Items view, click the button on the left side. |
|
|
To switch back to the search result. |
Search results can be saved, so it is easy to quickly recall them. They are listed in the Saved searches Panel. If not needed, the panel can be moved to the bottom.
To save your search, open the advanced panel and click on the ![]() button. Items can be removed again by clicking on the trash bin icons.
button. Items can be removed again by clicking on the trash bin icons.
Information: Search queries are stored on a per user level on Graphic Hub. If multiple users use the same login (for example, Guest) they will be mixed up.
Simple Search
To locate an item in Graphic Hub, type any property into the search field on top of the assets view. This can be either part of the name, the owner, the type, or keywords. In addition, Graphic Hub add-ons are also included by default.
Some examples:
|
Search Term |
Description |
|
vizrt |
Searches for all items, that has vizrt as:
|
|
scene |
|
|
project folder -geometry -scene -image |
Lists all folders and projects (excludes geometries, scenes and images). |
|
image Mousey_Mouse |
Lists all images owned by user Mousey_Mouse. |
|
blue material -folder -project |
Lists all materials with part of the name like blue, but excludes folder and projects |
|
Flo?an |
Lists all elements, that have the term Flo followed by any character followed by an . |
|
Flo*an |
Lists all elements, that have the term Flo followed by any text followed by an. |
|
Elem[b-g]nt |
Matches a range or a list of characters. |
|
{AB3584 |
Lists all elements where AB3584 is part of the UUID. |
Advanced Search
If the simple search is not fulfilling your needs, you can use the Advanced Search. It allows you to specify more search criteria in detail.
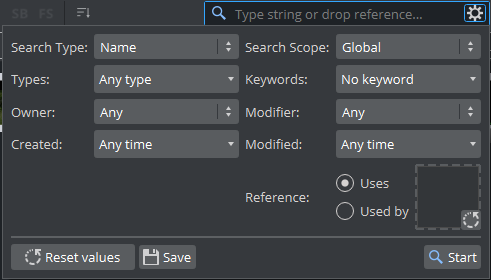
The default Search Type is Freetext, which means, your search criteria matches on:
-
The name
-
The owner
-
The type
-
The keywords.
Graphic Hub Add-ons are also included by default. Search by Name uses only the item's name as matching criteria. To limit the search to a single folder or product including its subprojects/folders, switch the Search Scope from Global to Selected folder. This is for the currently selected folder only. Types specifics which item types to search for. This is more or less the same as for example doing a blue material to find all blue materials, but lets define your type more gradually. By specifying Keywords, your search also includes these in the search query. If you need to find an item by a specific owner, the dropdown list lets you to choose a certain user.
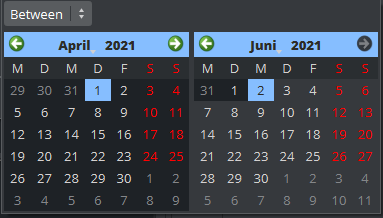
To search for a certain time an item has been modified, for example all scenes that have been changes last week, the modified property can be used. It can be:
-
Any time: Uses default value with no range specified.
-
From: Uses a start date until now.
-
Until: Shows any item modified before the specified date.
-
Between: Shows if an item has been modified between two dates.
Reference Search
There are two different ways to search for references:
Reference Search on an Item
Right click on an item (or CTRL+R) gives one the possibility to search for its references.
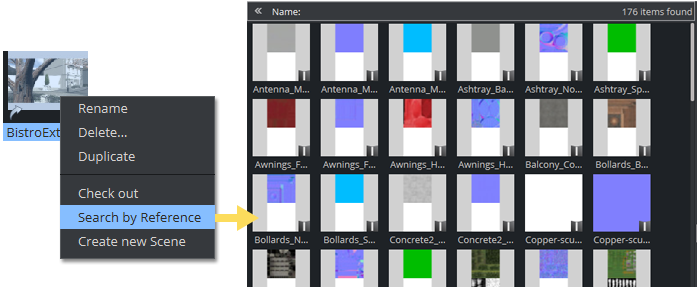
-
Scenes automatically show the items that refer to this scene.
-
Fontfiles show their related Fontface.
-
Other items (like images, etc.) show the File links instead.
Material Definitions for example can have textures as file links, but also be referenced by scenes. By default, the Reference search on a Material Definition shows the scenes it has been used by. If you need to know the textures a Material Definition is using, you need to use the Advanced Settings.
Note: It is not possible to perform a reference search for classic materials, as materials are not referenced. Material information is held inside the Scene.
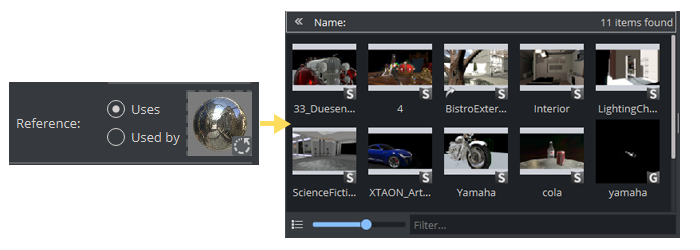
Advanced Reference Search
The advanced search panel allows you to specify your rest request even further. Drag an item to the drop area or directly into the search field. You can then specify if you want to search for References (Used by) or for File links (Uses).
-
Uses: Searches for all objects that use this object, in our example all scenes that use the Material Definition:
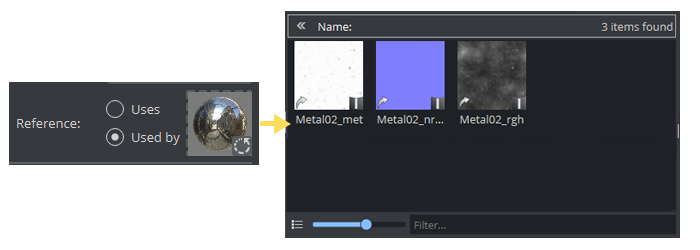
-
Used by: Searches for all items, that are being used by this object. In our example, the textures for our PBR Material Definition.
Troubleshooting Search
If your search result is not the expected one, please verify your advanced settings. If the search type is switched to Name, the search input field delivers fewer results than running in freetext mode. Always verify the mode in the search bar. Use the Reset values to bring back the advanced properties to its default value.
Shortcuts
The following shortcuts are valid for the Asset View:
|
Action |
Key and/or Mouse Shortcut |
|
Renames an item |
F2 |
|
Focuses on the search input field |
CTRL + F |
|
Copies the UUID of the item to the clipboard |
CTRL + U |
|
Copies the path of the item to the clipboard |
CTRL + SHIFT + U |
|
Checks in an item |
CTRL + I |
|
Adds a new scene or material (if the type is selected) |
CTRL + N |
|
Checks out an item |
CTRL + O |
|
References search on this item |
CTRL + R |
|
Exports file |
CTRL + E |
|
Zooms in |
CTRL + + |
|
Zooms out |
CTRL + - |
|
Copies |
CTRL + C |
|
Cuts |
CTRL + X |
|
Pastes |
CTRL + V |
|
Shows icon view |
CTRL + SHIFT + 1 |
|
Shows list view |
CTRL + SHIFT + 2 |
|
Selects all items |
CTRL + A |
|
Shows properties |
CTRL + P |
|
Duplicates file |
CTRL + SHIFT + V |
See Also