
Viz Artist User Guide
Version 5.0 | Published December 20, 2022 ©
Video Clip Playback Considerations
There are two methods to playback Video Clips:
-
Playback directly in a Clip Channel (see Video Clip Playback).
-
Playback as a Key Frame in the Stage (see Video Clip Animation in the Stage).
In both methods, the Media Assets all share the same available Clip Channels (1 to 16).
A Clip Channel can only have one video clip applied to it. If Clip Channel1 is applied to a Container, and is also applied to a Director in the Stage, the same video clip is shown in the Container and Stage, and the whichever is set last has priority. When the same Clip Channel is used in both the Scene Settings and the Stage, the main problem is that, whatever is changed in one place is reflected in the other. For example, when the out time of the clip is changed in the Scene Settings (which means the content of the player itself are changed) these changes affect the clip playback in the Stage as well, because it is the same player. In most if not all cases you do not want this to happen. To have Clip Channels in both the Scene Tree and the Stage use two different Clip channels (Clip1 and Clip2), or do not use both methods in one Scene.
The following points are important if one wants to playback clips without any jittering or stuttering:
-
Each clip channel requires several resources like buffers, codec initialization, file handles etc. Therefore please activate only the required amount of clip players going to be used.
-
Clips do have a pending player in background, meaning a clip is loaded into the pending player and when ready, it becomes the active player. This is not required anymore when using Superchannels, please deactivate the pending clip player.
-
To avoid jittering when going On Air, please use a warmup scene to utilize the clip channels. This warmup scene should have all required clip channels available as textures.
-
The warmup scene should load a clip into its clip channels. This ensures all buffers are prepared and filled up. The codec of the clip should match the codec used later on (switching to a different codec should not affect the clip player).
Information: You can use the flag Matrox.Clip.DelayedInitialization = 0, to make sure all clip channels are initialized on engine startup. The loading of clips is still required by the warmup scene. This increases your startup and shutdown time!
Layers
All Scenes, in all layers, also share the same Clip Channels.
If a Scene is loaded in the Main Layer with a video clip on Clip Channel 3, and a Scene is also loaded to the Back Layer with a different video clip, but also on Clip3, both Scenes/Layers plays the last loaded video clip. The one from the Back Layer in this example.
Clip Players
Each Clip Channel holds at least one Clip Player. If pending Clip Player support is enabled for the Clip Channel, an additional Clip Player is used for play back. Every Clip Player uses up additional system memory. But seamless transition from one video clip to another Video clip is only possible with pending Clip Player support enabled.
This section contains the following topics:
3 and 4-Point Loops in Clip Player
A 4-Point Loop describes a clip that has at least a loop part and an intro or an outro or both. To define a 4-Point Loop, the loop in and out time code and the number of times the loop part should be repeated, possibly infinite, are required.
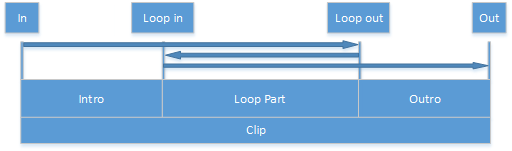
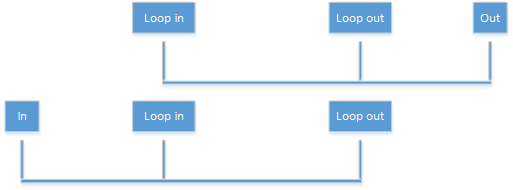
Note: A 3-Point Loop is a clip which has a loop part and only an intro or an outro (see below).
The 4-Point Loop features require Matrox hardware to work (X.mio, DSX.core or DSX LE).
IMPORTANT! The two clip players need to be configured correctly for the 4-Point Loop to work correctly (the animation in the Stage must be set to the beginning). Click on the Jump to beginning of animation button to set the two clip players, to the beginning of the animation.

Example: 4-Point Loop Use
4-Point Loops can useful in a wide variety of cases where you need to loop a video segment. Perhaps you do not know in advance exactly how many times you want to loop the video. For example, let us assume the video clip is a spinning globe animation. You know you have an intro, but how long the globe should spin, is dependent of the time another scene item is shown, say a video of the anchor speaking. When the anchor-video is done, you want the spinning globe to exit the scene.
Parameters for 4-Point Loops in the Stage Editor
Additional fields have been added to the clip setting pane where loop in, loop out and loop count can be set as shown in the image below. No additional command is needed to start or stop the loop.
Click on the Clip channel to view the 4-Point Loop parameters.
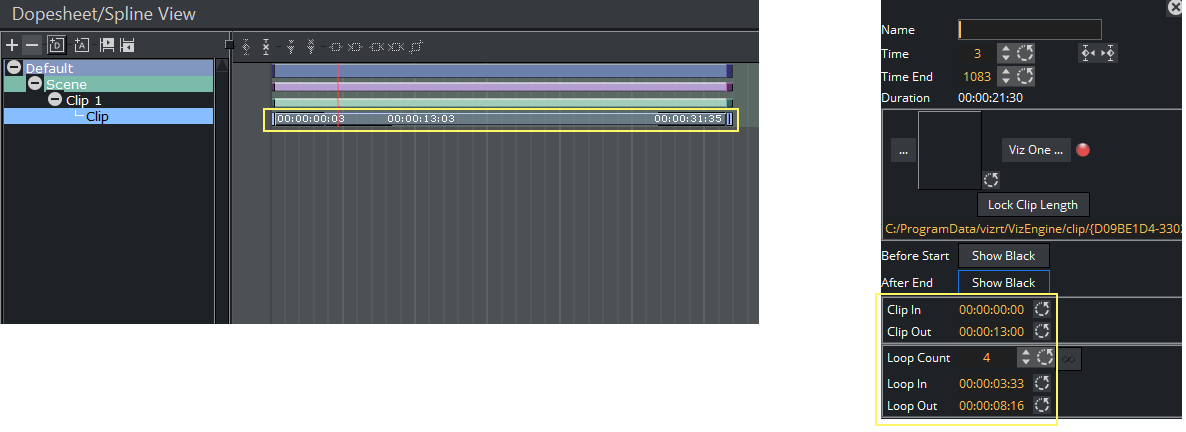
During scene-design the values of the 4-Point Loop are recalculated automatically when the Key Frames are changed by dragging them in the director tree. Any changes made in the entry fields are reflected in the time line pane to show the real-time length of the clip. When the start or the end frame of the clip is dragged, it snaps to the nearest possible time code to have an integer loop count.
General, Mixed and Special Modes
Play Clips with Resolutions Different from Channel
It is possible to play clips even if the resolution is different from the one set for the channel. However, there are some restrictions to that:
-
Can only play clips from the same genlock family.
-
The clip’s resolution must be of a regular broadcast format. For detailed information on which combinations are possible check the appendix.
Frame Accurate Clip Playback
If the clip, in the stage, needs to be played frame accurately, these features need to be set to active:
-
First, the pending clip playback support has to active. If not, the clips are not ready when needed (see the Video Input: Clip Input page in the Configuring Viz section of the Viz Engine Administrator Guide).
-
Additionally the Frame Accurate Viz Commands (FAVC) need to be set to active in Global Properties (see the Communication page in the Configuring Viz section of the Viz Engine Administrator Guide).
-
And the Command Execution Field Dominance should be set to Odd Retrace Counter (see Communication > Global Properties in the Configuring Viz section of the Viz Engine Administrator Guide). When using external control applications, it may be necessary to tweak the FAVC Bias.
For a scene containing a clip in the stage to play frame accurately it is necessary to use the SCENE*CUE command, which preloads the first clip Key Frame.
Video Clip Playback Use Cases
With the Clip Channel Media Asset it is possible to play images as DVE or Texture with the Matrox clip player or VML player. Supported image containers are .jpg and .png. The images have to be available on a physical disk for this feature to work. One advantage of an image played as a clip, is that the same features available for a video clip can be used on the image.
Playing Overlay Clips (Not Full Screen)
Playing a clip which is not full screen in size, like a spinning logo, an insert snipe or a special effect without audio. These are known as overlay clips. To play overlay clips it is recommended to use the VML clip player. VML supports clips with alpha and plays a lot of codecs.
SoftClip is able to play all installed VFW (Video For Windows/AVI) codecs on your computer. Please note that VfW is officially deprecated. There are dozens of codecs available, each with it’s own advantages and drawbacks. There is no general rule which codec to use (see Supported Codecs), but it is recommended to use the different types of Matrox codecs (depending on whether the alpha channel is necessary or not).
Playing UHD Clips
Clips in Ultra HD resolution require a lot of CPU resources for decoding. A strong CPU is required. The performance depends on the used codec, bitrate, color depth etc. It is recommended to use a special decoder board from Matrox (Matrox M264) in combination with a Matrox topology board.
Clip Handling
Slow Motion Playback
A shuttle rate between -1.0 and 1.0 results in the clip playing slower than normal, where negative values result in a backwards playback. The actual frame to play is determined by the internal frame counter which is increased on every grabbed frame. For a frame rate of 0.3 this would be:
|
InternalCounter |
ActualFrame |
InternalCounter |
ActualFrame |
|
Internal 0 |
Frame 0 |
Internal 0.3 |
Frame 0 |
|
Internal 0.6 |
Frame 0 |
Internal 0.9 |
Frame 0 |
|
Internal 1.2 |
Frame 1 |
Internal 1.5 |
Frame 1 |
|
Internal 1.8 |
Frame 1 |
Internal 2.1 |
Frame 2 |
Fast Forward and Fast Backward
A shuttle rate <-1.0 or >1.0 results in the clip playing faster than normal, where negative values result in a backwards playback. The calculation of the next Frame to be delivered is done the same way as described above using the set shuttle rate.
Flushing Clip Channels
The FLUSH command can be used to clear the active clip player and reset all parameters to their default value. All valid clip frames still in the pipeline are cleared as well and black is sent. If the pending clip player also needs to be cleared, send FLUSH to the PENDING command channel.
Settings
Repeat Mode
Determines how clip playback should behave when paused:
-
None: Black is played out.
-
Frame: The last frame is shown, which shows both fields.
-
Field: Only the last field is shown, copied to first and second field. This setting is only relevant if the clip’s scan mode is interlaced.
Reverse Fields
This setting is used for smooth playback when playing interlaced clips in reverse. Enabling reverse fields swaps the playback of first and second field during reverse playback. This setting applies only to interlaced clips.
Loop Mode
If on, the clip loops infinitely between clip in and out times.
Auto Run
If on, the clips start immediately after being loaded and delivering the first frame.
Scripting and Plug-in Interface
Scripting
The scripting interface refers to the plug-in interface and has therefore the same limitations as the plug-ins have. To use a clip channel in scripting, first retrieve a channel from the system:
oClipChannel as ClipChannel = system.GetClipChannel( iChannel )This object can now be used to control the clip channel:
oClipChannel.SetClipName( "clip.avi" ) oClipChannel.LoopMode = true oClipChannel.Play(0)The scripting interface to clip channel allows for the same use cases as the plug-in interface does.
Plug-ins
The plug-in interface provides almost all functions available in the Command Interface. The only limitation here is, all functions refer to the current scene. The use cases are the same as described in 3 and 4-Point Loops in Clip Player. Stage use cases cannot be addressed with the plug-in interface.
IO Matrix
Source PAL
|
Output DVE |
Video In |
|
Output Texture |
Video In |
||||
|
|
PAL |
720p |
1080i |
|
PAL |
720p |
1080i |
|
|
PAL |
|
- |
- |
|
PAL |
|
- |
- |
|
720p |
- |
- |
- |
720p |
- |
- |
- |
|
|
1080i |
|
- |
- |
1080i |
|
- |
- |
|
|
Output DVE |
Clip In |
|
Output Texture |
Clip In |
||||
|
|
PAL |
720p |
1080i |
|
PAL |
720p |
1080i |
|
|
PAL |
|
- |
- |
|
PAL |
|
- |
- |
|
720p |
- |
|
- |
720p |
|
|
- |
|
|
1080i |
|
|
|
1080i |
|
|
|
|
Source 720p
|
Output DVE |
Video In |
|
Output Texture |
Video In |
||||
|
|
PAL |
720p |
1080i |
|
|
PAL |
720p |
1080i |
|
PAL |
- |
- |
- |
|
PAL |
- |
|
- |
|
720p |
- |
|
- |
720p |
- |
|
- |
|
|
1080i |
- |
|
- |
1080i |
- |
|
- |
|
|
Output DVE |
Clip In |
|
Output Texture |
Clip In |
||||
|
|
PAL |
720p |
1080i |
|
PAL |
720p |
1080i |
|
|
PAL |
|
- |
- |
|
PAL |
|
|
- |
|
720p |
- |
|
- |
720p |
|
|
- |
|
|
1080i |
|
|
|
1080i |
|
|
|
|
Source 1080i
|
Output DVE |
Video In |
|
Output Texture |
Video In |
||||
|
|
PAL |
720p |
1080i |
|
PAL |
720p |
1080i |
|
|
PAL |
- |
- |
- |
|
PAL |
- |
- |
|
|
720p |
- |
- |
- |
720p |
- |
- |
|
|
|
1080i |
- |
- |
|
1080i |
- |
- |
|
|
|
Output DVE |
Clip In |
|
Output Texture |
Clip In |
||||
|
|
PAL |
720p |
1080i |
|
PAL |
720p |
1080i |
|
|
PAL |
|
- |
- |
|
PAL |
|
- |
|
|
720p |
- |
|
- |
720p |
|
|
|
|
|
1080i |
|
|
|
1080i |
|
|
|
|
See Also