
Viz Artist User Guide
Version 5.0 | Published December 20, 2022 ©
Spline Editor
The Spline editor shows the Key Frames on a Channel as splines along the time-line.
The Key Frames are presented vertically in the Spline editor according to the properties they possess. The horizontal scaling represents the time value.
Tip: The time value can be set to either seconds, frames, or fields from the Stage Editor Bar.
The Time-line Marker defines the current time, and the Scene Editor shows the animation accordingly. It is possible to drag Key Frames in the Spline Editor both horizontally (changing the time) and vertically (changing the value) at once.
This section contains information on the following topics:
Spline Editor Procedures
The Spline editor can be enabled or disabled in the top menu:
To Resize the Height or Width of the Spline Editor
-
Height: Drag the horizontal separator between the Dopesheet editor and Time-line Marker.
-
Width: Drag the vertical separator between the Stage Tree Area and Stage Editor.
Zooming
You can zoom in and zoom out on your spline. The Z or Y keys zoom in, the X key zooms out. Alternatively, the mouse wheel allows to zoom in, where a click and drag on the middle mouse button allows to pan your view.

You can also Zoom In when pressing the Z Key and drag the zoom area with your mouse:
Use the A and S keys to change the scaling in the Y-Axis. To reset your view you can either click on ![]() the reset to standard view or
the reset to standard view or ![]() to reset to the selected spline.
to reset to the selected spline.
To Switch Between the Various Splines
Some properties like Scaling, Rotation require three splines (X,Y,Z) on the same timeline. All of the three splines are showed at the some time, but you can only modify the selected one.
-
Use the Show Spline 1,2, and 3 buttons from the Stage Editor Bar

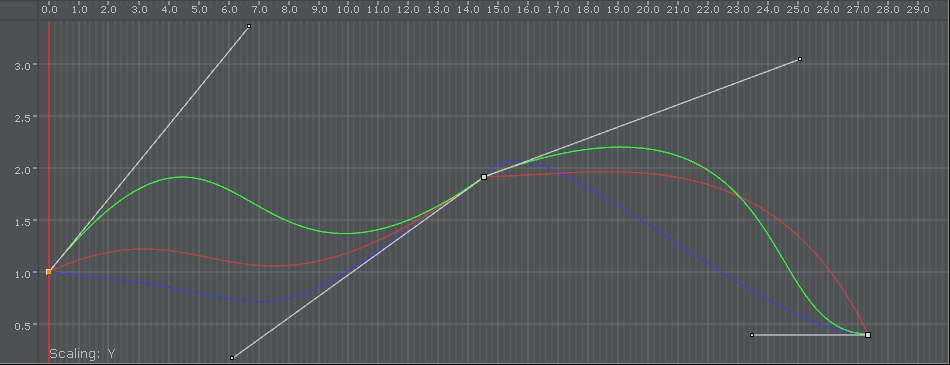
Example of Axes X, Y, and Z in the Spline Editor

To Move Key Frames in the Spline Editor
-
Select the required Key Frame and drag it around.
-
To change only the position on the time-line or the value, press SHIFT to lock the axes. Keep CTRL pressed while you drag the Key Frame if you want to snap to grid along the time-line.
You can move a Key Frame in the spline editor, so either the position on the time-line (left and right) or the value stored (up and down) in the Key Frame is changed.
Editing Handles
As each Key Frame on the spline has two handles, moving them is the most easy way to edit the curve. To edit a handle left-click it and drag it around. You see that the spline reflects your movement.
By default you move the handles proportional this way. This means if you change the handle on one side, the one on the other side moves too. If you want to only edit the handle on one side, you need to left-click the required handle. Keep the left button pressed and press CTRL. If you drag the handle, only the one you drag right now moves and the other one stays. This “single handle mode” is enabled for the Key Frame as long as you press CTRL.
Furthermore you can use the buttons in the main menu to edit the handles at a Key Frame. To do so select the Key Frame you want to change the handles in and select the action in the main menu. For ease of use multiple Key Frames can be selected.
|
Icon |
Description |
|
|
Sets left and right spline handles in selected Key Frame to linear. |
|
|
Sets spline handles in selected Key Frame to smooth left and linear right. |
|
|
Sets spline handles in selected Key Frame to linear left and smooth right. |
|
|
Sets left and right spline handles in selected Key Frame to smooth. |
|
|
Sets left and right spline handles in selected Key Frame to tangential. |
Position in the Spline Editor
If you animate a position, there are much more considerations to make.
Rotation in the Spline Editor
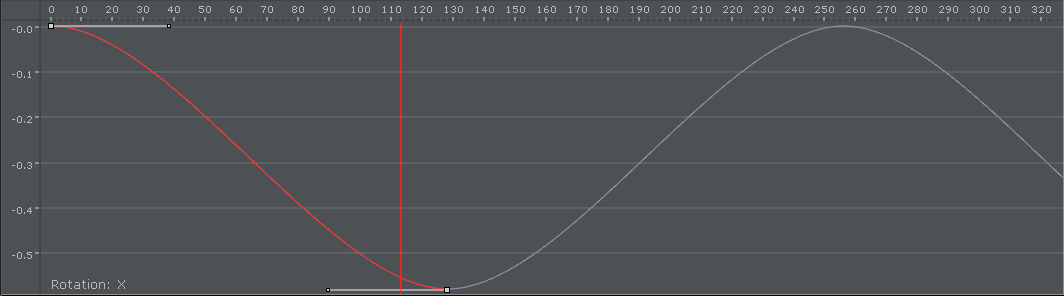
If you have animated the rotation, you can rotate about up to all three axes at the same time. In the spline editor, three different splines are shown, one for every axis. The red one is for the X-axis, the green one for the Y-axis and the blue one for the Z-axis. For ease of use in the lower left corner, you find indicated which axis is currently selected.
To switch between the three axes, click on one of these icons: ![]()
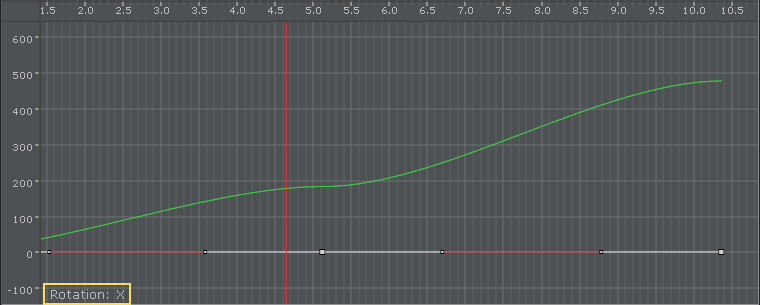
The selected property (in the above sample Rotation: X) is shown in the lower left corner.
Scale in the Spline Editor
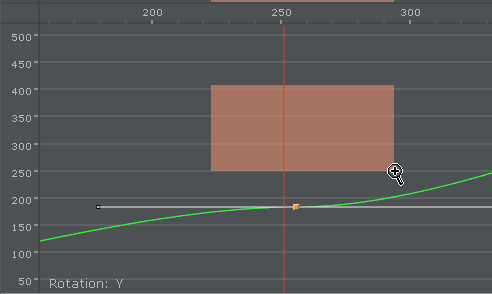
If you have animated the scale, you can scale along up to all three axes. In the spline editor, three different splines are shown (when Prop or Single is selected), one for every axis. The red one is for the X-axis, the green one for the Y-axis and the blue one for the Z-axis. For ease of use in the lower left corner, you find indicated which axis is currently selected.

Material in the Spline Editor
If the material has been animated, two different splines are shown in the spline editor. The red one is for the alpha value, the green one for the shininess. For ease of use in the lower left corner, you find which parameter is currently selected.
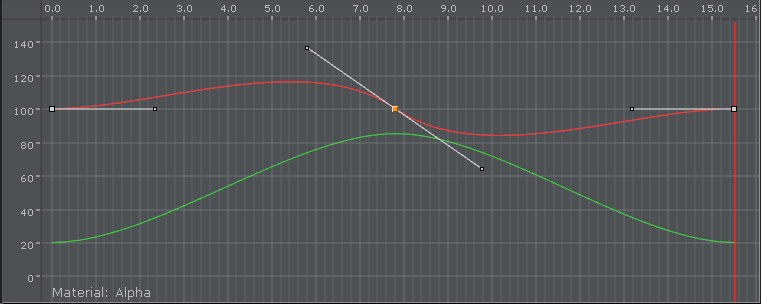
The color values are edited by selecting the keyframe.
Additional Best Practices for the Spline Editor
Normally for each channel only one spline is shown in the spline editor. But there are animation channels where more splines are available for editing. As you can only edit the Key Frames/handles of one spline, you must use the number keys in the Stage Editor Bar to select the required spline.
Pressing SHIFT while moving a Key Frame in the Spline Editor enables you to drag it only horizontally or vertically, but not both directions at the same time. Pressing CTRL while moving a Key Frame enables the Snap to Grid function, allowing the Key Frame to be placed only at certain time-line intervals. For more information (see Stage Editor Bar).
When animating certain channels, such as scaling or rotation, up to three splines are shown in the Spline editor, each describing the state along one axis, either X, Y, or Z. For a better overview, different colors are used; red for X-axis, green for Y-axis, and blue for Z-axis. Every spline contains various Key Frames with handles.
Example of Key Frame and Handle Tool Tips
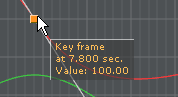
If the Show Info option is enabled in the Stage Editor Bar, placing the pointer over a Key Frame or handle shows a tool tip with status information about time-line and value.