
Viz Artist User Guide
Version 5.0 | Published December 20, 2022 ©
FBX Files
Viz Artist’s built-in FBX Importer reads Autodesk’s exchange file format for 3D assets. FBX files (.fbx) are normally saved in a binary (or native) format, but they can also be saved in ASCII format. Binary FBX files and ASCII FBX files both use the .fbx filename extension.
Which features of a scene, that can be carried over to a Viz Scene, depends on:
-
FBX support of a 3D modeling application: The FBX file format supports many common features of a 3D scene. But not every feature offered by the major 3D modeling packages can be covered by an interchange format.
Refer to the documentation of the 3D modeling application to discover which features can be exported to the FBX format. -
Availability of the contained features in Viz Engine: Viz Engine’s feature is optimized for real-time. Features which are not available in Viz Engine cannot be imported and are ignored.
Note: Certain effects can be technically possible in Viz Engine but would require an elaborate conversion which may not be available.
To import an FBX file to Viz Artist, see Import of Files and Archives.
This section contains information on the following topics:
Scene Graph Traversal
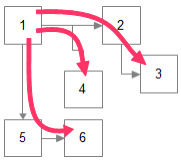
The Scene representation in the form of a Scene Graph is common to all 3D applications, the FBX file format is also built this way. When an FBX file is imported to Viz the Scene Graph is traversed node by node. All child nodes are traversed before advancing to the next sibling node.
This is how FBX nodes are transformed into Viz containers:
Scene Graph Traversal, Child Nodes First
FBX Node Types and How they are translated into Viz Scene Tree Items
|
FBX Node |
Child Nodes with Viz Classic Render Pipeline |
Viz Tree with Viz Classic Render Pipeline |
Child Nodes with Viz Engine Render Pipeline |
Viz Tree with Viz Engine Render Pipeline |
|
Empty |
Imported |
Group |
Imported |
Group |
|
Camera |
Ignored |
Imported into global camera |
Ignored |
Imported into global camera |
|
Light |
Ignored |
Imported into global light |
imported |
Imported as Light plug-in |
|
Mesh |
Imported |
Geometry |
Imported |
Geometry |
|
Other |
Imported |
Group |
Imported |
Group |
Transformations
The computation of transformations is more streamlined in Viz Engine than in FBX because the focus is on real-time graphics. To limit computing time spent on transformations the number of parameters incorporated in computing the final transformation matrix has deliberately been kept low in Viz. In contrast, in a 3D modeling application the number of parameters incorporated in computing the final transformation matrix is high, to give maximum flexibility.
Note: If unsupported transformation features are contained in a FBX scene, Viz Engine tries to provide them by combining several transformations into one (maintaining the transformation order). This limits animation and can only work to a certain degree, after which Viz Engine falls back to baking the imported transformation onto the imported vertices.
-
Baking transformations: This is the fallback which may be chosen for imported nodes as necessary. It implies computing the transformation matrix with the FBX formula and to apply the result to the imported vertices.
-
The good: To Bake the imported transformations onto the imported vertices basically means that arbitrarily complex transformations can be imported into Viz Engine.
-
Drawback: Any information on how the result of a complex transformation has been obtained is discarded through baking. In particular individual items of the transformation cannot be animated anymore.
-
Avoid Transformations Being Baked
If unsupported features are detected the transformations of those nodes are Baked, which means that individual transformations are not retained in a Viz Scene. The transformed vertices are in the Viz Scene, but with all transformation parameters reset to their default values.
To avoid this make sure that unsupported features are not used in a Scene and, ideally, that the FBX properties which import into the same transformation in a Viz Scene are not used at the same time:
-
Do not use a scaling offset: An extra offset applied after rotation and before scaling. It depends on the modeling application if it is available and under which name. To be on the safe side try to limit this to the regular translation and the rotation pivot.
-
Do not use a separate scaling pivot: This can be tricky, depending on the 3D modeling application. In Maya the two pivots move together by default, which keeps the possibility to map them both to a single axis center in Viz Engine. If the modeling application moves the rotation pivot separately by default, and objects are scaled afterwards, there are two transformations based on different pivots. Viz Engine has to bake the results to reflect them correctly.
FBX Import: Avoid Separate Scaling Pivot
|
Rotation and scaling settings |
State |
Result |
|
Rotation and scaling pivot identical |
Object rotated and/or scaled |
Ok, fully retained in a Viz Scene |
|
Rotation and scaling pivot different |
Object not scaled |
Ok |
|
Object scaled |
Baked |
Note: More complex transformation hierarchies can be built and multiple pivots simulated by placing the objects in groups and apply additional transformations to the group or groups. This is reproduced in the scene tree when importing to Viz Engine.
Avoid Transformations Being Combined
If, during import, two FBX properties have to be combined into a single property in Viz, they cannot be animated separately anymore. Limitations are not fully specified yet, since animation import is still under development, but to keep 100% the same control over transformations as in the original scene it is a good idea to consider these tips:
-
Do not use a rotation offset.
-
Do not use geometric translation/rotation/scaling in 3ds Max.
-
Do not use unit conversion (see Export FBX Files from 3ds Max and Maya).
-
Do not use axis conversion.
-
FBX uses a Y-up axis system, this is also the default setting for the FBX export. If the modeling application uses a different axis system it applies pre-rotation of ± 90° to all objects to change the orientation of the Scene to match the FBX axis system. This can interfere with animation.
-
Maya uses a Y-up axis system by default so all pre- and post-rotations are set to zero, which is perfect. If the modeling application uses another axis system (for example, 3ds Max uses Z-up) and problems occur it is possible to select a different option in the ‘Axis Conversion’ section in the FBX export settings, so that no corrective rotation has to be applied.
-
Export FBX Files from 3ds Max and Maya
To Export FBX Files from 3ds or Maya
-
From the File menu in Maya 2013, select Export (All)… or Export Selection….
-
Select a directory and enter a filename.
Note: Make sure that FBX is selected as the export file type to make export options show.
Units
It depends on each modeling application how units in virtual 3D space correspond to real world units. The default working unit is centimeters. When a Scene is exported choose a scale factor in the FBX export dialog, the option is named File units converted to and can be found in section Advanced Options > Units.
The table below shows how units import from Maya into Viz Artist when different settings are used:
Maya Units Imported into Viz Artist
|
Maya Working Units |
Object size in Maya |
File units converted to |
Size in Viz Artist |
Scaling factor |
|
Centimeter |
6 |
Centimeters |
6 |
1 |
|
Centimeter |
6 |
Millimeters |
60 |
10 |
Caution: It is recommended that Scenes are built so that a scaling factor of 1, or, if this is not possible, to scale the Scene up in Viz Artist after it is imported. The reason: If scaling is enabled during export Maya automatically alters the Scene to preserve the hierarchical transformation results. In some cases, this causes problems (for example, creating scaling pivot points, which are not supported in Viz).
Materials
Viz Engine supports one material per mesh node. The first material found on a FBX node is imported into a Material object, which is then applied to the Viz Container.
Note: Multiple or layered materials are not supported.
Materials with Viz Classic Render Pipeline
Supported FBX material classes are Lambert Shading and Phong Shading. Both types of shading have there own set of parameters which are described in more detail in the tables below:
Lambert Shading
|
FBX |
3ds |
Maya |
Viz |
|
Ambient Color |
Ambient |
Ambient Color |
Ambient |
|
Diffuse Color |
Diffuse |
Color |
Diffuse |
|
Diffuse Factor |
- |
Diffuse |
Diffuse Color Attenuation |
|
- |
- |
- |
Specular =0,1% |
|
Emissive Color |
Self-Illumination |
Incandescence |
Emission |
|
Transparency Factor/Color |
Opacity (%) |
Transparency (Color) |
Alpha |
Phong Shading
|
FBX |
3ds |
Maya |
Viz |
|
Ambient Color |
Ambient |
Ambient Color |
Ambient Color |
|
Diffuse Color |
Diffuse |
Color |
Diffuse Color |
|
Diffuse Factor |
- |
Diffuse |
Diffuse Color Attenuation |
|
Emissive Color |
Self-Illumination |
Incandescence |
Emission Color |
|
Specular Color |
Specular |
Specular Color |
Specular Color |
|
Specular Factor |
Specular Level |
- |
Specular Color Attenuation |
|
Shininess |
Glossiness |
Cosine Power |
Shininess |
|
Transparency Factor/Color |
Opacity (%) |
Transparency (Color) |
Alpha |
Other Materials
Other kinds of material which the modeling application supports may be mapped to a FBX Lambert or Phong material by the exporter, at least the parameters which are compatible to those material types.
Materials with Viz Engine Render Pipeline
The main material used in the Viz Engine Render Pipeline is the PBR Material. The importer either imports "Stingray PBS" materials from Maya or tries to derive some basic values from any other Material available in the .fbx file.
Stingray PBS
This is the preferred material to be used when using Maya in combination with Viz Engine, because the channels directly map from Maya to Viz Engine.
|
Stingray PBS |
PBR Material |
|
Use Color Map Color Map Base Color |
If "Use Color Map" is enabled, then the Color Map is imported as a Texture on the BaseColor Texture slot. If "User Color Map" is disabled, the Base Color is imported as the Base Color. Base Color animations are also imported when available. |
|
Use Metallic Map Metallic Map Metalness |
If "Use Metallic Map" is enabled, then the Metallic Map is imported as a Texture on the Metallic Texture slot. If "Use Metallic Map" is disabled, Metallness is directly imported as Metallic Factor. |
|
Use Roughness Map Roughness Map Roughness |
If "Use Roughness Map" is enabled, then the Roughness Map is imported as a Texture on the Roughness slot. |
|
Use Emissive Map Emissive Map Emissive |
If "Use Emissive Map" is enabled, then the Emissive Map is imported as a Texture on the Emissive Texture slot. If "User Emissive Map" is disabled, the Emissive color is imported as the Emissive Color. Color animations are also imported when available. |
|
Emissive Intensity |
Intensity value of the Emissive channel. |
|
Use Normal Map Normal Map |
If "Use Normal Map" is enabled, then the Normal Map is imported as a Texture on the Normal Texture slot If "Use Normal Map" is disabled, the slot is left as empty. |
|
Ao Map Use Ao Map |
If "Use Ao Map" is enabled, then the Ao Map is imported as a Texture on the Ambient Occlusion Texture slot. If "Use Ao Map" is disabled, the slot is left empty. |
Other Materials
For all materials where .fbx is able to create a so called Surface Material (usually Lambert and Phong), a PBR Material is created, where a few basic parameters are imported.
|
Surface Material |
PBR Material |
|
Diffuse Diffuse Factor |
If a texture is assigned on the diffuse channel, it is imported onto the Base Color texture slot. The diffuse color is imported as Base Color. If a Diffuse Factor is available, the Diffuse Color gets pre-multiplied with it. Diffuse color animations are also imported when available. |
|
Emissive Emissive Factor |
If a texture is assigned on the emissive channel, it is imported onto the Emissive Color texture slot. The emissive color is imported as is. If an Emissive Factor is available, it is imported as the Intensity of the Emissive slot. Emissive color animations are also imported when available. |
|
Ambient |
If a texture is assigned on the ambient channel, it is imported onto the Ambient Occlusion texture slot. |
Textures with Viz Classic Render Pipeline
FBX can associate a texture with each color channel on a material.
Note: Currently one texture for the diffuse color channel is supported.
Textures are referenced by the FBX file through their path and filename by default. This feature is broken in the current FBX SDK provided by Autodesk (the exported file may contain an absolute path and in some cases this path is not correct, even on the machine where the file was created). Texture images can be embedded into the FBX file which is a lot more robust. Tick the check-box Embed Media in the export dialog to enable this.
Note: Regardless of the export parameters chosen, the FBX file can still contain incorrect texture references. If texturing problems occur use a free FBX viewer (for example, the QuickTime plug-in) to check if the texture import really failed or if there is a problem with the Viz import.
Camera
Currently up to 16 cameras are imported. The import is limited and can give little more than the correct camera position and direction. Dependent on the transformations that have been applied to a camera, and additional parameters unique to the modeling application, the camera position and viewing parameters can deviate a lot after import.
Lights with Viz Classic Render Pipeline
The lights detailed below are supported, but not all their parameters are imported:
Supported Lights
|
|
Lights |
|
3ds |
Target Spot |
|
Free Spot |
|
|
Target Directional (Switch to ‘Overshoot’ to make them resemble Viz Artist’s Infinite lights) |
|
|
Directional (Switch to ‘Overshoot’ to make them resemble Viz Artist’s Infinite lights) |
|
|
Omni (Switch to ‘Overshoot’ to make them resemble Viz Artist’s Infinite lights) |
|
|
Maya |
Directional Light |
|
Spot Light |
|
|
Point Light |
The only animation properties imported for Lights are:
-
Translation
-
Cutoff / Cone Angle (because hardware accelerated OpenGL lights are limited, this is unlikely to produce the exact same effect produced in the modeling software)
Color animation is not imported because it requires separate channels for red, green and blue components.
Spotlights
For performance reasons Viz Engine only supports the standard OpenGL light parameters.
OpenGL Spotlight Parameters and Corresponding Light Parameters in Viz
|
OpenGL |
Viz |
Description |
|
Cutoff |
Cone Angle |
Specifies the angle between the axis of the light cone and a ray along the edge of the cone. Can also be named ‘outer cone angle’. |
|
Exponent |
Penumbra |
Controls how concentrated the light is. The light’s intensity is highest in the center of the cone. It’s attenuated toward the edges of the cone by the cosine of the angle between the direction of the light and the direction from the light to the vertex being lit, raised to the power of the spot exponent. |
FBX translates a modeling application’s spotlight parameters to an inner and outer cone angle. During import into Viz the exponent is approximated based on the inner angle of the spotlight. Results can be different from what is seen in Maya or 3ds.
Exponent in Maya
Maya has an alternative spotlight parameter, Dropoff, which corresponds directly to the OpenGL parameter Exponent. With the Viz Artist VizFbxExtension plug-in, this parameter can be exported. This allows work with real GL-spotlight parameters in Maya and gives a viewport lighting much more faithful to the actual rendering results in Viz. Without the VizFbxExtension plug-in, Maya does not export that parameter, because no other Autodesk product supports importing it.
Lights with Viz Engine Render Pipeline
In contrast to the Viz Classic Render Pipeline, lights are now directly imported in the Viz Engine Render Pipeline as container plug-in. The following light types are supported:
|
FBX |
Viz |
Attributes |
|
Point Light |
Point Light |
Color |
|
Spot Light |
Spot Light
|
Color |
|
Directional Light |
Directional Light |
Color |
|
Area Light |
Area Light |
Color |
Reimporting Maya FBX Files
When you change a Maya scene that is already in use in Viz Artist, you can reimport the Maya scene without losing changes made in your Viz Artist scene. When reimporting scenes, changes in the .fbx file and the Viz Artist scene are combined. This requires that you install a separate plug-in for Maya, which is included with the Viz Artist installer. After installing the plug-in, activate the VizUUID.py plug-in in Maya. When the plug-in is active, you find a new section called Viz UUID in the Extra Attributes tab when exporting from Maya. Based on this UUID, Viz Artist determines which scenes or objects to reimport. Reimport requires that the UUIDs are identical.
-
Create a scene in Maya and export it as .fbx.
-
Import the scene into Viz Artist.
-
Add different features to the Viz Artist scene, such as animations, textures, or effects. Then save the scene.
-
Make some changes to the original scene in Maya, then export it again using Export as or Export and replace the previous file.
-
Open the Import pane in Viz Artist. Reimport the changed .fbx file by first selecting the scene to import. Then, drag the target scene where the changes are imported to, to the Re-import Scene field.
-
In this example, a changed .fbx file has been imported to the original Viz scene, where multi-texturing and light changes have been applied in Viz Artist:
VizUUID Plug-in Installation
-
When Installing Viz, make sure you have the Maya FBX Export component selected.
-
This installs all necessary files into the Viz Engine subfolder export/FBX. Standard installation path is C:\Program Files\vizrt\VizEngine\export\FBX.
-
Adjust your MAYA_PLUGIN_PATH so that it points to the folder above. Please refer to your Maya documentation on how to do this.
See Also