
Viz Artist User Guide
Version 5.0 | Published December 20, 2022 ©
Texture Editor
To apply a texture to a Container drag a texture (e.g. an image) from the Server Panel to a Container. In the Container, an icon (a thumbnail of the texture) shows. If a texture is dragged to the Scene Tree area it creates its own Container, Geometries can be added later on, or the texture can be left as it is in the Scene. Open the Texture Editor by clicking the icon representing the texture, either on the Container or in the Properties editor.

Tip: Modifications to the texture in the Texture editor only apply to the texture in the selected Container.
Image Properties
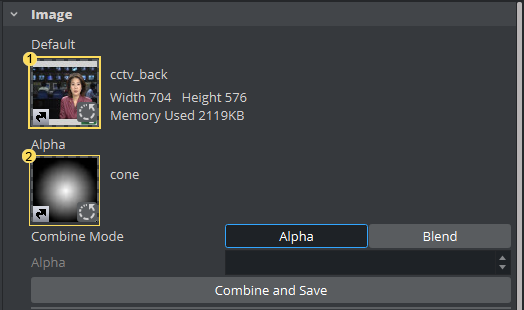
Shows the added texture:
Two image textures can be used in one Container, however, Media Asset textures are limited to one. Click on a Media Asset image to open the editor for the Media Asset.
-
Default Texture (1): Shows a thumbnail of the primary texture (the same thumbnail that is shown on the Container). To change the texture, drag another texture to the drop zone. If only one texture is used the other functions in the Image panel are inactive.
-
Alpha Texture (2): Shows the thumbnail of a secondary (alpha) texture, if any. This texture is used as an alpha channel for the Default texture. When two textures are used the Image panel Alpha and Combine functions are active.
-
Combine Mode: The second image can be used either as an Alpha channel or it can be blended into Texture (1).
-
Combine and Save: When a second image is added, click this button to create a new single image from the two images. The new image is created in the currently open folder in the Server Panel.
Tip: To save the new image in another folder, move to a different folder in the Server Panel before the Combine button is clicked.

-
Wrap Mode: Wraps the object by repeating or clamping (no repeat – the texture’s edge color is used to fill the rest of the object) the texture onto the object’s surface. This setting comes into operation if the texture mapping cannot fill the whole object (e.g. the texture was scaled below 0.0):
-
Repeat: Repeats the whole texture over again to fill out the object.
-
Clamp: Repeats the pixels on the end of the image to fill out the object.
-

-
Component: Select from:
-
Color: Uses only the RGB color of the texture. Set the alpha to a constant value in item one.
-
Alpha: Uses only the alpha of the texture. Set the RGB color of the texture to a constant color specified in item one.
-
Color Alpha: Uses both the alpha and the RGB color of the texture (default setting).
-
-
Constant Color: Set the constant RGB color of the texture when Alpha is selected.
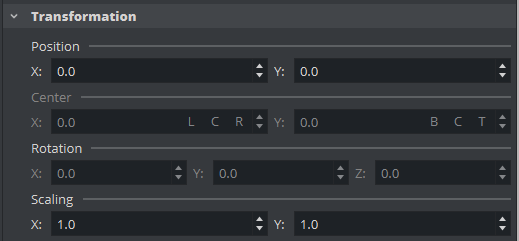
Transformation
-
Position: Defines the position of the texture relative to the one stored in the picture.
-
Center: Shifts the center of the image. The center can be set to Left, Center Right respective Bottom, Center, Top.
-
Rotation: Defines the rotation of the texture relative to the one stored in the picture.
-
Scaling: Scales the image that is used as texture.
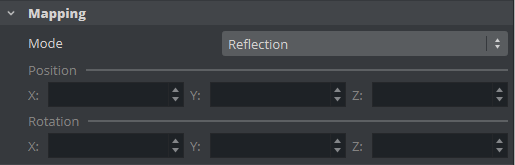
Mapping
The mapping option adjusts the way texture mapping is done:
-
Vertex: Means that the texture mapping is done using the object texture, or UV, coordinates. These coordinates index a texture image, and are interpolated across the object to determine, at each of the object pixels, a texture image value. In most cases on 3D objects, this gives the best looking result. The built-in geometry plug-ins in Viz Artist have defined their texture coordinates. Imported objects can have texture coordinates if they have been generated by an external 3D modeling program. If for example adding a picture to a cube, all sides look the same, and the whole image is shown on each side.
-
Linear: Is a ‘straight forward’ mapping where the image so to say is laid over the object directly on the frontal plane. The object is then moved through the image and every pixel on the object inherits the pixel it “touches” on the image. On 3D objects, this causes a repetition of the pixels on the surfaces in the Z axis. If for example adding a picture to a cube, the front and back side look good, but the remaining sides are a repetition of the pixels laying on the edge of the front and the back side.
-
Reflection: Maps the texture as if it were a reflection of a surrounding object. The reflection simulates that the texture image is an all-embracing object that casts its reflection on the object. The object acts in a way like a mirror.
-
Spherical: Spherically texture projection onto a geometry. The mapping position and rotation can be adjusted with the corresponding parameters.
-
Cylindrical: Cylindrical texture projection onto a geometry.
-
Cube: Cube texture projection onto a geometry. This option needs a vertical cross cubemap which specifies how each of the six side projections should look like. A second image cannot be used with Cube Mapping (see Image Properties). When using Cube mapping method for textures, it is not possible to use the same texture on another object with a different mapping method.
-
Mapping Position: Sets the texture projection origin for Spherical and Cylindrical mapping.
-
Mapping Rotation: Sets the texture projection rotation for Spherical and Cylindrical mapping.
Note: Mapping position and rotation are only available for Spherical and Cylindrical mapping types.
Multitexturing
Texture units take a texture and map them to a piece of geometry:

-
1-4: If the graphics card supports it, it is possible to have up to four available texture units which can be used in parallel to do multi-texturing.
-
Inheritable: Units can be inherited onto the textures of child Containers. Multiple inherit is possible, but be sure to use different texture units for each texture that should be inherited to not overwrite a unit.
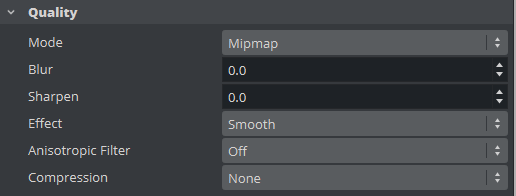
Quality Properties
The quality parameters specify a trade between rendering speed and texture quality:
-
Mode:
-
Pixel: Shows the texture ‘as it is’ with no smoothing and anti aliasing. It takes little resources to render, but it can often create a poor visualization. This can be visible as ‘toothed’ lines and transitions, especially when close to the texture. A motion of either object or camera, especially in the Z axis, creates a ‘blurring motion’ on the texture, as the texture scales to fit the object.
-
Linear: Performs a linear interpolation to smooth the texture when being magnified or shrunk. The texture looks good, but some distortions can be visible when the textured object is animated further away on the Z axis. As the object then gets smaller and smaller, the shrinking and interpolation of the texture creates a lot of “noise” on the texture. As a consequence, the linear quality is appropriate when the objects that have the texture do not change their size much.
-
Mipmap: Performs a linear interpolation to smooth the texture. In addition, it offers a solution to the problem that shows on the two other qualities when the object is being moved away along the Z axis or shrunk. To avoid the “noise” that we see when a texture constantly scales to try to fit onto a shrinking/magnifying, the mipmap quality creates a set of prefiltered images in a decreasing scale down to almost on pixel. These are used as the object scales up and down and a more static look of the texture is thereby achieved. Mipmap quality absorbs more memory performance than the two other qualities.
Note: The following quality options are only available for the Mipmap quality.
-
-
Blur: Makes the image blurry. The blur filter can be set to either Smooth, which blurs the image smoothly, or Mosaic, which makes the blur look like tiles.
-
Sharpen: This option is useful when the rendering window is scaled to half height mode.
-
Anisotropic Filter: The Anisotropic Filter can be set to either Off or 2-16x. Anisotropic filtering is used, when textured objects need to be rendered in z-direction, where textures usually get blurred.
Texture compression can be used to save texture memory on the graphics card:
-
None: No compression.
-
DXT1: Compresses to an RGB image. This format has a 6:1 compression ratio (DXT1 does not store alpha).
-
DXT3: Compresses to an RGBA image with a 4:1 compression ratio.
-
DXT5: Compresses to an alternative RGBA image that treats the alpha channel different than DXT3 (alpha looks smoother). DXT5 has the same compression ratio as DXT.
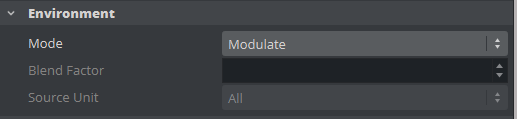
Environment Properties
The environment parameters specify the way the texture RGBA information is combined with the object RGBA information:
-
Environment: Select from:
-
Blend: Blends the RGBA parameters of texture and object.
-
Decal: Uses only the RGBA information of the texture and disregards the RGBA of the object.
-
Modulate: Uses the RGBA information of the texture and enables in addition use of lighting on the textured object.
-
Add: Adds source unit one and source unit two together.
-
Add Signed: Adds source unit one and source unit two then subtracts 0.5.
-
Interpol.: Linear interpolation between source unit one and source unit two.
-
-
Blend Factor: Defines in interpolation mode how much of source unit one and unit two is used (0.0%: shows current unit, 100%: shows source unit).
-
Source Unit: Sets the second source unit for interpolation mode (can be all other units together or just a specific unit).
Note: Blend Factor and Source Unit environment options are only available for the Interpolated environment.
Stereo Mode Properties
Select the correct stereo mode for the inserted image:

-
None: No Stereo mode.
-
Config: Images are drawn as set in the Viz Configuration (see the Configuring Viz section of the Viz Engine Administrator Guide).
-
Over Under Left Top or Over Under Right Top: Two images are stored, one over (top) and the other under (bottom), left or right eye (top) first. The image height is halved, providing half resolution.
-
Side by Side Left or Side by Side Right: Two images are stored, side by side, left or right eye first. The image width is halved, providing half resolution.