
Viz Artist User Guide
Version 5.0 | Published December 20, 2022 ©
Working with Containers
This section contains information on these topics:
A scene is build by using a set of containers. Each container can hold multiple items and defines the layout and hierarchy of a scene.
Container Components
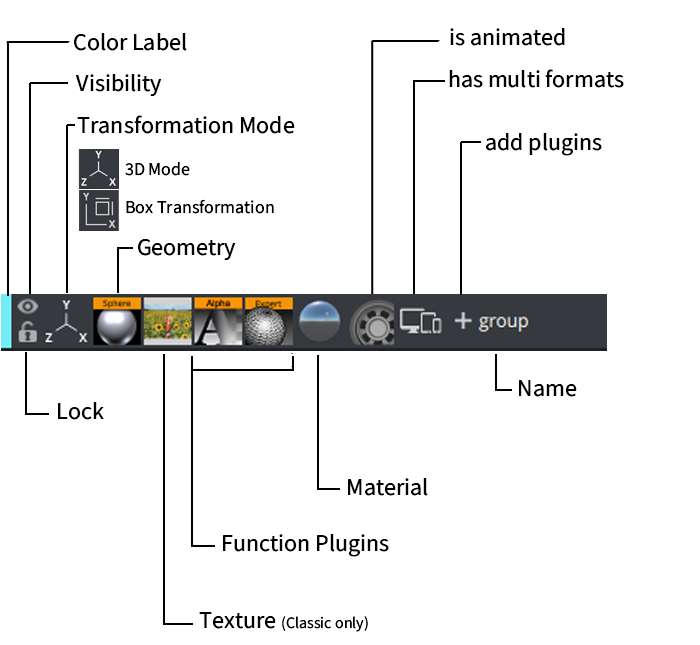
A container consists of one of the following components:
-
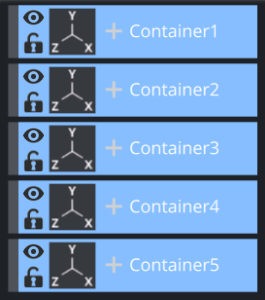
Color Label: Is always available and helps to quickly identify a container. See Color Labels for details
-
Visibility: Turns rendering of the container and its children on or off. This is always available.
-
Transformation Mode: Indicates if the container is used as a regular 3D container or if it is used in Box Transformation mode. Always available. The transformation is inherited to its siblings. See Box Transformation and 3D Transformation for details.
-
Lock: Prevents unwanted modification in the scene editor. Always available. The container can still be modified by the Transformation editor.
-
Geometry: Shows assigned geometry. A container can, but must not have a geometry assigned. This can be a merged or imported geometry or one of the Built-in geometry primitives. The thumbnail icon reflects the geometry of imported assets.
-
Texture: This is available in Classic Scenes only. It represents a thumbnail of the texture this container is assigned to. Click the icon to open the Image Editor.
-
Function Plugins: Function plug-ins enhance the functionality of this container and may also influence its siblings. There can be multiple function plug-ins assigned to a container.
-
Material: Represents a Classic Material for classic scenes or a Phong, PBR or other Material Definition based materials in Viz Engine pipeline. The material is inherited.
-
Animation: Indicates that the container is animated.
-
Multi Format: Indicates that the container has different properties for different formats. See for Working with Different Formats details.
-
+ Button: Allows to quickly and easily add functionality to the container. See Plugin Overlay Panel for details.
-
Name: Displays the container name. See Container Names for details.
Container Names
You can rename containers to ease identification of their role(s) in your scene design. Container names can be any combination of uppercase and lowercase letters, or numbers. However, they cannot contain any of the following special characters:
-
$ (dollar sign)
-
/ (slash mark)
-
\ (backslash)
-
@ (at sign)
-
* (asterisk)
-
? (question mark)
-
% (percent)
-
" (quotation mark)
-
{ } (curly brackets)
To rename a container, click on its name:
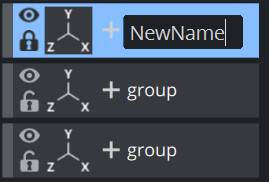
To rename a selection of containers, you need to use the context menu.
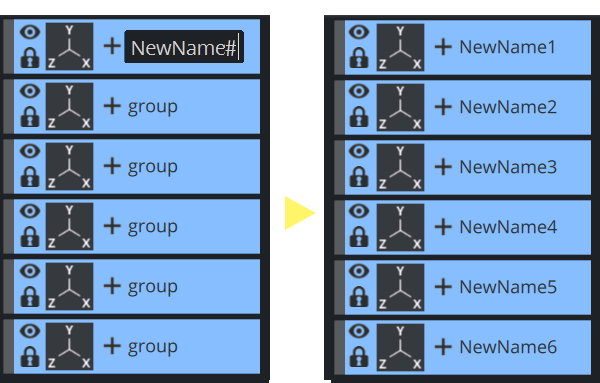
Tip: If you use a # in the name of a multi selection, all your containers are automatically numbered:
Basic Concept of Using a Container
A scenes structure is based on container and the way how they are organized. Containers can be added to the Scene by clicking on the ![]() icon or by dragging the icon to its final position within the Scene Tree.
icon or by dragging the icon to its final position within the Scene Tree.
The position of the target destination is marked with a white line:
Examples
-
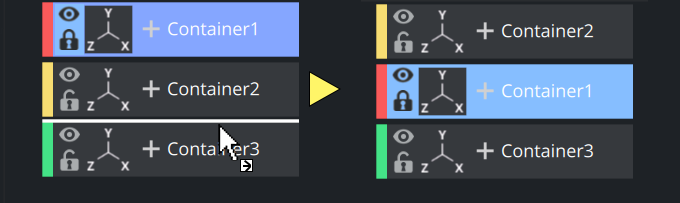
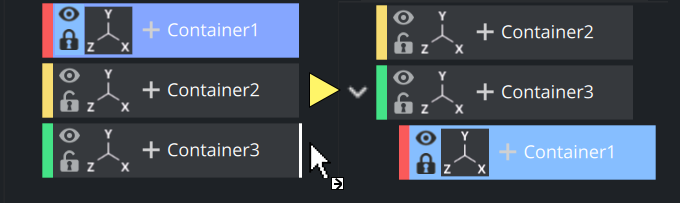
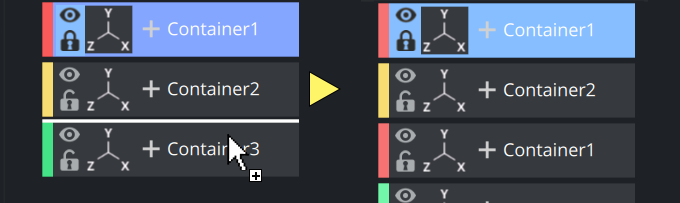
Dragging Container1 on top of Container3 rearranges the order. It would be the same operation as dragging Container1 under Container2:
-
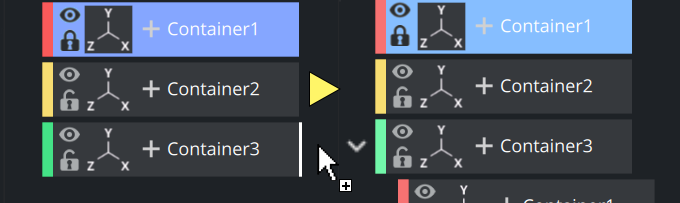
Dragging Container1 next to Container3 moves Container1 as child of Container3.
Note: On this operation, the transformation of Container3 is inherited onto Container1. Pressing the ALT button while moving a Container (or group of Containers) within the Scene retains the transformation properties. This lets a Container, which is part of a Group, to be moved to another group while the absolute transformation of the Container does not change, although the parent Containers (Groups) have different transformations.
-
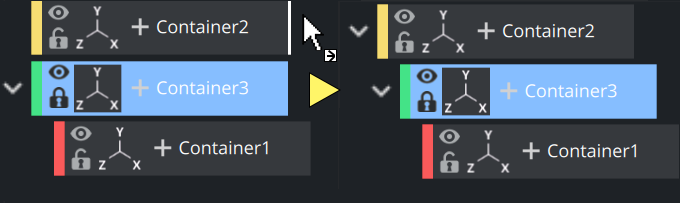
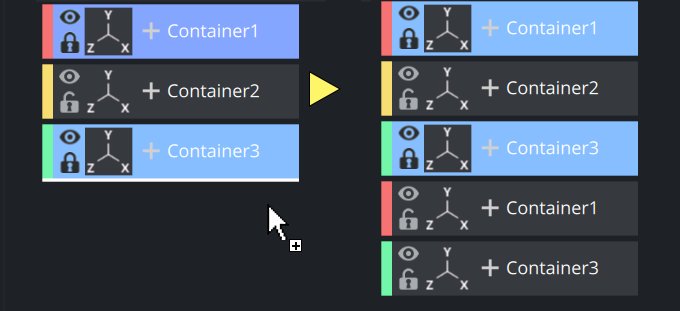
Dragging Container3 and its Sub Container1 underneath Container2.
Selecting Multiple Containers
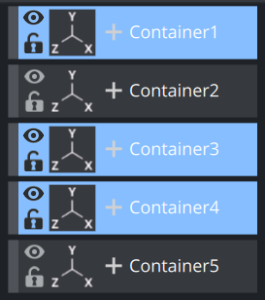
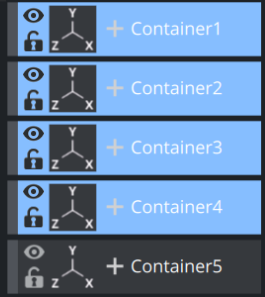
More than one Container can be selected in the Scene Tree. This can be done by using the CTRL key to select single containers or SHIFT to select a range. To select All containers use CTRL + A.
When multiple Containers are selected in the Scene tree, properties can be applied to all the selected items. This multiple selection feature is global.
|
Multi Selection |
Result |
|
CTRL Key
|
|
|
SHIFT
All Containers in between are selected. |
|
|
CTRL + A |
|
Copying Containers
-
Hold CTRL and drag the Container to its new position, or
-
Use CTRL + C and CTRL + V to copy and paste the Container. Copied Containers are placed as Sub-Containers of the selected Container.
Note: When copying a Container with Sub-Containers, all Sub-Containers are copied as part of the same operation.
Examples
-
Copy Container1 below Container2.
-
Copy Container1 as Sub-Container into Container 3.
-
Multi-Selection of Container 1 and 3 are copied below Container 3
Deleting Containers
To Delete a Container from a Scene
-
Drag a Container to the trash can, or
-
Right-click the Container, and in the context menu select Delete Container [Name], or
-
Use the shortcut keys CTRL + DELETE.
Note: If deleting a parent Container, all Sub-Containers are deleted too.
Grouping Containers
Containers in the Scene Tree can be organized in a hierarchy and grouped in logical divisions. The hierarchy depth is practically unlimited. Grouping Containers can be compared to creating a parent/child hierarchy. Such a hierarchy provides a better overview, especially in complex Scenes, and is very practical since changing the properties of the group (for example adding a new material) also applies the changes to all the Sub-Containers.
Note: Changing the properties of one of the Sub-Containers (for example adding a material) overrides the settings for this particular Sub-Container.
Moving one group is also much easier than moving a lot of single Containers.
A parent Container, that has Sub-Containers, is marked with a white arrow to the left of the Container. If the arrow points to the right ( ![]() ), the Container is collapsed and the Sub-Containers are not shown in the Scene Tree. If the arrow points downwards (
), the Container is collapsed and the Sub-Containers are not shown in the Scene Tree. If the arrow points downwards ( ![]() ), the Container is expanded and the next level of Sub-Containers are shown. Any Container can basically be used as parent, although group Containers (that hold transformation only) are best suited.
), the Container is expanded and the next level of Sub-Containers are shown. Any Container can basically be used as parent, although group Containers (that hold transformation only) are best suited.
Examples
-
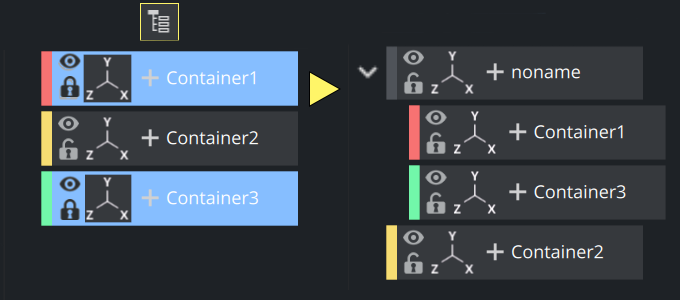
 Group (CTRL + G)
Container 1 and Container 2 are grouped together into a new "noname" container, placed on top of the first selected container. Any transformation, operation or plug-in applied to the group also affects Container1 and Container3.
-
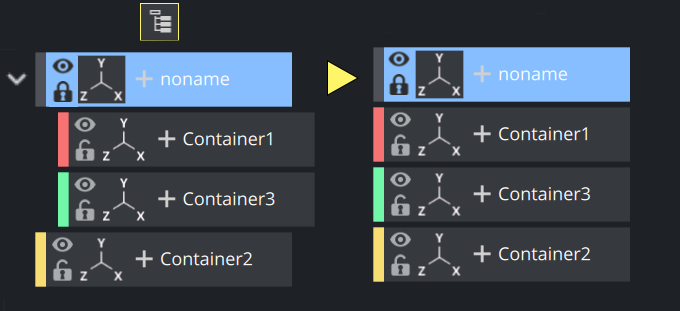
 Ungroup (CTRL + SHIFT + G)
The group "noname" is being ungrouped. Container 1 and Container 2 are taken out of the group, the group container "noname" remains. Any transformation, operation or plug-in applied to the "noname" group no longer affects Container1 and Container3!
Merging and Splitting Containers
Containers can be merged into compound objects and saved as reusable components to the Graphic Hub database. Any animations are also merged and added to the new compound object’s Container.
A saved compound object can be used in other Scenes have an active reference between the stored object and all Scenes where it has been used by default. Through use of stored objects with active references, changes can be applied to many Scenes at once, which is typically a meaningful way to work when designing a set of Scenes that share many design items. The geometry of a compound object cannot be edited. A compound object must be split for the geometry to be edited again. Splitting a referenced compound object disables the reference.
Note: Some older scenes are converted to use a newer merge method, a message “Old merge style, convert to new merge style” informs the user.
An alternative to merged scenes is the new Scene-in-Scene functionality.
Examples
-
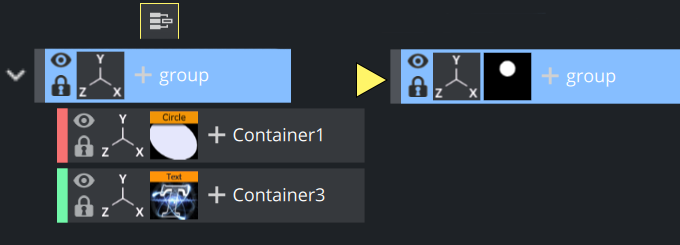
 Merge (CTRL + M)
Container 1 and Container 2 are merged into the group. The tree structure is not visible anymore.
-
Split (CTRL + SHIFT + M)
The merge group is split up again into its single components. You need to expand the resulting container to see its content.

To Save a Compound Object to a Graphic Hub
-
Right-click a Container (with or without Sub-Containers),
-
In the context menu select Merge Container.
-
Drag the compound object’s icon from the property editor or Scene Tree and drop it onto a folder/project in the Server Panel.
-
Type a descriptive name for the object in the dialog box
-
Click Ok. The object is now visible in under the Server Objects tab.
Tip: Any animations or scripts used within the object are kept when saving.
Note: Make sure to drag only the object icon, not the whole Container.
Container Context Menu
A right-click on a Container in the Scene Tree opens a Container context menu.
Right-click on a Container Name
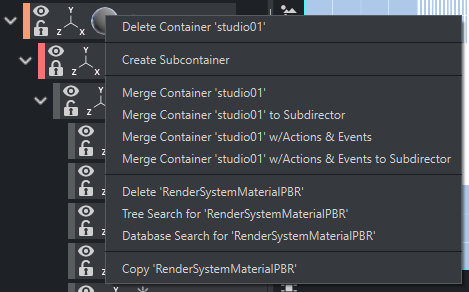
Right-click on the Container name to show these context menu options. Depending on which component you are clicking on, the content of the menu might vary.
Global Container Functions
-
Delete Container <name>: Deletes the selected container.
-
Create Sub Container: Creates a new empty subcontainer for the selected container.
-
Copy/Cut/Paste: Allows to copy and paste various Container Components or the whole container.
Information: Please be aware that now it is possible to copy components too, in previous versions this was copying the whole container only.
-
Merge options:
-
Merge Container: Merges the selected Container and all its Sub-Containers into one compound object, or extracts an already merged object.
-
Merge Container to Sub Container: Merges the selected Container(s) and all the respective Sub-Containers into one compound object and creates a new sub director for the merged animation.
-
Merge Container w/ Actions & Events to Sub Director: Merges the selected Container(s) and all the respective Sub-Containers into one compound object, including actions and events and creates a new sub director for the merged animation.
-
Merge Container w/ Actions & Events to Sub Container: Merges the selected Container(s) and all the respective Sub-Containers into one compound object, including actions and events.
-
-
Change to Box Transformation / Change to 3D Transformation: Changes the coordinate system (Viz Engine Render Pipeline only). Box Transformation is 2D mainly and works with Flexbox Plugin. 3D is traditional xyz-space.
Content Menu for Images/Materials/Geometries
-
Delete property: Deletes the property from the Container.
-
Tree Search for property: Opens the Search and searches the Scene Tree for instances of this property.
-
Database Search for property: Searches for the property in the database, and shows the result in the Server Panel.
Content Menu for Media Assets
-
Show settings of <Media Asset>: Opens the Texture View (Media Asset Manager) and the Media Assets tab of the Scene Settings in the Property panel (see Media Assets).
To Create and Split Material Advanced
A combination of Image, Material and as Shader can be combined and stored as Material Advanced.
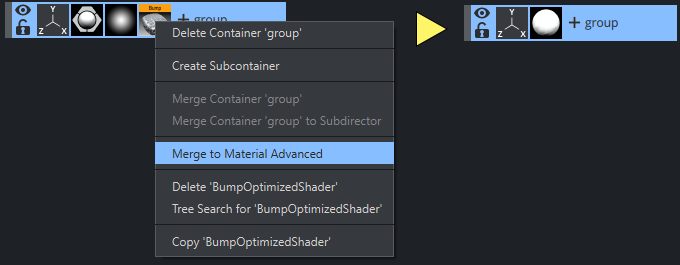
This Material Advanced can then be dragged into the Asset View to store it. Once a Material Advanced has been created, it can be split again to access the original components.
Note: This functionality is for the Classic Render Pipeline only!
Container Properties and Editors
Container Editors
Clicking on any of a container activates different editors:
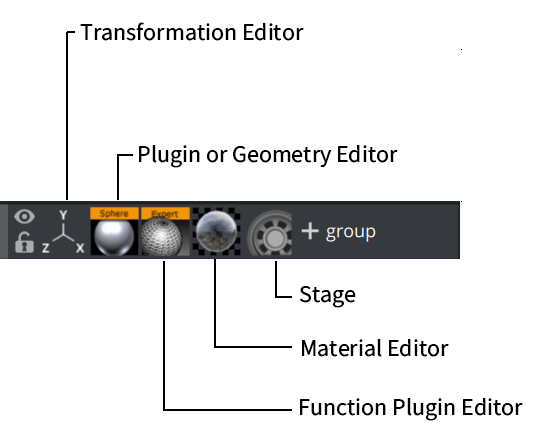
-
In Classic mode, clicking on a texture opens the Texture Editor.
-
If you are using a built-in geometry (like a Sphere), the Plug-in Geometry Editor is opened, if a imported or merged geometry from Graphic Hub is used, the geometry editor is shown.
-
A font (Classic or Viz Engine) is also handled as a geometry, therefore the respective Font Editor (Classic or Viz Engine) is opened.
-
Multiple plug-ins can be assigned to a container, each of them has its own configuration interface.
-
Viz Engine scenes can hold material definitions like Phong, or PBR materials. Each of them has its own editor.
-
If an animation is applied to a container, a click on the gear icon jumps to the stage.
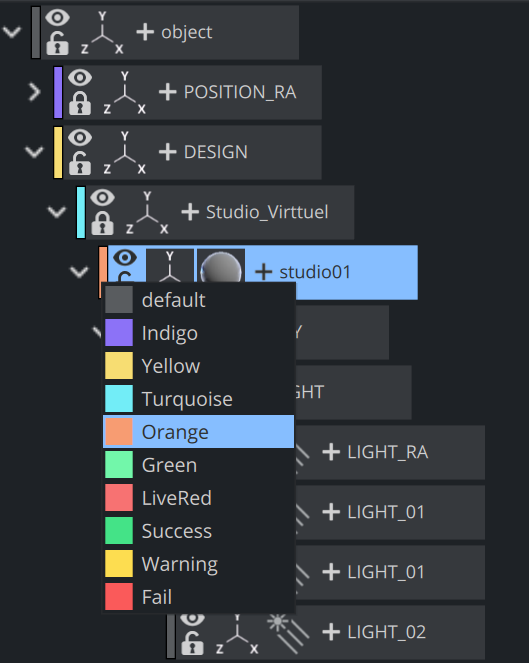
To Add Color Labels
A label can be assigned to a container to categorize them or to easily locate them on larger scene trees. For instance, every container that is going to be controlled by an external application can get a yellow label. The number of labels as well as the color and the text can be configured in the User Interface section of the configuration. Labels are also used as search criteria.
To Add Properties
To add new properties, several sources can be used:
-
(1) Use the Plug-in Overlay Panel to quickly assign any function to a container.
-
(2) Fonts, Images, Geometries can be dragged from the Asset View.
-
(3) Built in Geometries, Media Assets and Function Plug-ins can be dragged from the Plug-ins Panel to a container.
-
(4) From the sidebar of an selected container to the destination container.
-
(5) From any other container.
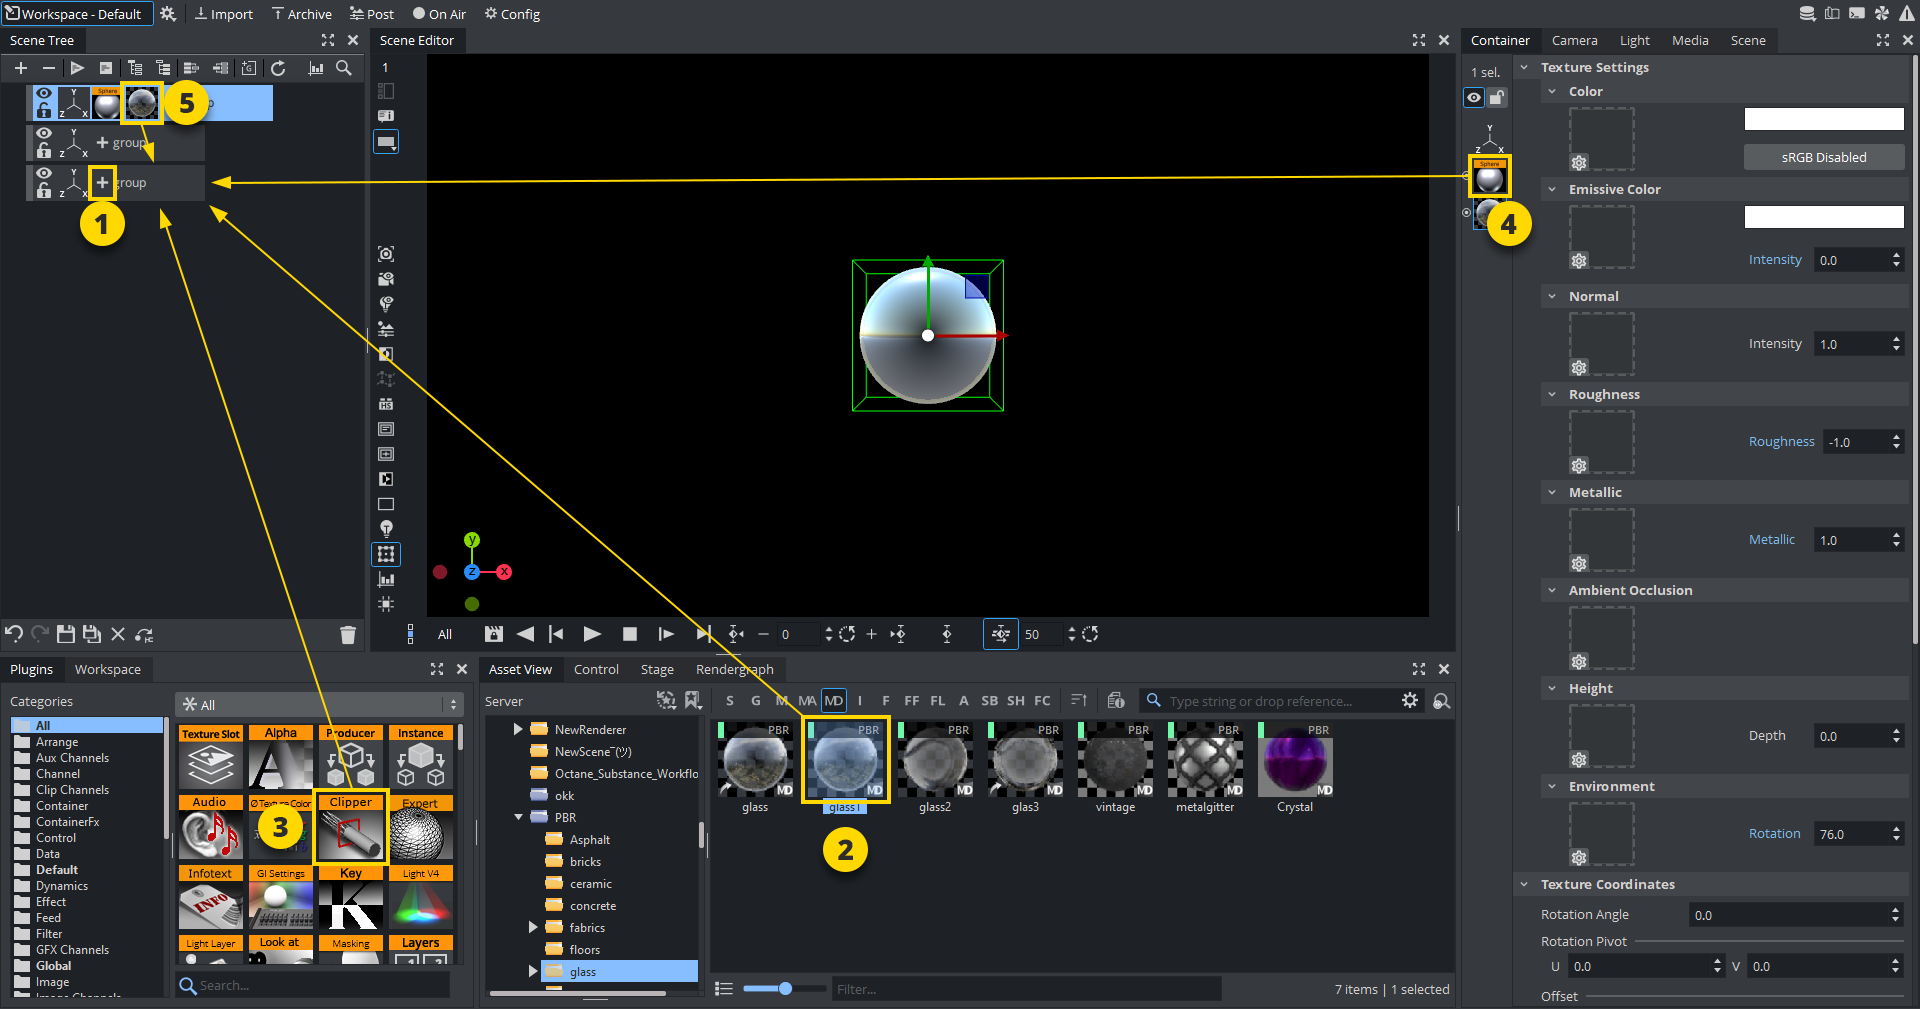
These can be dragged either to the container or to the sidebar (4) of any selected container.
When multiple Containers are selected in the Scene tree, properties can be applied to all the selected items. This multiple selection feature is global. Select the required Containers then apply the appropriate property.
These properties can be added to a Container:
|
Items (Classic) |
Classic Render Pipeline |
Viz Engine Render Pipeline |
|
|
|
|
Built Ins |
|
|
|
|
|
|
(1) When dragging an image in Viz Engine Render Pipeline, a quad geometry and correct Phong material are created. |
||
Only one Geometry plug-in, one Shader or one Media Asset can be applied to a single Container. If a new Geometry plug-in, Shader or Media Asset is added the first one is removed from the Container.
Tip: If a Shader, Media Asset or a few Container plug-ins are dragged to an object in the Scene Editor, they are added to the Container which contains the Object. The Media Asset is added as a Texture. If a Container plug-in can be added this way, the object becomes active when the Container plug-in is moved over the object.
Tip: If multiple Geometry or Image items are dragged from the Assets View to the Scene Tree, a Container for each selected item is created.
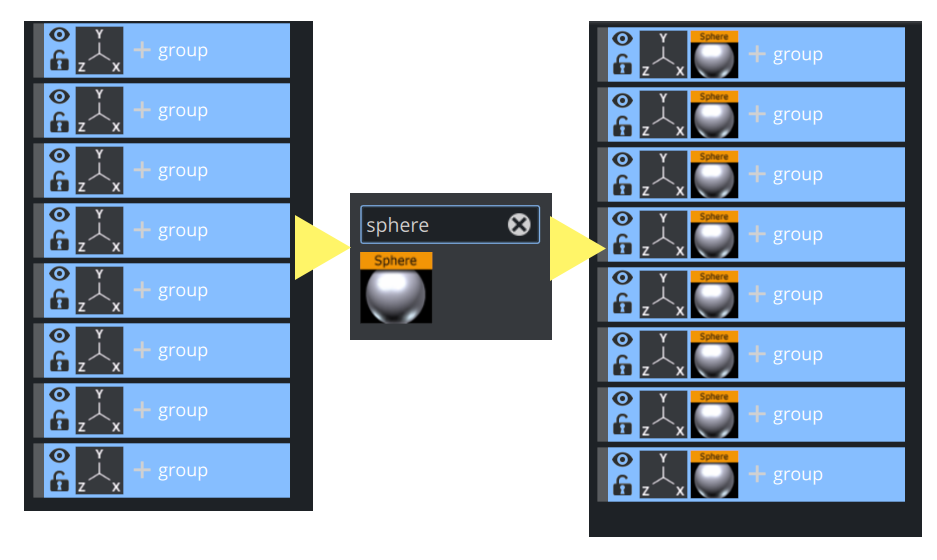
Example
-
Create a few containers.
-
Select all of them by clicking on the first and last one.
-
Open the Plug-in Overlay Panel, type sphere and add it to the selection:
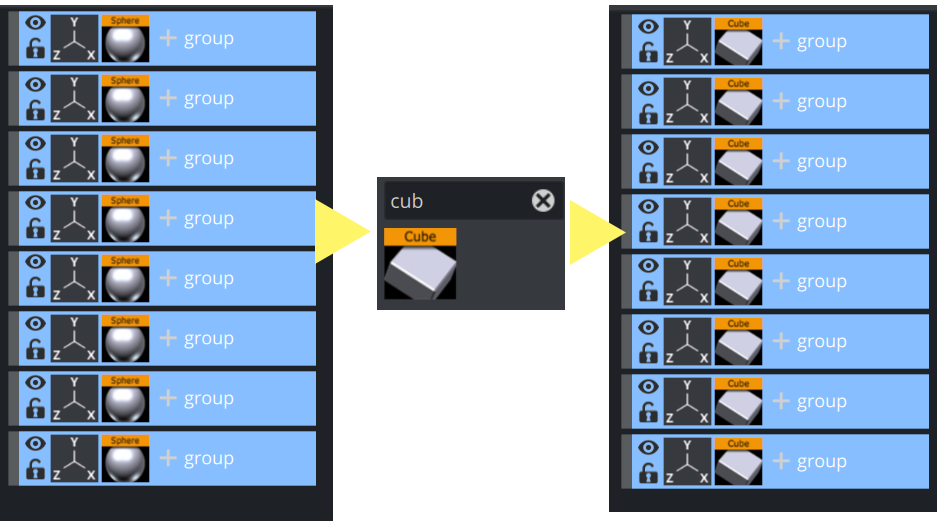
To Change Specific Properties on Containers
To replace our Sphere with any other geometry, grab any geometry and drag it to the destination container. This works also on multiple containers.
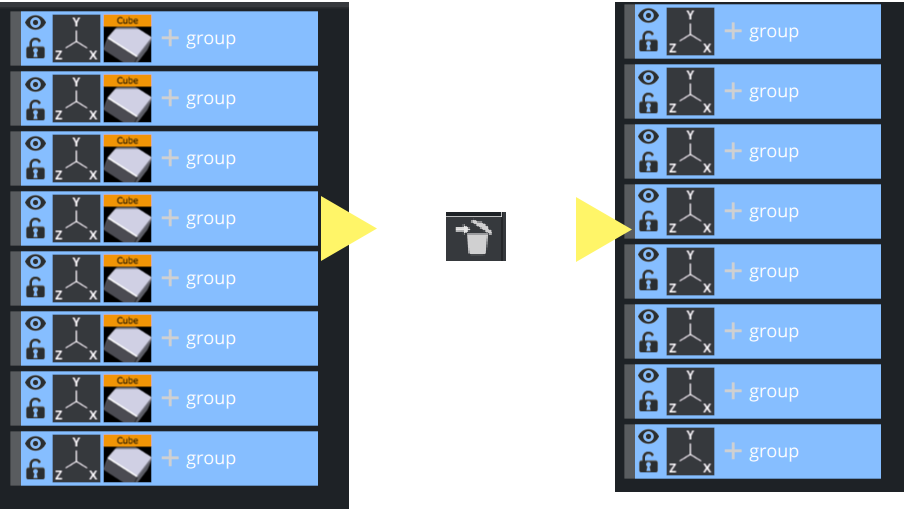
To Delete Properties
Grab your property and move it to the trash bin. Make sure you grab the Cube geometry and not the container itself.
See Also
-
For more information about setting default merge and split behaviors, see the User Interface page in the Configuring Viz section of the Viz Engine Administrator Guide.
-
For more information about how to configure colors, see the Colors page in the Configuring Viz section of the Viz Engine Administrator Guide.