
Viz Artist User Guide
Version 5.0 | Published December 20, 2022 ©
Import of Files and Archives
The following chapter explains how to get assets into Viz Artist.
Viz Artist can import Files (Fonts, Images, Geometries, Scenes, Audio clips) and Archives (archives have the filename extension .via). Archives are, if possible, self contained and complete. This means that if a user archives one or more Scenes, then all referenced items in the scene, including links, fonts, images and so on, are archived. A user can choose to archive only individual items such as some fonts or some images.
All items used in Viz Artist are stored in Graphic Hub (GH). Viz Artist connects to the GH through a network connection, even if the GH is local. Graphic Hub is a database, and every file in Graphic Hub is uniquely identified by its UUID (a unique identifier number). Files in Graphic Hub can have links. This means that possibly several Paths/Names can link (or point) to the same file in the GH database.
Note: Special characters like % and * are automatically renamed to _ as these characters are used internally.
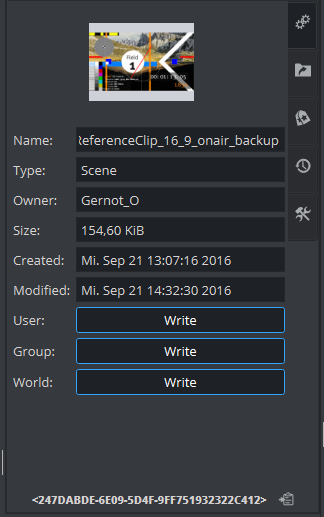
Details of an item in Graphic Hub are shown in the properties panel:
Tip: It is strongly recommended to have a clear and well communicated plan for organizing the paths and naming conventions for all resources in Graphic Hub. This makes life easier for users and import/export operations are easier to do without the creation of clutter.
Note: If Viz Artist is running in Viz Engine mode, the import is limited to only import archives.
Import Using Asset View
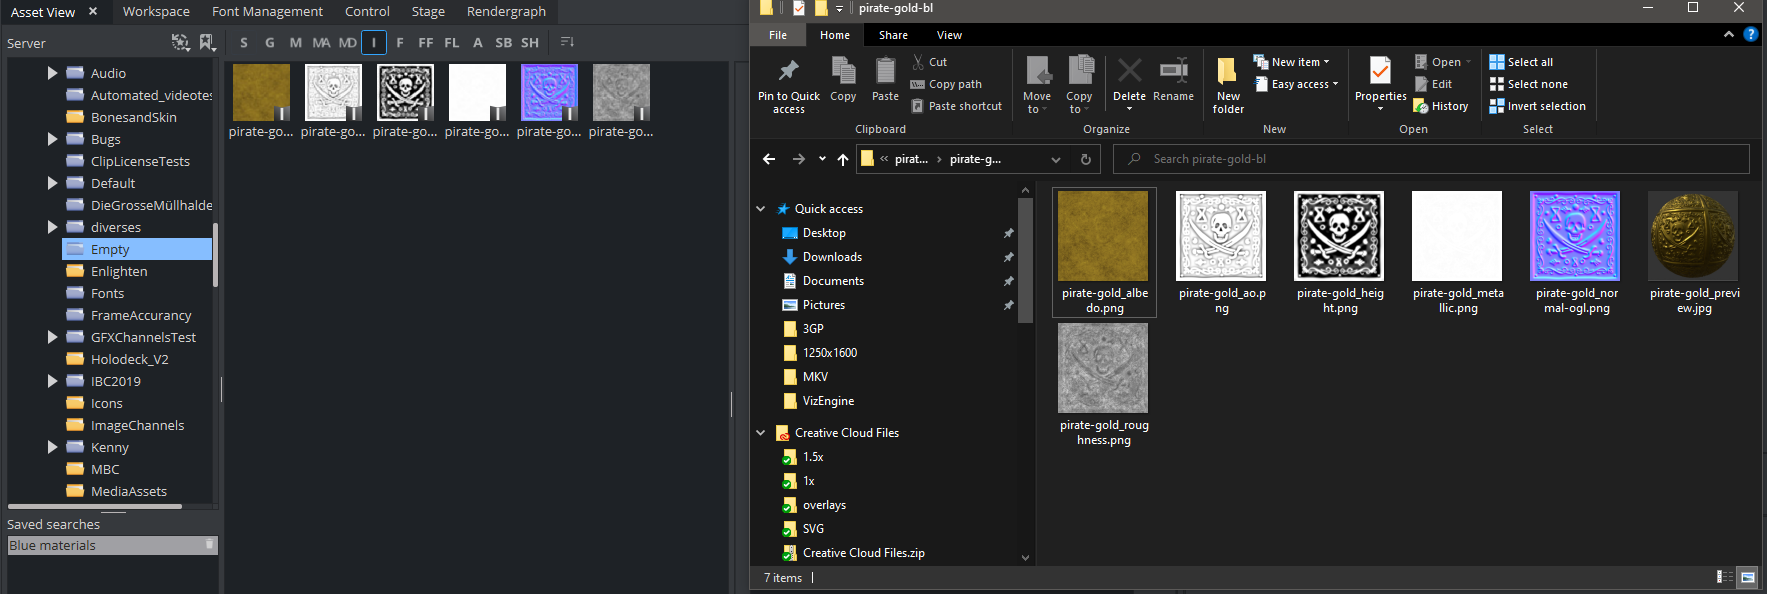
Asset view can be used to import files via drag and drop from Windows Explorer. To do so, select your files in Windows Explorer, drag them into Viz Artist and drop them onto the Asset View.

Depending on the type of file you dragged, a dialog pops up asking how to import your files. For images you need to select compression and quality. Scenes (.fbxand .c4d) are imported in the background, so there is no visual feedback. After the import has finished, items show up in the Asset view.
You can even drag multiple different types at once to the asset view. For each file extension, the import settings dialog is shown.
Information: Adobe After Effect files are limited to one item only. Multiple after Effect scenes are not supported for import.
Import Window
Another way to import files, is to use the Import Window. To Open the Import Window, click on the Import entry in the top menu.
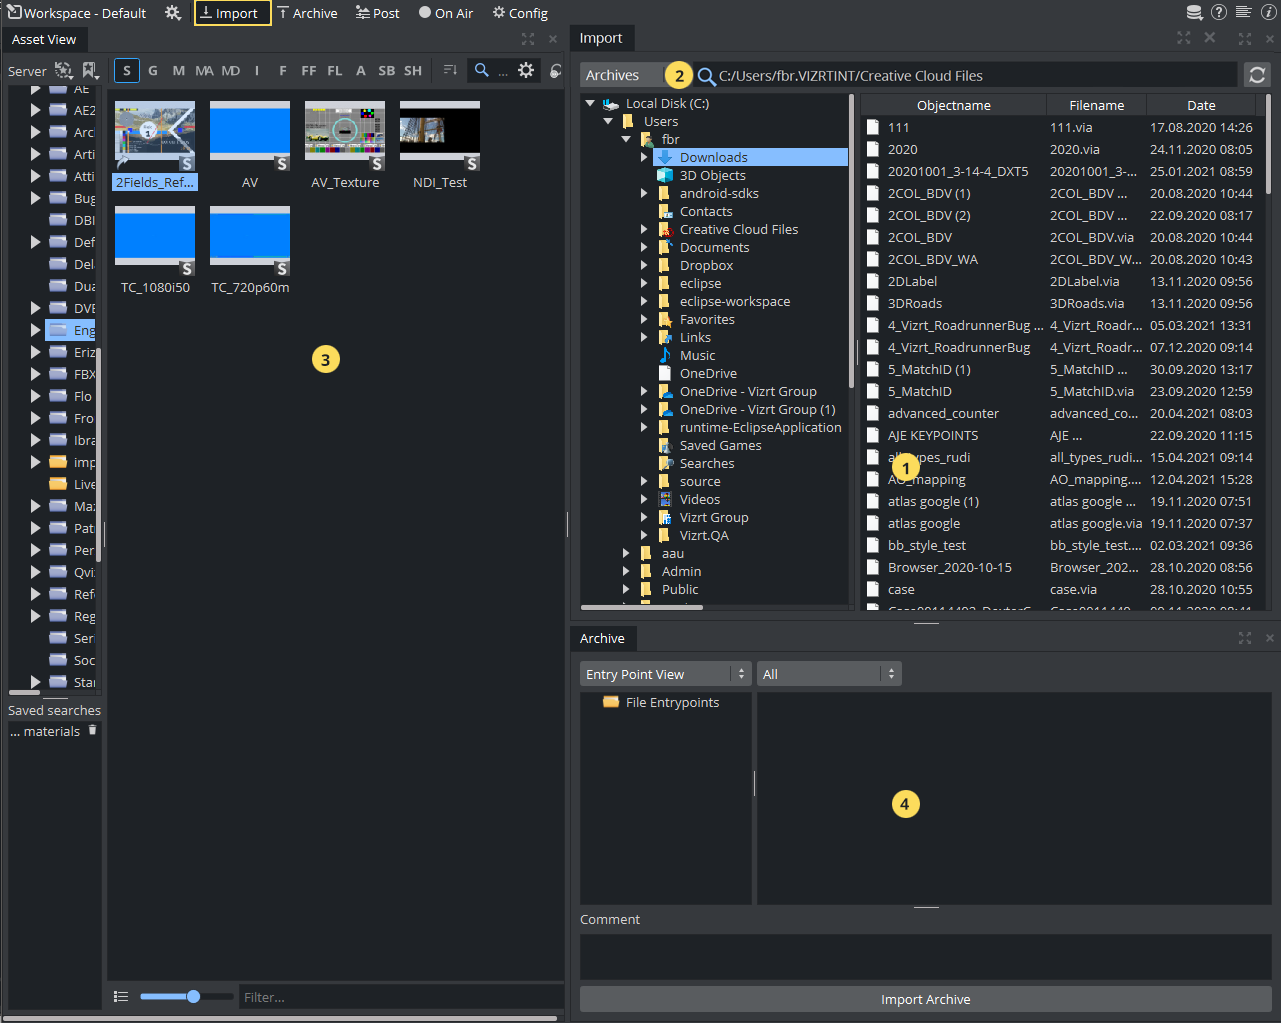
The Import Window consists of the following sections:
-
Import Panel (1): Gives access to the source drives, where assets can be imported from.
-
Import Menu (2): Selects what kind of assets are listed in the Import Panel.
-
Server Panel (3): Gives access to all folders and projects in Graphic Hub.
-
Archive View (4): Shows the content of Archives.
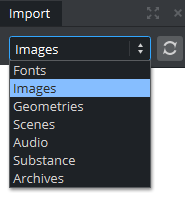
Make sure you correct type has been chosen in the Import Menu:
To import any asset, make sure the correct destination folder has been chosen in the Server Panel. If your destination folder does not yet exist, simply right click on one of the folder/project entries in the server panel and create a new folder or project as your new destination.
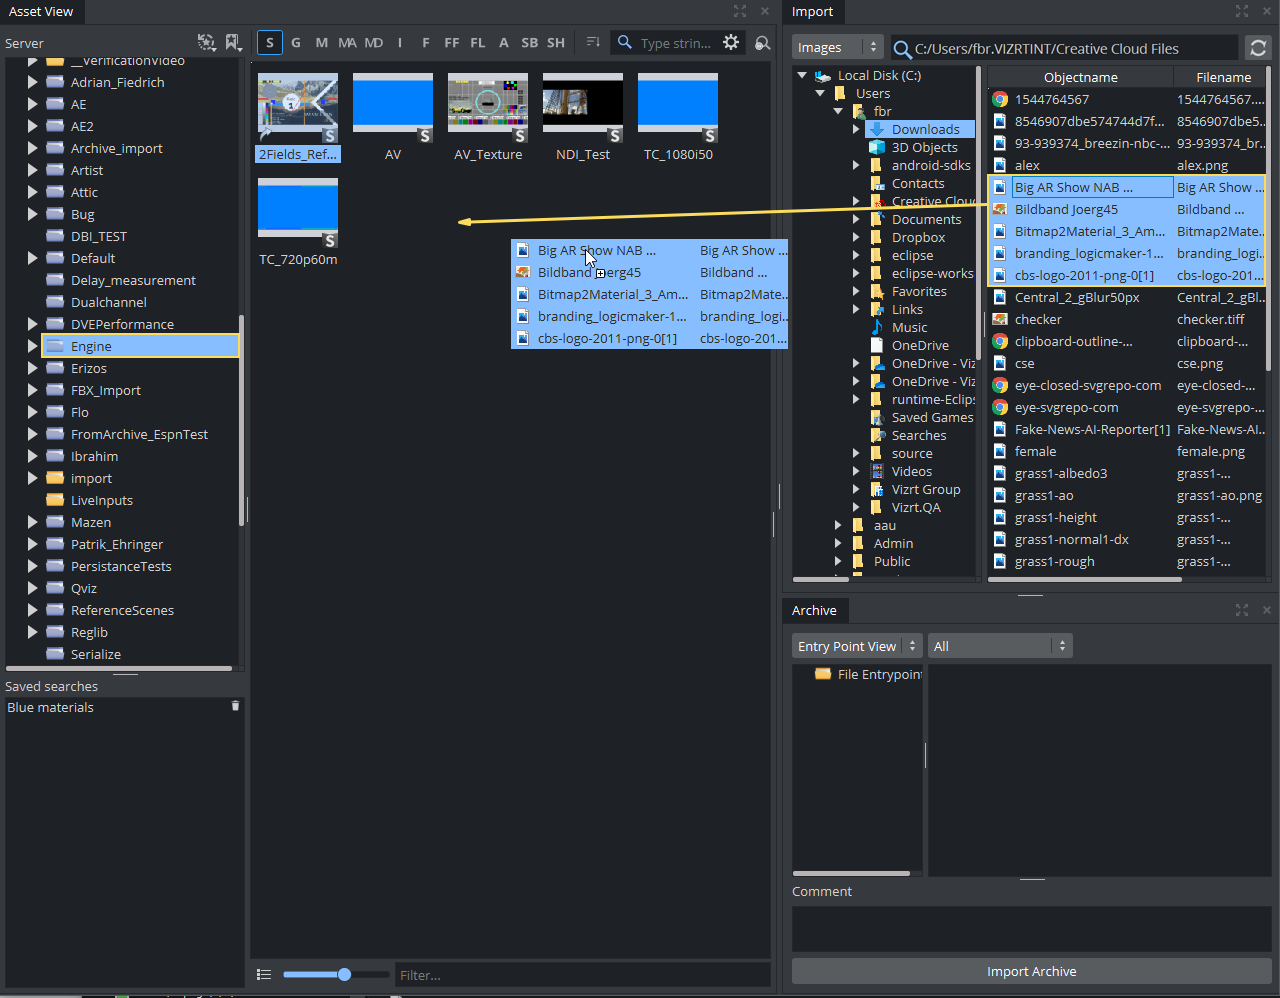
Grab the files to be imported from the Import Panel and drop them over to the Server Panel.
If a reference to a file, which is to be imported, already exists in Graphic Hub, this dialog shows:

Select from:
-
Replace: Overwrites the file on Graphic Hub.
-
Rename: Renames the file and import (new file). Opens a new dialog, type a new name and press OK.
-
Replace All: Stops the file import of the file shown in dialog window. The import procedure continues with the next file.
-
Cancel: Overwrites all files if there are multiple files.
-
Cancel All: Stops the import of all files.
If further options are required, an option window prompts for those. This window shows up for every single file extension. If you want to import several .jpg images with different options, you need to import them file by file to specify the options.
To Import Various File Types
Import of Images
Images on Graphic Hub are prepared to be used as textures. This means a compression can be applied and mipmap levels are being generated. Compressed images are smaller in size.
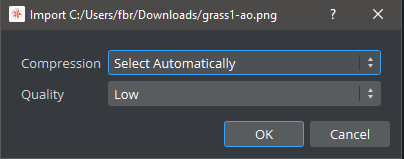
The compression can be set to be:
-
None: No compression is applied.
-
Select Automatically: Either DXT1 or DXT5 is used, depending if your image has alpha information.
-
DXT1: Compression for images without alpha.
-
DXT5: Compression for images with alpha.
The quality defines the compression for .png and .jpg images. it can be chosen between Low, Medium and High.
Note: The maximum dimensions of an image that can be imported and used as a texture in Viz Artist is 16384 pixels in width or height.
SVG Images
SVG files are rendered into images, therefore a few more options need to be provided as the final width and height, combined within the keep aspect ratio settings. The DPI should be kept as it was originally written, using more than 96 does not make sense.
Supported Image Formats
|
Format |
Importable |
Exportable |
Supported by the |
Supported by the Viz |
|
BMP |
Yes |
Yes |
Yes |
Yes |
|
PNG(1) |
Yes |
Yes |
Yes |
Yes |
|
TGA |
Yes |
Yes |
Yes |
Yes |
|
JPEG |
Yes |
Yes |
Yes |
Yes |
|
HDR(2) |
Yes |
Yes |
Yes |
Yes |
|
EXR |
Yes |
No |
Yes |
Yes |
|
VBN(3) |
Yes |
No |
Yes |
Yes |
|
TIF |
Yes |
Yes |
Yes |
Yes |
|
PSD(4) |
Yes |
Yes |
Yes |
Yes |
|
GIF |
Yes |
No |
Yes |
Yes |
|
SVG |
Yes |
No |
Yes |
Yes |
|
(1) No support for 16-bit per channel PNG images. |
||||
EXIF information is read when importing JPEG information. Images are automatically rotated based on the rotation information stored within the image.
Import for Scenes
Scenes created in certain other 3D applications can be imported to Viz Artist. However, any geometry that is to be imported must be a polygon geometry. Pay special attention to this when importing geometries from CINEMA 4D, as these must have been saved as a .c4d file with the Save Polygons for Melange option enabled (Located under Edit > Preferences > Files in CINEMA 4D), to make sure that all items saved are stored with their corresponding polygon data.
|
Format |
Comments |
|
Autodesk (.fbx) |
FBX is a 3D asset exchange format compatible with many 3D tools (see FBX Files). |
|
After Effects (.aep) |
See Adobe After Effects. |
|
CINEMA 4D (.c4d) |
See CINEMA 4D. Note: A license is required for the import of CINEMA 4D Scene, issued by Vizrt. |
|
VRML (.wrl) |
Deprecated format, Should not be used anymore. |
Autodesk FBX
FBX is a very common file format that most 3D applications support. It is the recommended format to bring 3D scenes into Viz Engine.
FBX supports Lights, Camera, Textures, Materials and Bones. When importing an FBX file, the following dialog shows up:
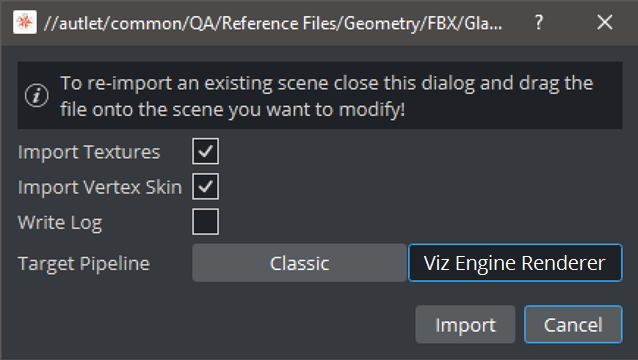
Then, choosing Viz Engine as Target pipeline, the importer creates PBR material definitions. The importer either imports "Stingray PBS" materials from Maya or tries to derive some basic values from any other Material available in the .fbx file. In Classic, basic Materials are generated.
If your FBX file contains bones/vertex skinning animations, these options needs to be enabled explicitly. The maximum levels of bones is currently restricted to 256.
The Log File is located at C:\ProgramData\vizrt\VizEngine\Engine_00_FBXImport_20210604Z115647.log
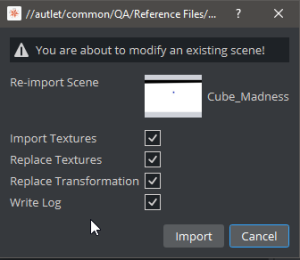
When you change a FBX scene already imported in Viz Artist, the scene can be easily reimported by dragging the changed FBX file onto the Viz Artist scene.
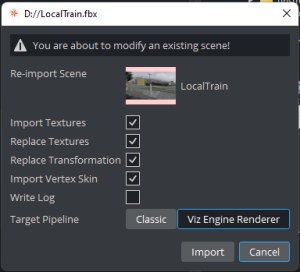
Note: To allow correct re-importing, the VizUUID plug-in needs to be used. This helps identify existing objects.
Detailed information about how to handle FBX files can be found in the Third Party Integrations section.
After Effects
When you import an Adobe After Effects project to Viz Artist, it automatically creates containers for text and image items, and then adds the Control Text and Control Image plug-ins for each text or image container. The import process creates the sub-folder import within the target folder, and then imports images, fonts, and sub-scenes, to this sub-folder. It does not import fonts that already exist on Graphic Hub, but references the already existing fonts in instead.
When re-importing a scene, you must select if Viz Artist also re-imports images and clips:
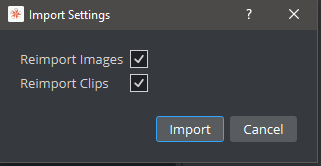
-
Import and overwrite existing files (Enabled) or,
-
Do not import files which already exist (Disabled).
Set the respective Import Settings to disabled if there are no changes to the image or clip files. The speeds up the import process, as it bypasses the Adobe After Effects renderer.
Items that Viz Artist cannot interpret, or that cannot be rendered in real-time (such as special effects), are rendered as a clip by the After Effects renderer. Because of this, Open Viz Configuration and make sure that the Output Format setting in Viz Artist matches the Composition setting in Adobe After Effects. Also, activate the number of clip channels you require in the Video Input section, and enable the w/Alpha option. Otherwise, Viz cannot play out these clips.
Viz Artist automatically imports these clips to the Graphic Hub as a Video Clip item, and composes them in the imported Scene. Like any other file in the Graphic Hub, the Scene references these clips by UUID.
Import Limitations
Import of Adobe After Effects compositions is limited to the following Adobe After Effects items:
-
Cameras
-
Texts
-
Solids
-
Masks (no animated points and no feathering)
-
Shapes (no animated points and no feathering)
-
Images
Items included in nested compositions are imported/exported in the same way as items that belong to a single (root) composition.
IMPORTANT! Adobe After Effects needs to be installed on the same machine as Viz Engine.
These items are imported with their animations (Key Frames are not baked, they are converted directly to Viz Artist Key Frames).
All items and/or effects from Adobe After Effects, which cannot be converted to Viz Artist objects, are rendered as video clips and imported into the Graphic Hub. The import tries to combine multiple objects, which cannot be imported, and render them into one video (MPEG2 iFrame HD + Alpha). Currently, the importer is configured to use no more than two Clip- and 16 GFX channels for one scene (including sub-scenes). If more channels are necessary to import the composition, the importer renders layers which are actually supported as native items, but create an importable/not-importable alternation, as clip.
For example, if an imported After Effects scene would need more than two clip/16 GFX channels in Artist, then the importer collapses those layers step by step until the resulting import does not need more than 2/16 channels. However, this may lead to the situation that layers/items which are actually supported as native items in Viz, are still imported as pre-rendered clips. You may want to consider this when working in After Effects before importing into Viz.
Note: This can lead to several video clips if there are many alternations of importable and not importable layers.
Adobe After Effects offers a 2D/3D layer option. In Viz Artist, there is one camera per Scene. This means that each time 2D and 3D layers are mixed in the composition the import needs to create a new sub-scene (GFX Channel) to set a camera accordingly and still maintain the correct layer Z-sorting.
Cinema 4D
Cinema 4D files are always imported as Classic scenes. Only basic texture mapping can be chosen, therefore you can only specify if textures are imported or not.
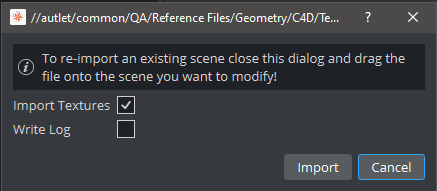
The Log File is located at C:\ProgramData\vizrt\VizEngine\Engine_00_C4DImport_20210604Z114310.log
When you change a CINEMA 4D scene already imported in Viz Artist, the scene can be be easily reimported by dragging the changed .c4d file onto the Viz Artist scene.
Information: Cinema 4D import needs to be licensed!
Photoshop
For information about importing Photoshop files as scenes, please see Photoshop Import
Import of Fonts
The most common file formats for fonts are supported. Please observe however, that path rendering of fonts is not supported for fonts imported with Font Import set to Windows (Advanced) in Font/Text Options in Viz Configuration.
When importing Classic fonts, Blur and Outline variants are created automatically.
|
Type |
Comments |
|
Adobe Type1 fonts |
Postscript Type 1 fonts (.pfb files). |
|
Adobe Type2 fonts |
Postscript Type 2 fonts. |
|
True type fonts |
Recommended, most common format. |
Tip
Tip: To import Fonts for Text, please use the Font Management
Import of Geometries
The following formats can be imported for geometries. It is recommend to use FBX if possible.
|
Format |
Comments |
|
Autocad (.dxf) |
Drawing Interchange Format. |
|
Wavefront (.obj) |
Geometry definition file format |
|
3D studio (.3ds) |
3D-Studio |
|
(.glb) and (.glTF) |
Graphics Language Transmission Format |
IMPORTANT! Autocad (.dxf) files to be imported need to have 3DFACE entity.
Import of Audio
Audio files need to be 48kHz -16 bit. Maximum 16 channels, minimum two (stereo) as mono is not supported. The following file formats can be imported:
|
Format |
Comments |
|
WAV |
Waveform Audio File Format |
|
OGG |
Ogg Vorbis |
|
MP3 |
Mpeg Layer 3 Audio |
Import of Substances

Substance materials are supported by the Substance Shader. There are no options for the Substance Import.
|
Format |
Comment |
|
.sbsar |
Substance Designer Archive |
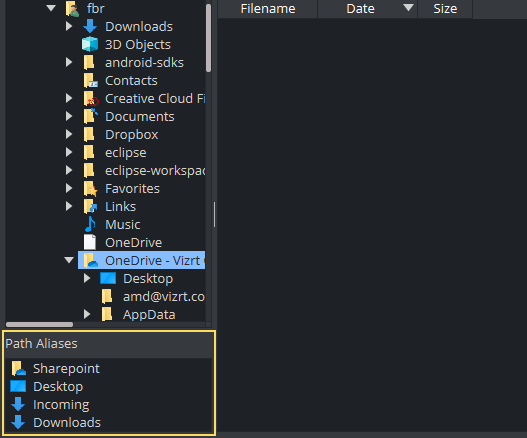
Path Aliases
Use a path alias to help streamline the import process. Path Aliases, defined in Viz Configuration, create shortcuts to frequently used file paths for import operations. This switches the default path (for example, images to be your Camera or Teams-synchronized Sharepoint folder). To define them, set your Aliases in Viz Configuration Path Aliases.
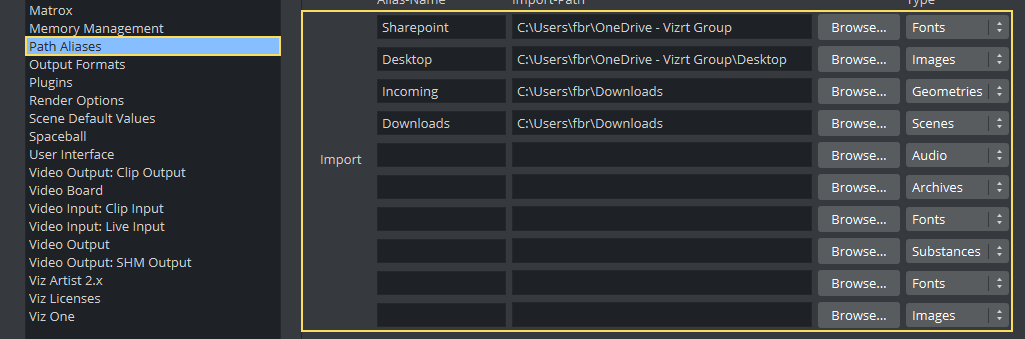
Once they are set, the import shows them as a list. Clicking on them directly navigates to the selected folder.
To Import Archives
An Archive (filename extension .via) is a single file that holds various types of items and remembers the project or folder they were stored. Archives are typically used for backup and for transferring Scenes from one Graphic Hub to another.
IMPORTANT! Archives created with Viz Artist 2.x must not be imported to Viz Artist 3.x in this way. They need to be imported using the Graphic Hub Manager (see the Graphic Hub User Guide).
For the following examples, lets assume one has the following basic structure defined on Graphic Hub:

-
Folder A consists of an image and a geometry, the image is also linked into Folder B.
-
Folder B has three images.
-
Projects holds a scene.
-
Fonts has some Fonts imported.
A scene is being built (MyScene):
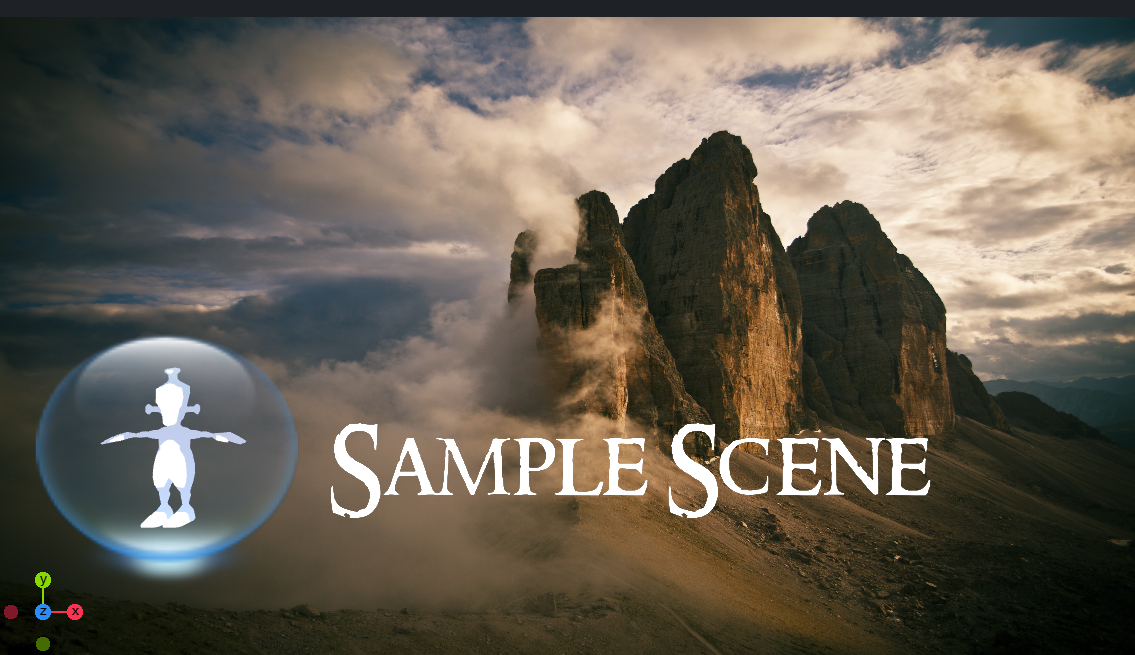
It consists of an background image, a font, another image and a simple geometry (Note, this is not using the linked image pattern).
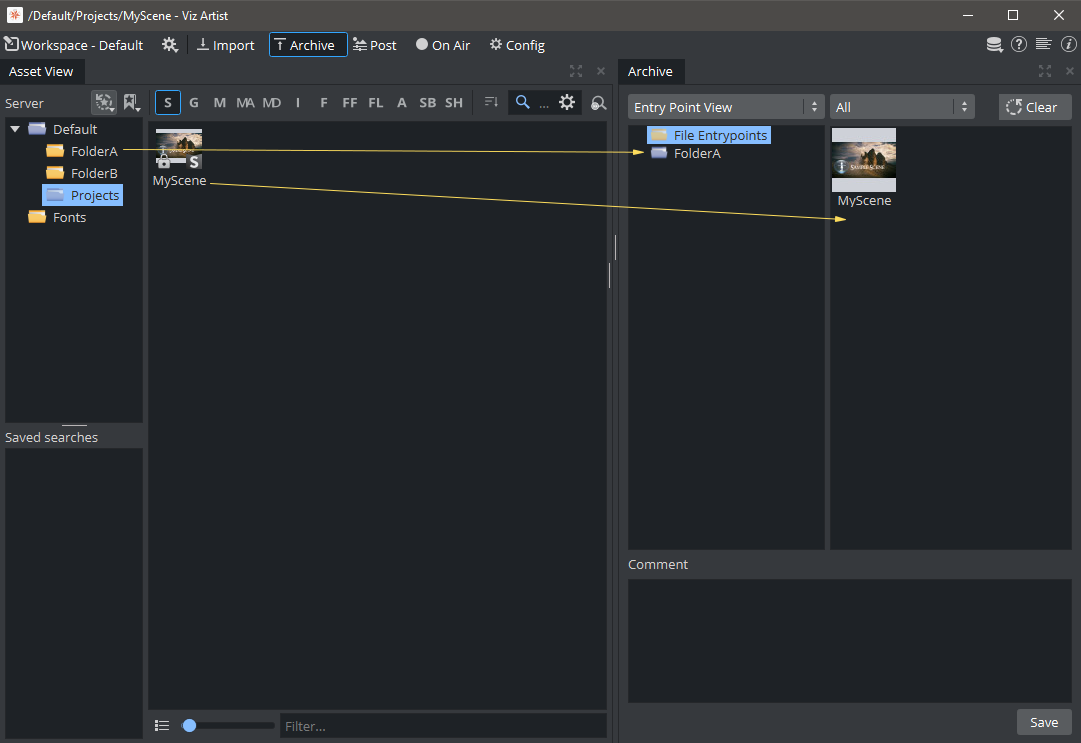
The user now creates an archive of his work to import this content later one to another machine. He drops the Scene into the Archive view and also decides to add the image pattern (which is not being used by the scene) by adding the FolderA to the archive and creates a sample.via .
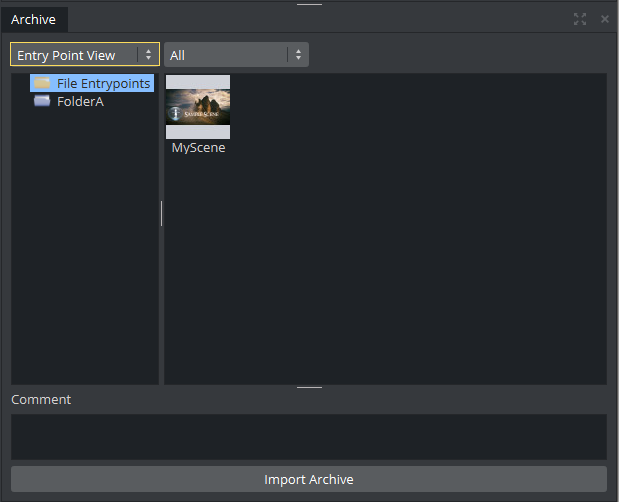
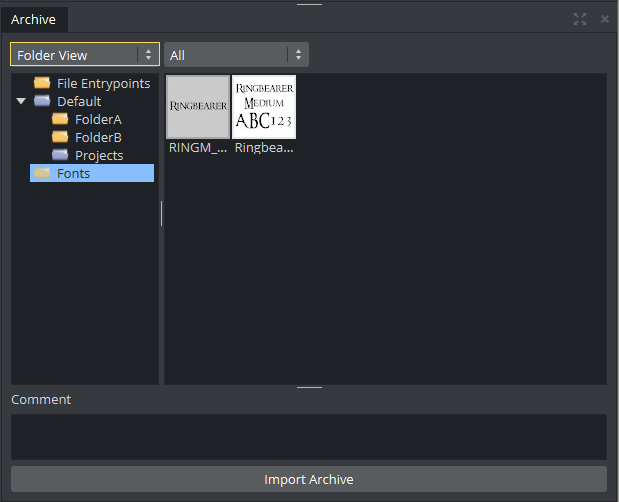
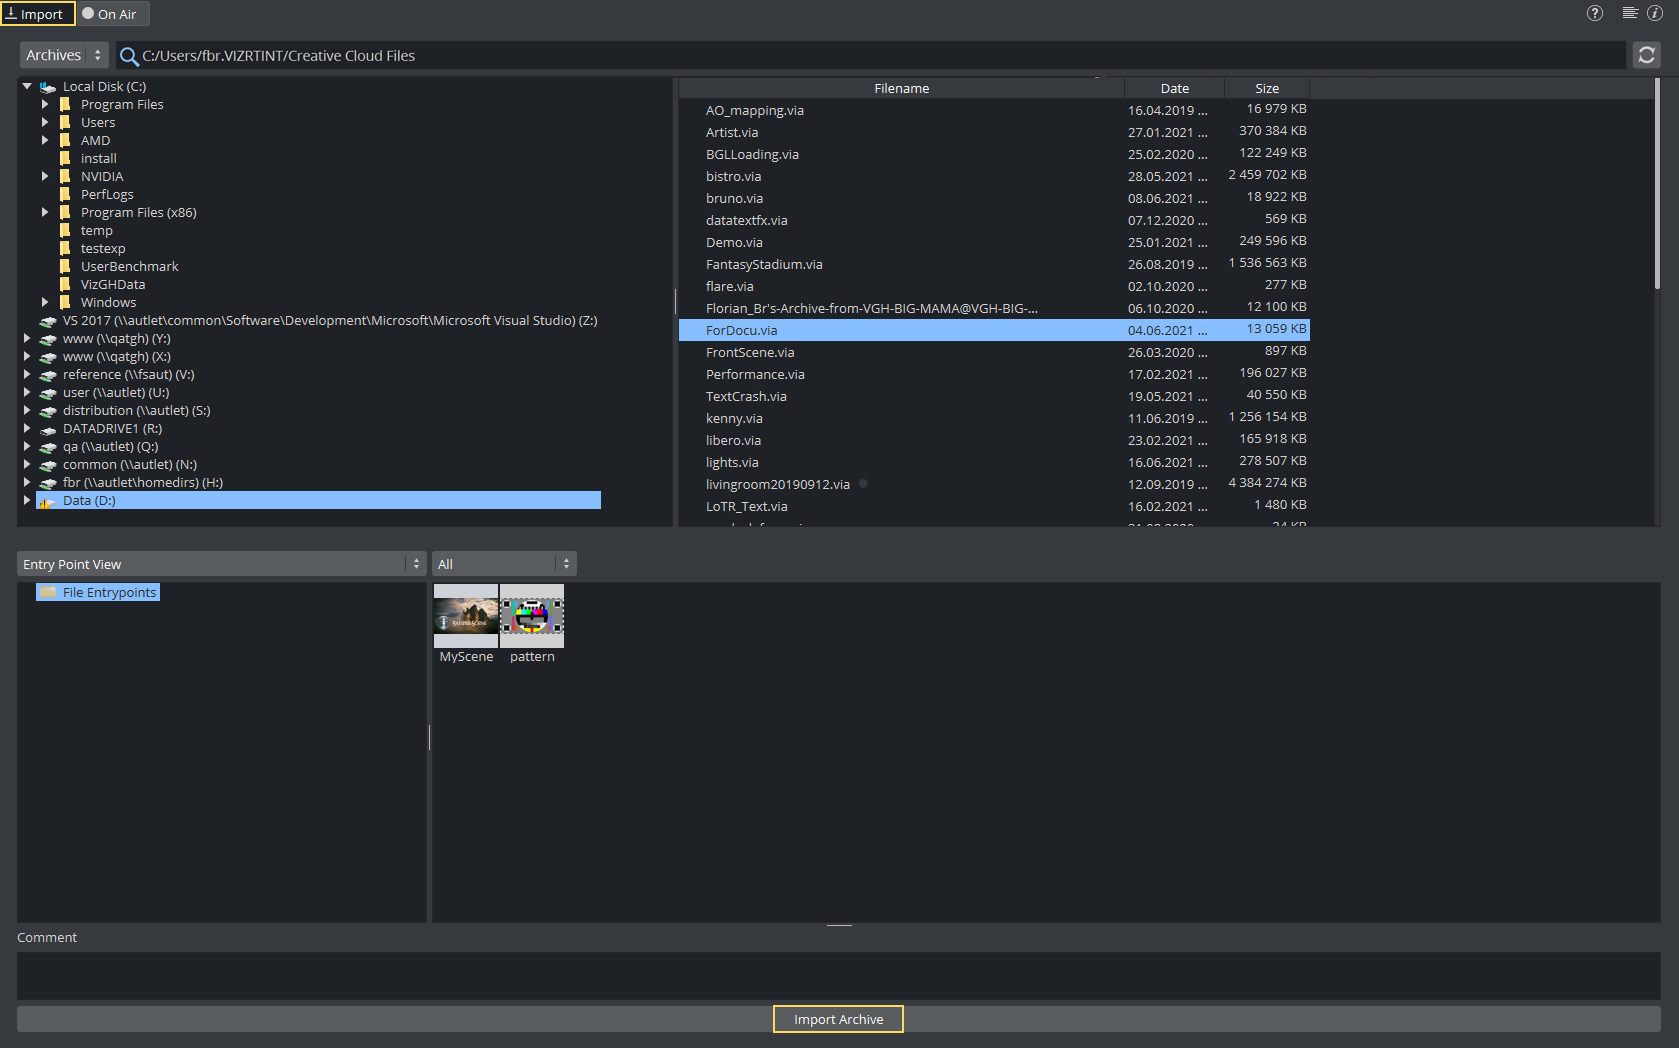
View Archive Content
An archive can be compared with a .zip file. To view the content of an archive, simply select the via file in the import panel. If the sample.via is now opened on another machine, the content of the archive is displayed in the Archive pane on the bottom of the Import panel.
Use the drop-down menu in the preview panel to see the different aspects of an item’s composition.
-
Entry Point View: Shows all Entry Points. An entry point is created for each item or project or folder added to an archive by drag and drop. Note that the scene is displayed as a single Entry Points, the references and the related folders are not shown.
-
Folder View: The folder view shows what is included in the archive and is more close to the example of a .zip file. Note that the archive took all items linked to the scene and their folders. Fonts only shows the fonts being used by the scene.
There are several options how this archive can be restored now.
-
Import the Archive "as is".
-
Import an Archive to a Specific Location.
-
Import Part of an Archive.
To Import an Archive "as is"
IMPORTANT! Using this method of import, the archive is imported to the root (/) of the GH while maintaining the path and names of the items in the archive.
-
In the Import panel, search for the Archive to import.
-
Select the required Archive.
-
Click on Import Archive.
The archive has been restored exactly as it has been written. Folder A, Folder B, Projects and the Fonts have been restored as well as the items being used and the content of Folder A (added as entry point). Projects created for Playout usually follow a certain folder structure, therefore importing an archive as is is mainly used.
To Import an Archive to a Specific Location in a Graphic Hub
Instead of restoring the archive 1:1 and keep the original structure, you may want to add this structure into an existing folder structure. To do so:
-
Be sure the correct destination project has been selected (existing_project).
-
In the Import panel, search for the Archive to import.
-
Select the required Archive.
-
Drag the archive s into their now location on the new Graphic Hub.
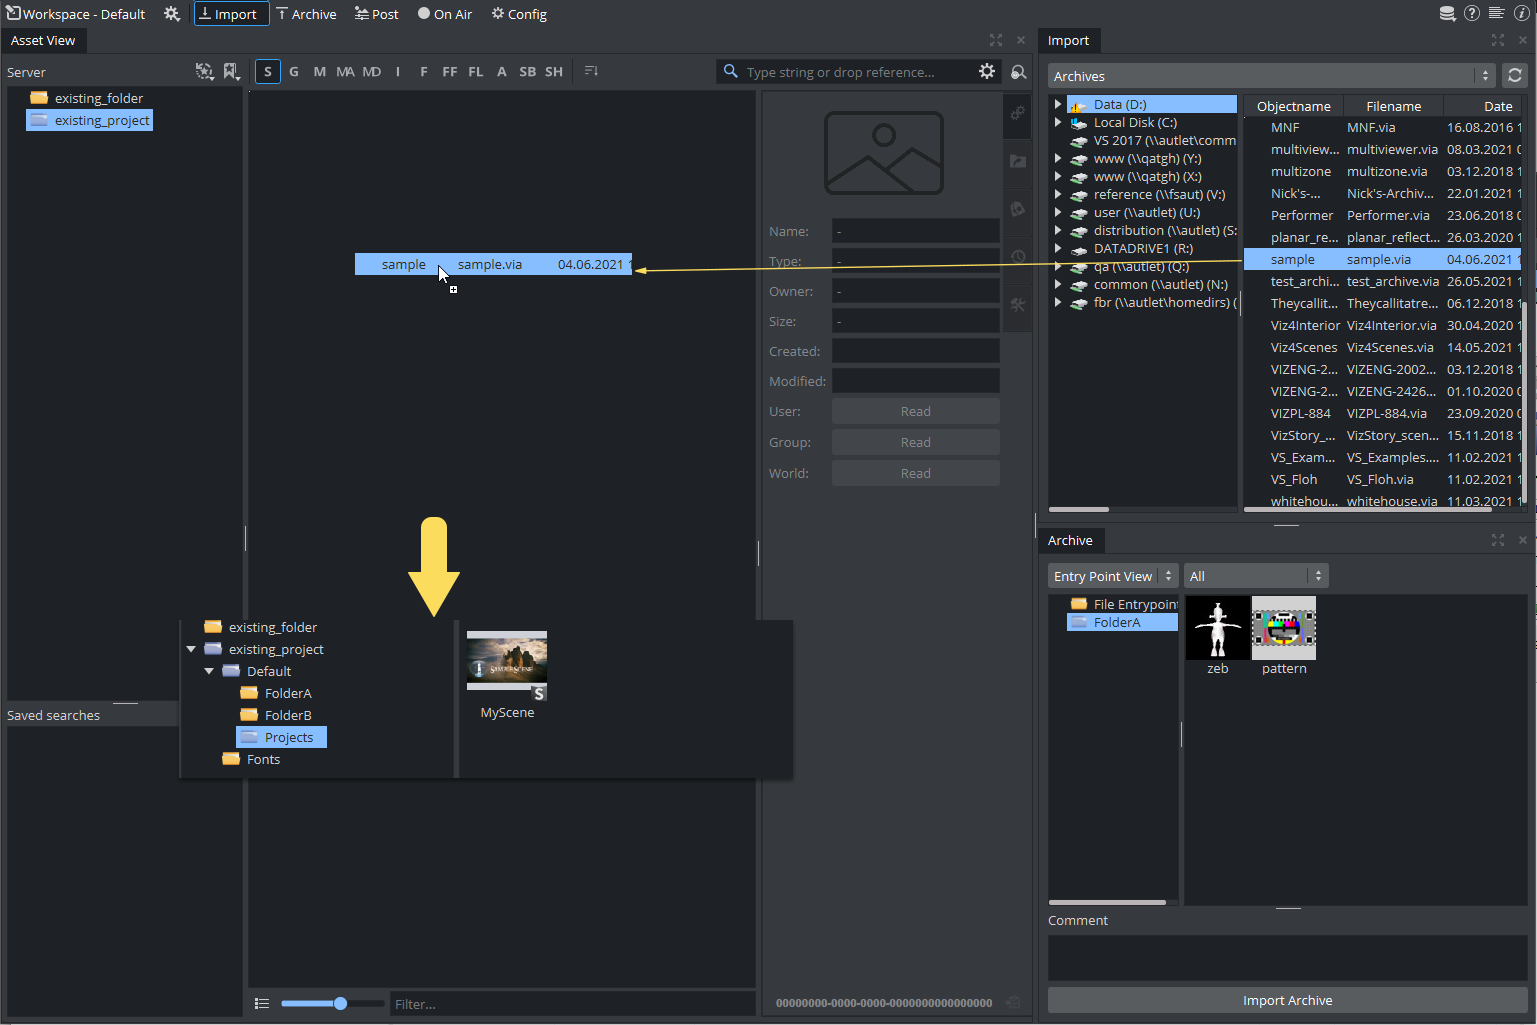
The content of the archive has been restored underneath the selected project. The original structure of the archive is now available as subfolders and subprojects within the selected destination folder. This operation can fail if the destination is a folder and not a project folder and the archive has projects inside. Projects can not be subitems of folders. Be sure that your destination points are always projects.
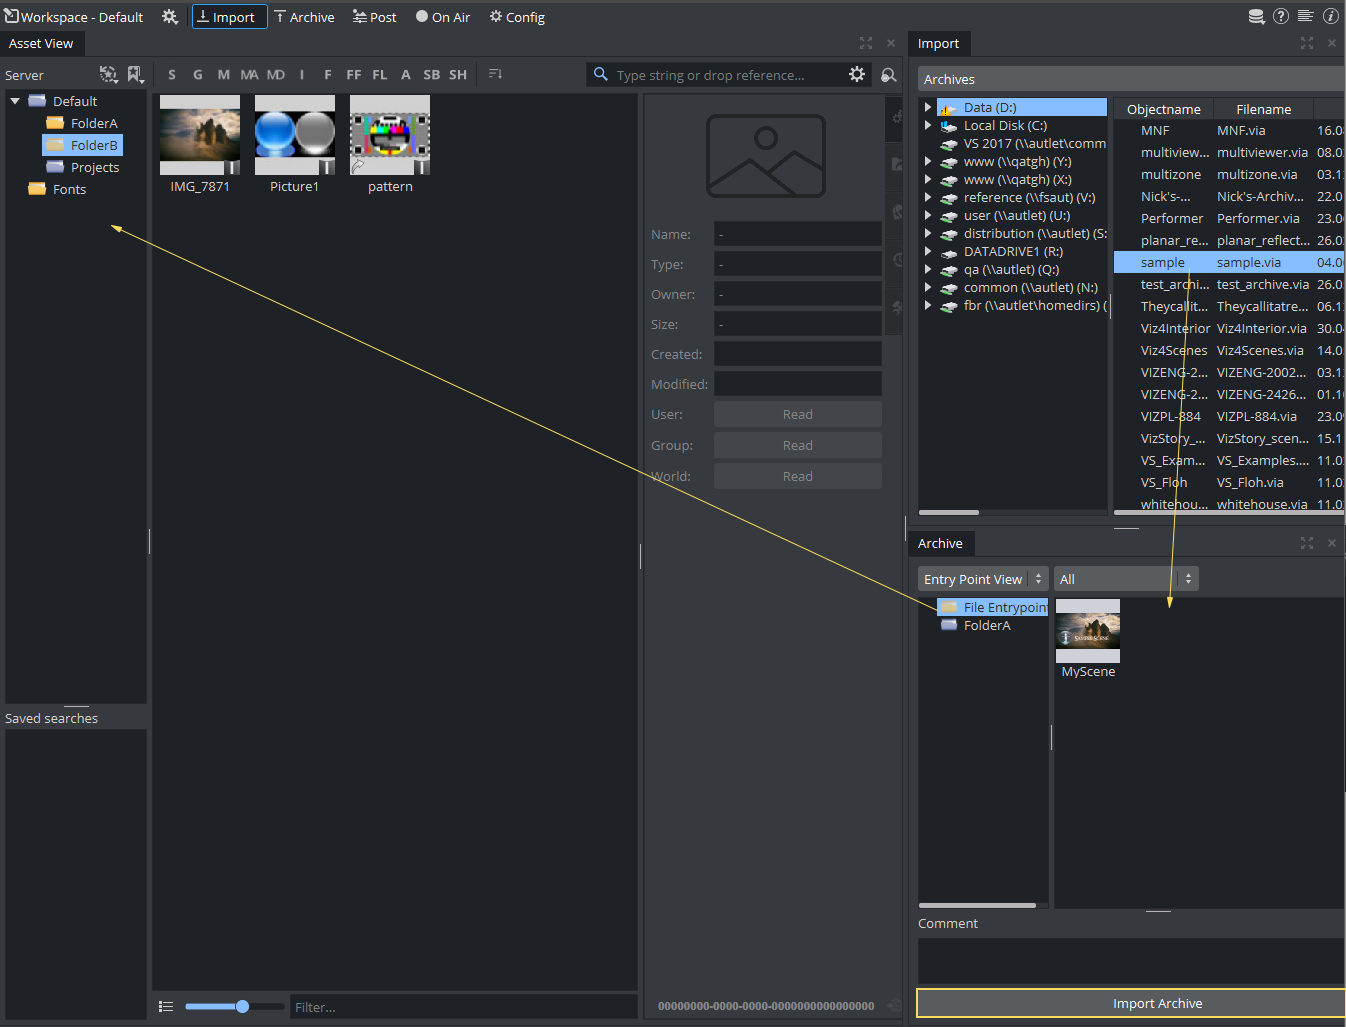
To Import Part of an Archive
If only single items of an archive are needed, they can be imported without importing the whole content.
-
In the Import directory tree, search for the Archive to import.
-
Select the required Archive in the right side panel.
-
From the top menu, select Entry Points View.
-
Select an import option:
-
To import all entry point files from the archive, drag the File Entry Points file folder and drop it in the left panel.
-
To import a folder and its contents from the archive, drag the required folder from the folder entry points and drop it in the left panel.
-
-
To import one or more files, drag and drop them into the left panel.
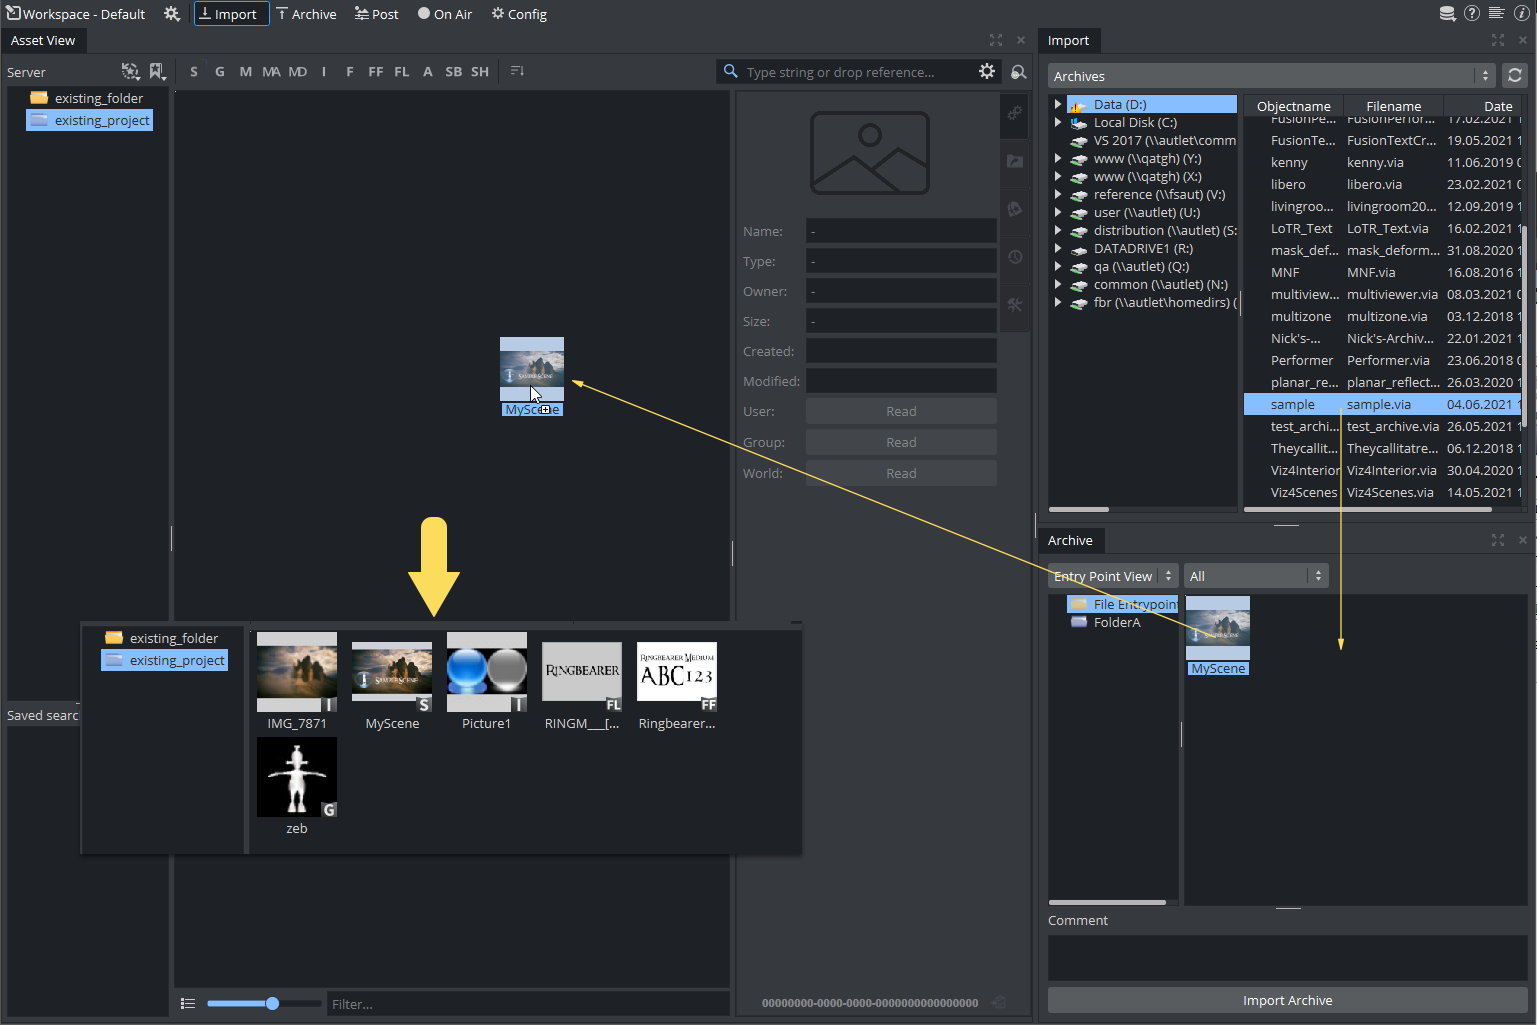
In this example, the user decided to restore the scene only. He clicks on the scene and restores it into the project existing_project. The scene and all related references are imported into the destination project without and structure. All files end up in an flat representation.
IMPORTANT! The archive is imported into the folder selected in the Graphic Hub tree. All reference files are included to guarantee full functionality. This method of import flattens the imported items. This means that the path or directory structure of the items in the imported archive are not kept. Use this method of import for importing parts of, or items of an archive.
Note: To import projects or folders, the same procedure applies, with the exception that you select Folder View from the pull-down menu, and drag and drop the required folder.
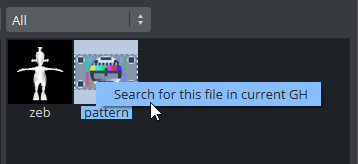
To Search for Imported Files
Search for files before or after the import for an Archive. Use this feature to see if similar or the same files are present in the system and to find the file’s location after import.
To Import an Archive in Viz Engine Mode
An archive can be imported in the On Air User Interface if Viz Artist is not installed, Viz Artist is not licensed or Graphic Hub Manager is unavailable. The functionality is limited to import an Archive only "as is".
-
Click on the Import button in the On Air User Interface.
-
Browse for the Archive to import.
Note: There is no drag and drop import function if Viz Engine is in On Air mode.
-
You can browse for the content of your Archive, but there is no functionality to only import parts of the Archive.
-
To import the Archive to its original location, click the Import Archive button.
Once imported, the Scenes can be used for playout (scenes need to be preloaded first).