
Viz Artist User Guide
Version 5.0 | Published December 20, 2022 ©
Snapshot
A snapshot can be taken of the current content in the Scene Editor.
When clicking the Snap ![]() button, the Server Panel is automatically selected from the main menu, and the database content shows. The image is placed in the folder/project that was last visited.
button, the Server Panel is automatically selected from the main menu, and the database content shows. The image is placed in the folder/project that was last visited.
To Take a Snapshot
-
Click the Snap
 button.
 -
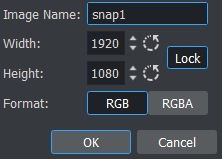
In the Snapshot dialog box that shows, enter the name to save the snapshot as.
-
Select the size and format for the image.
-
Click OK to save the image to the database.
Note: An RGBA image uses the key information as alpha.
Note: To save the image in another folder/project: First select the destination you want to use, then click the Snap ![]() button again.
button again.
Taking snapshot from a running video is allowed. The procedure above is interactive. If required, you can alternatively instruct Viz to take a snapshot using the commands below. The examples below, calling renderer directly, assumes the Engine is in On Air mode:
RENDERER*VIDEO*SNAPSHOT CREATE file:///c:/images/snapshot.pngRENDERER*VIDEO*SNAPSHOT CREATE vizgh:///my/images/snapshotRENDERER*VIDEO*SNAPSHOT CREATE vizgh:///{159FC7E7-B724-4CC3-B474B7EE46CDA043}/snapshot-
Example 1 writes a .png image to disk. The .png file format is particularly useful when working with RGBA images or four channel data in general.
-
Example 2 saves the snapshot to the Graphic Hub (GH) using a path.
-
Example 3 saves the snapshot to the GH using a GH ID (unique identifier, the UUID must already exist).
See Also