Viz Artist User Guide
Version 5.0 | Published December 20, 2022 ©
Tutorial
This section contains information on the following topics:
Create a Project
It is good practice to create a project with a folder for each new design. This makes sure that a project with more than one design does not get mixed up, and potentially overwrite other files.
Create a Master Scene
When creating a new Transition Logic scene design, it is common practice to first define the Toggle Layers. After the toggle layers have been defined, one would typically move on to create the Master scene, and add the defined toggle layers.
Note: Creating the Master scene first is recommended, as it is needed to complete the object scenes.
To Define the Toggle Layers
-
Create a list of all graphical items to be shown. For example:
-
A large two lines lower third.
-
A small one line lower third.
-
A small one line top third.
-
A left side over the shoulder (OTS).
-
A right side OTS.
-
A logo bug.
-
A “coming up next” bug.
-
A news ticker.
-
A clock.
-
-
Create an operational scenario where you decide how items affect each other, and which items can be on-screen at the same time. For example:
-
Only one lower or top third can be on-screen at a time (toggle layer one).
-
Only one OTS can be on-screen at a time (toggle layer two).
-
Only one logo or “coming up next” bug can be on-screen at a time (toggle layer three).
-
The news ticker and clock should be possible to take in and out independently of all layers (toggle layers four and five).
Note: All toggle layers can potentially be on-screen at the same time, but only one object scene per layer can be shown at the same time.
-
To Create a Toggle Layer

-
Create a new scene, and name it default. This is the Master scene.
IMPORTANT! This scene must not be named background, as this triggers legacy mode in other software such as the Media Sequencer.
-
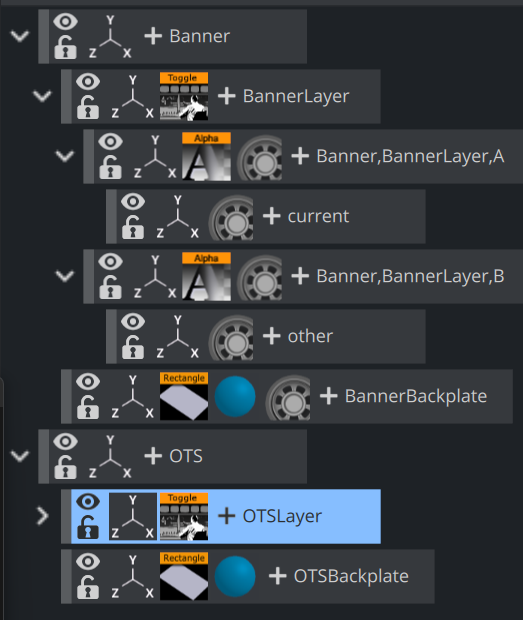
Add a group container to the scene tree, and name it Banner. This is the placeholder for the banner’s toggle layer and backplate graphics for the banner object scenes.
-
Add a sub-container to the Banner container, and name it BannerLayer. This acts as the placeholder for the Toggle plug-in.
-
Add the Toggle plug-in to the BannerLayer container. This generates the default object placeholders for the toggle layer’ s current and other state.
-
Add a sub-container to the Banner container, and name it BannerBackplate. This is the placeholder for the banner’s backplate(s).
-
Add a rectangle and material to the BannerBackplate container, and adjust the Transformation Editor properties such that it creates the look and feel of a simple lower third graphics.
-
Axis Center: Set X to left (L) and Y to bottom (B). The X and Y values are set to -50.
-
Position: X: -330, Y: -160, Z: 0
-
Scaling (single): X: 1.0, Y: 0.4, Z: 1.0

-
-
Open the Stage by clicking the Stage button in the main menu.
-
Add a new director, and name it BannerLayer. This is the placeholder for the backplate animations.
-
Animate the banner backplate:
-
Scaling X: 0 at 0 fields.
-
Scaling X: 6.6 at 50 fields.
-
Scaling Y: 0 at 100 fields.
-
-
Open the Stage and check that the animation resides under the BannerLayer director. If not, place it (drag and drop) under the BannerLayer director.

-
Select the Banner director, set the director’s Time Marker to 0.000 seconds, and add a Stop/Tag.
-
Select the tag and name it O (uppercase O, not zero).
-
Add a new tag for the animation’s in point and name it LOWERTHIRD, and a second out point named O. These tags represent the basic states the graphics can be in.
-
Open the Toggle plug-in editor, and click the Default Key Frames button.
-
Adding Key Frames adds a one second default alpha cross fade effect to objects placed on that layer.
Note: Adding default Key Frames is not possible until the layer’s director has at least two states defined where one has to be the O state.
-
-
Now it is time to add a layer for the Over the Shoulder graphics (OTS). Repeat steps 2-14 for a new layer called OTS with the following transformation properties and animations:
-
Axis Center: Set X to left (L) and Y to top (T). This sets the X value to -50 and the Y value to 50.
-
Position: X: -330, Y: 100, Z: 0
-
Scaling (single): X: 1.0, Y: 0.05, Z: 1.0
-
Scaling X: 0.0
-
Scaling X: 1.0 at 50 frames.
-
Scaling Y: 1.4 at 100 frames.
-
Scaling X: 0.05 at 150 frames.
-
Scaling X: 0.0 at 200 frames.
-
-
Save the scene with all directors in their O state.
IMPORTANT! Make sure to set all directors to an O state before saving the scene. This is because backplate graphics saved in a visible state are shown on-screen the first time any toggle layer is taken On Air.
To Add a Key

Open the Scene Settings Editor and select the Auto Key option under Render Sequence in the Global Settings Panel.
Tip: Click the Key button in the Scene Editor to toggle the key.
Create an Object Scene
Before creating object scenes you should start by creating a master scene. After the master scene has been created, the next step is to create the object scene(s) that reside on the different toggle layers defined in the master scene. An important part of object scene design is to add the Control Object plug-in. The Control Object plug-in enables the object scene to tell Viz Engine which layer it resides on and the state the master scene should be in when taken On Air by the operator.
The object scene can expose other parameters to the operator by adding other control plug-ins, such as Control Text and Control Image. Additionally, the object scene can be used to add preview tags, so that the scene can be previewed by newsroom users working with the Viz Pilot Newsroom client.
To Create Object Scenes

-
Create a new scene, and name it 1000.
-
Add container to the scene tree, and name it lowerthird.
-
Add Control Object plug-in to the lowerthird container.
-
Add a sub-container to the lowerthird container, and name it text.
-
Add a font to the text container.
-
Add a Control Text plug-in to the text container.
-
Open the Control Object’s editor, and set the following parameters:
-
Description: Headline
-
Transition Logic: On
-
Layer Identifier: BannerLayer
-
State Identifier: LOWERTHIRD
-
Background scene: default
-
-
Open the text container’s transformation editor, and set the following properties:
-
Position: X: -320, Y: -150, Z: 1
-
Scaling (locked): 0.5
-
Scaling (locked): 0.0 at 0 frames
-
Scaling (locked): 0.5 at 50 frames
-
-
Save the lowerthird scene.
-
Repeat steps 2-11 for the OTS object scene with the following parameters, transformation properties and animations.
-
Scene name: 2000
-
Description: Text
-
Transition Logic: On
-
Layer Identifier: OTSLayer
-
State Identifier: OTS_LEFT
-
Background scene: default
-
Position: X: -330, Y: 120, Z: 1
-
Scaling (locked): 0.3
-
Scaling X: 0.0 at 50 frames
-
Scaling X: 0.3 at 100 frames
Tip: Open the Control Text Editor and disable the Single line parameter.
-
-
Save the OTS scene.
To Create a Background Image for the Object Scene
-
Open the Master scene.
-
Open the Stage view and set the layer’s state where it matches the state of the Object scene, for example LOWERTHIRD.
-
In the Scene Editor, click the Snap button and save the snapshot. Make sure to give it an identifiable name, for example banner_lowerthird. The snapshots can be used as placeholders for the object scenes.

To Create a Preview Point
-
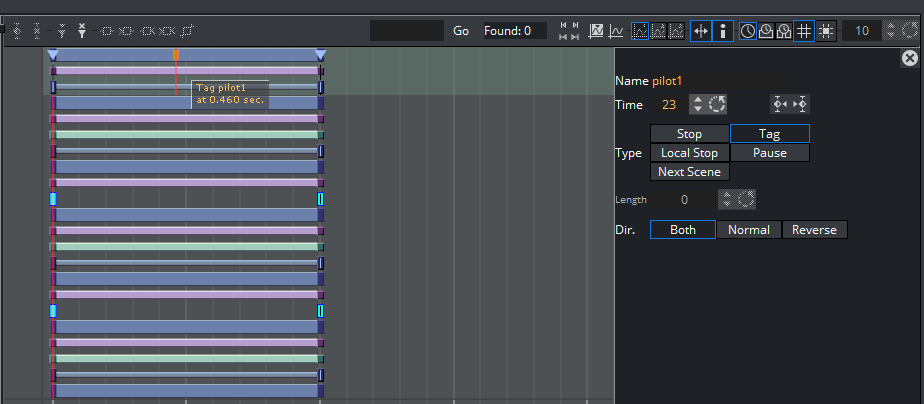
Open the Stage, and select the Default director.
-
Position the Time Marker from where you would like the scene to be previewed.
-
Click the Add a Stop/Tag button.
-
In the appearing editor enter Name as pilot1 (case sensitive), and set Type to Tag. When previewing using a remote (external) Viz Artist/Engine preview, either from a newsroom system, or when connected to a Media Sequencer with a control application, the pilot1 tag is the default preview point for the object scene.
