
Viz Artist
Version 3.10 | Published May 03, 2018 ©
2D Patch
![]()
The 2D Patch is a two dimensional planar curved grid of polygons. The grid is defined by control points that are located on the perimeter of the grid. The parameters of each one of the control points is the location X and Y, and the assigned texture coordinates U and V. The calculation of the internal grid points is done with a mix of a one-dimensional cubic spline and a two dimensional bilinear interpolation.
It is possible to specify the interpolation direction to be just in one direction, or in both. Depending on the shape that should be created, it is important to choose the right direction (for example it is not too difficult to create an annulus with this plug-in, after choosing the right interpolation direction along the radius).
Note: This plug-in is located in: Built Ins -> Geom plug-ins -> Default
This section contains the following topics:
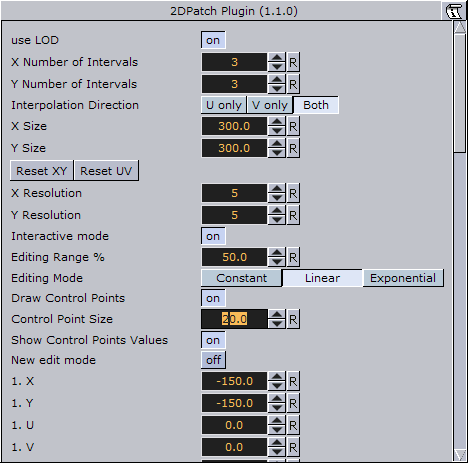
2D Patch Properties
-
use LOD: Enables/disables dynamic level of detail.
-
X and Y Number of Intervals: Sets the number of intervals between the control points in the X and Y direction respectively. Parameter name: NX/NY.
-
Interpolation Direction: Defines the direction of interpolation from the control points on the perimeter to the internal grid points. Parameter name: interDirect.
-
X Size, Y Size, Reset XY (button) and Reset UV (button): Gives initial values for the control points. The values of X and Y-Size will take affect just after hitting the Reset XY button. The Reset UV button is setting default values to the texture coordinates. Parameter name: SX/SY, resetXY/resetUV.
-
X Resolution and Y Resolution: Defines the number of subdivisions to polygons between the control points in the X- and Y-direction respectively.Parameter name: MX/MY.
-
Interactive mode: A toggle to enable or disable the interactive mode of direction manipulation with the mouse. Parameter name: interactive.
-
Editing Range %: Sets the amount of “effect” the movement of one point (move with <Shift> pressed) should have on the neighboring points. Parameter name: EditingRange.
-
Editing Mode: When moving a point, it is possible, by pressing <Shift>, to move the other points simultaneously. How the points move depends on the editing mode that is chosen. Parameter name: EditingMode.
-
Constant (button): The other points will move their positions exactly equal to the one you move.
-
Linear (button): The other points move in a linear way, based on the distance from the point that is being moved.
-
Exponential (button): The other points move in an exponential way, based on the distance from the point it is being moved.
-
-
Draw Control Points: A toggle to draw or not to draw the control points. Enables the Control Point Size parameter. Parameter name: drawControlPoints.
-
Control Point Size: Sets the control point size.
-
-
Show Control Points Values: Enables the manipulation of the control points in the rendering window. Parameter name: controlPointSize.
-
New edit mode: When enabled, and you press down <Ctrl>, you can see the control points and also you have the opportunity to move the control points. The “Interactive mode” and the handle “script/plug-ins event mode” must be enabled.
-
X, Y, U and V: Sets position and texture coordinates for each of the control points. These values will typically be changed in the rendering window only with the mouse.
Note: There are 12 control points that each have their own X,Y,U and V parameters.
2D Patch Workflow
-
Set the right number of control points, according to your estimation of how complex the patch is you are going to create. This number can be changed at any time. The plug-in will redistribute the new points along the already defined patch.
-
Estimate the final length and width of the patch.
-
Move the patch to the right place in your scene. If it is going to be on some horizontal plane, it might be easier first to edit it in the default orientation, and afterwards rotate it to the right place. There is no problem to continue working on it after the rotation has been made, but because of the perspective, it might be less straightforward.
-
Turn on the Draw Control Points toggle and the Interactive toggle. While working with the cursor, you do not have to be very close to the control point that you would like to manipulate. The plug-in will find by itself the nearest control point to where is your cursor is. The selected control point will get yellow color, as compared to all the rest that are white, to indicate that it has been selected for editing.
Note: You will be able to do the direct manipulation just if the object is the selected object in the Viz Artist container tree. Remember also, that regardless of the position of your cursor, if the patch is the selected object, and the interactive toggle is on, always one control point will become selected and will be changed while working with the cursor. Hitting the space key on the keyboard cancels the current selection. The cursor then returns to normal functionality until the patch object is selected again.
-
With the left button, according to the selection roles above, you can change the X and Y location of each of the control points.
-
Once the shape of the patch is more or less defined, it is a advisable to set the resolution parameter. Performance wise you should set it as low as possible, but it should be high enough to guarantee a smooth enough look.
-
Choose an image and drag it on the patch in the usual way. After doing it open the image texture editor and set the Mapping property to Vertex, and the Wrap property to Clamp.
-
The next step is to map more accurately the image on the patch. Set first the Texture Length according to your estimation, then choose the Texture Direction, and then play with the Texture Head Location to see the texture flowing along the patch. This is a good point to review again all the parameters you set before.
-
The last step is to define an animation if necessary. Typically with the patch the animation will be just on the Texture Head Location. To learn more about animation see Create Animations .
Caution: While defining an animation on the parameters of a 2D Patch, you must make sure that the right window is open in Viz Artist. Without it, the changes that you are doing with the cursor will not take effect with regard to the animation.
2D Patch Tips
-
It is sometimes useful to work with 2D Patch while in wireframe mode. If you have a texture with alpha, to see it correctly, you need to turn the image off with the small enable/disable button near the image icon.
-
Remember that if the 2D Patch is not selected, the interactive mode is not active. As result of this, the first click with the mouse on unselected object will be always with the normal Viz Artist functionality of the cursor, of moving, rotating and so on the object.
-
If you are done with the interactive session of defining a 2D Patch, turn the Interactive toggle off.
-
While working on a 2D Patch in the interactive mode, it is not possible to select another object with the cursor in the Viz Artist Scene Editor. The way to select another object is first to hit SPACE, and thereafter select the other object.
-
Doing animation on the 2D Patch is quite expensive performance wise. Be aware to it, and try to use as much as possible a small number of control points and polygons.
-
For the texture used for the 2D Patch, make sure that along the flow direction, you have on both texture edges a clean line with alpha equal to 0. Other wise you will get a wake of the image edges in front or behind it.
-
Do not change the number of control point along an animation. It is possible, if necessary, to change the resolution number.
-
While defining an animation, make sure to remove from it, if necessary, the toggle values of Show Control Points, Interactive Mode and so on.
2D Patch Known Limitations
-
When you use 2D Patch in a scene, by choosing an object in the Viz Artist rendering window, the Viz Artist user interface is not updated automatically.
-
While copying a 2D Patch, to make it work in the interactive mode, it is necessary to save the scene first.
-
If the texture coordinates on the control points are getting outside the [0,1] range artifacts may show. Be aware to keep it within the [0,1] range.