
Viz Artist
Version 3.10 | Published May 03, 2018 ©
Media Asset Workflow
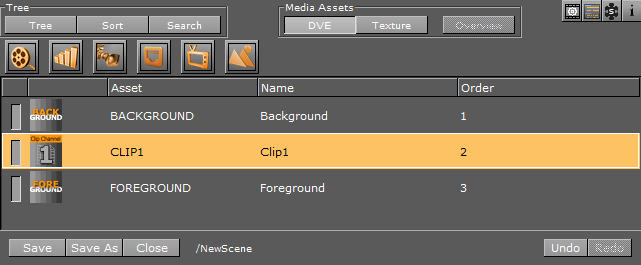
Media Assets can be added to a Scene as DVE or Texture through the Media Assets manager.
This section contains the following topics:
Media Assets as DVE
Important: Hardware surfaces in Viz Engine, such as a Live Video Media Asset or Clip Channel Media Asset, are rendered with the video hardware. Software based DVEs, such as Image Channels and GFX Channels, are rendered with the Graphics card, and then composited on the video hardware as one surface. The software renderer ensures the correct ordering within this surface, but as there is only one final surface, multiple hardware-based surfaces and software-based surfaces cannot be blended interchangeably.
As DVEs are composited on the video hardware, the graphics can be placed either in the front or in the back of the DVE layer. The main layer in Viz Artist defines this behavior. If the same scene is set into the background layer, this means the DVE effect is always drawn in the back of graphics.
To add a Media Asset as DVE it must be placed into the Media Asset Manager in the Scene Tree panel.
Tip: If a Scene is dragged to the Media Asset Manager, a GFX Channel Media Asset is automatically added as DVE.
This section contains the following topics:
To Add a Media Asset as DVE
-
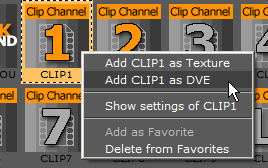
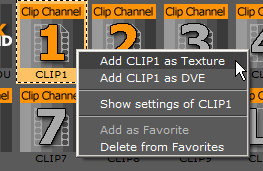
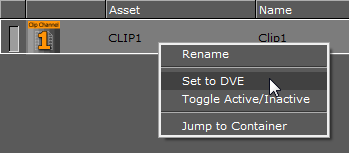
Right click on a Media Asset, and select Add <Media Asset> as DVE.
-
The DVE button in the Media Asset manager is automatically selected
-
The selected Media Asset is added to the DVE view
Or:
-
-
With DVE view selected, drag the Media Asset to the DVE panel
-
The selected Media Asset is added to the DVE view
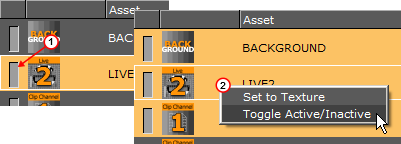
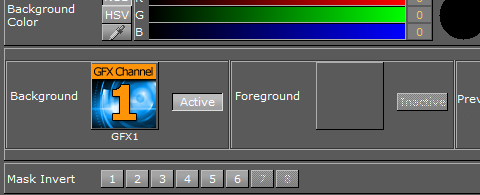
Tip: A Media Asset can be set to active or inactive. Toggle the active/inactive button (1) or use the Media Asset context menu. If Media Assets are multi selected use the context menu to set active or inactive (2).

Tip: Click on the Media Asset, to open its properties panel.
Tip: Click the
 icon (top right of the Scene Tree panel) to view Media Asset properties at any time.
-
To Set a DVE Media Asset to Texture
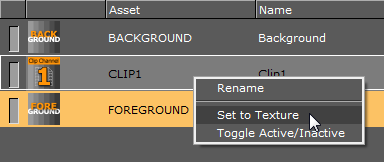
At any time, right click on the Media Asset to set it to Texture. The selected Media Asset will then be set as a texture and will show the in the Media Asset Manager Texture panel.
Tip: Media Assets can also be multi selected and set to Texture.
Order DVE Media Assets
Each Media Asset, added as DVE, can be sorted in a render order, as required.
Note: If the Video Input Layer Targets and Priority settings are made Active in Scene Default Values, each active Media Asset will be added to either the DVE or Texture section of the Media Asset Manager. They will be set in order of priority as set in Scene Default Values (see Viz Configuration in the Viz Engine Administrator Guide).
The Background and Foreground Media Assets are, by default, added as DVE layers. The Background Media Asset is always the first Media Asset to be rendered. The Foreground Media Asset can be ordered the same as other Media Assets.
To sort a render order, drag a Media Asset to a new position.
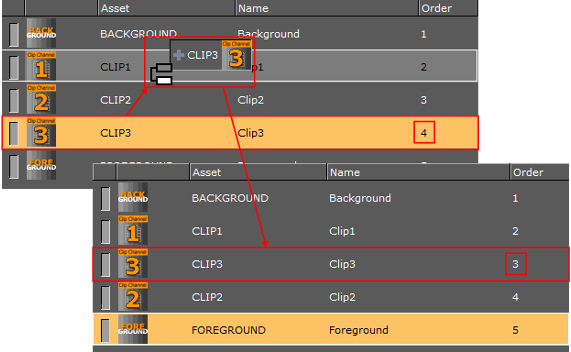
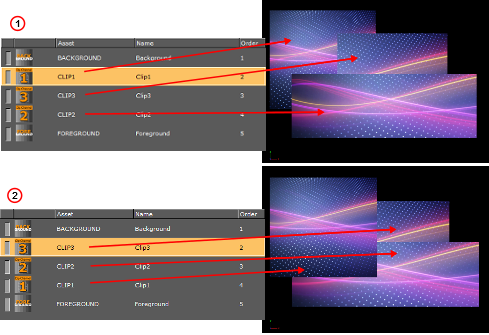
The order of each DVE Media Asset determine the order each Media Asset is rendered. The first Media Asset in the list is rendered first, the second is rendered next, and so on. See the image below:
Example 1: the Clip order is 1, 2 and 3. So Clip 1 is rendered first and Clip 3 is rendered last
Example 2: the Clip order is 3, 2 and 1. So Clip 3 is rendered first and Clip 1 is rendered last.
Media Assets as Texture
To add a Media Asset as a Texture it must be placed into the Media Asset Manager in the Scene Tree.
Tip: If a Scene is dragged to the Media Asset Manager a GFX Channel Media Asset is automatically added as a Texture.
This section contains the following topics:
To Add a Media Asset as Texture
-
Right click on a Media Asset, and select Add <Media Asset> as Texture:
-
The Texture button in the Media Asset manager is automatically selected
-
The selected Media Asset is added to the Scene Tree and a new Container is created (click Tree to view)
Or:
-
-
Drag the Media Asset to a Container or the Scene Tree:
-
If a Media Asset is dragged to a Container in the Scene Tree, or it is dragged to the Scene Tree (which creates a Container), then the Media Asset is automatically created as a Media Asset Texture
Or:
-
-
Drag the Media Asset to the Media Asset Manager:
-
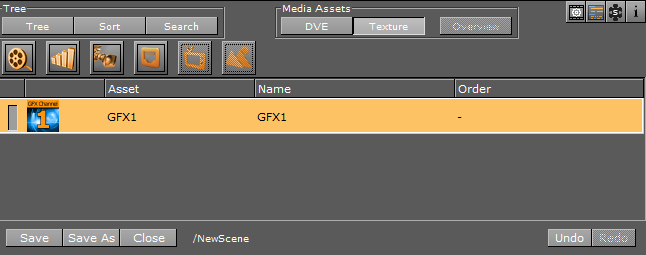
With Texture selected in the Media Asset Manager, drag the Media Asset to the Texture panel
-
If a Media Asset is dragged directly to the Media Asset Manager, a Container is not created automatically. To use the Media Asset in a Scene make sure that the same Media Asset is added to a Container in the Scene Tree
Or:
-
-
Drag a Media Asset to the Background or Foreground drop zone in Global Settings.
-
If a Media Asset is dragged to the Background or Foreground drop zones it is applied in the Scene as a full screen texture
Tip: A Media Asset can be set to active or inactive. Toggle the active/inactive button (1) or use the Media Asset context menu. If Media Assets are multi selected, use the context menu to set active or inactive (2).
Tip: Click on a Media Asset in the Media Asset Manager to open its properties panel.
Tip: <Right-click> the Media Asset icon in a Container. Select Show settings of <Media Asset>.
Tip: Click the
icon (top right in the Scene Tree panel) to view Media Asset properties at any time.
-
To Set a Texture Media to DVE
At any time, right click on the Media Asset to set it to DVE. The selected Media Asset will then be set to DVE and will show the Media Asset Manager DVE panel.
Tip: Media Assets can also be multi selected and set as DVE.
To View the Media Asset Container
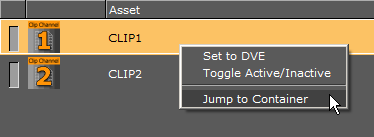
At any time, right click on the Media Asset and select Jump to Container to view the first Container in the Scene Tree, which holds the selected Media Asset (if a Container was created for the Media Asset).
Order Texture Media Assets
Each Media Asset, added as Texture, will be ordered only by its addition to a Container in the Scene Tree.
If the Video Input Layer Targets and Priority settings are made active in the Scene Default Values, each active Media Asset will be added either the DVE or Texture view of the Scene Tree. Set in order of priority as set in Scene Default Values (see Viz Configuration in the Viz Engine Administrator Guide).
A Texture added to the Texture view is not added to a Container. To use a Media Asset as a Texture it must be also added to a container as well.
See Also
Media Assets as a Background or Foreground
This section details how to add a Media Asset as a background or foreground in a Scene. A Scene can be shown through a Foreground Media Assets with alpha.
To Add a Media Asset as a Background or Foreground
-
Click Scene Settings -> Global Settings.
-
Drag a Media Asset to the Background or Foreground drop zone.
-
The Media Asset is added to the Media Asset Manager as a Texture
-
-
Click on the Media Asset in the Media Asset Manager.

-
In the Media Asset properties panel configure the Media Asset as required.