
Viz Artist
Version 3.10 | Published May 03, 2018 ©
SoftClip
![]()
The SoftClip is used for playing video clips projected on a texture, and supports AVI files only. This format supports RGB and RGBA (alpha channel).
In its simplest form, the SoftClip plug-in can exist on an empty container to play back a video clip in Viz Artist/Engine. Other plug-ins can be mixed with SoftClip to obtain different results. For example you can apply a SoftClip plug-in to a Sphere and add a Material to affect the overall shape, color and shading of the video clip.
With SoftClip you are able to control the video clip within the stage, unlike with the Live Video Media Asset method. The video clip size can also be whatever you decide, however, it is recommended that you keep the dimensions in multiples of 8 (e.g. 128x128 or 256x512) for performance purposes.
Use of the SoftClip plug-in might have an affect on performance and quality, hence, it is recommended to use the Performance Editor when working with the SoftClip plug-in.
IMPORTANT! Viz Engine keeps all designer, operator and automation loaded scenes and plug-ins in memory. As a consequence, if 30 different templates that load 30 different scenes are loaded, that each has a single SoftClip plug-in on it, Viz Engine will have thirty SoftClip plug-ins with 30 threads activated in memory. If every plug-in has specified that it should have 10 preloaded frames, then Viz Engine will have 300 uncompressed decoded frames preloaded in memory. This can take a substantial amount of memory, and the combination of having that much data loaded and that many threads running is likely to affect performance. This workflow situation has to be taken into consideration when designing and testing the design. Therefore, unloading scenes and cleaning up the Viz Engine renderer, a function in many Vizrt control client programs, should be used.
Note: This plug-in is located in: Built Ins -> Container plug-ins -> Texture
This section contains information on the following topics:
SoftClip Properties
-
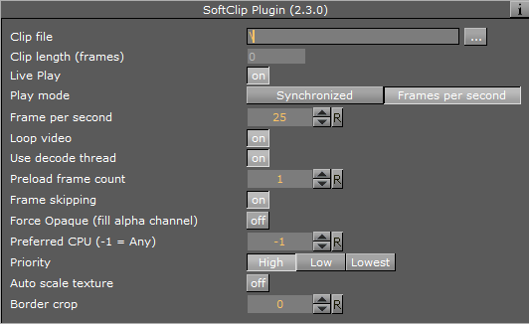
Clip file: Use this function to browse for the clip to be played out.
Note: It is important that all video clips are stored locally on the D: drive of the machine used to play out the graphics. Remember to save the clip locally on the client machines with preview (e.g. Viz Trio) and use the same D: drive so that the clip can be seen in preview.
-
Clip length (frames): Shows the number of frames for the clip
-
Live Play: Make sure that the clip will be played and synchronized to the frame rate of the Viz Engine. This is set in Viz Configuration / Output Format options (described in the section Configuring Viz of the Viz Engine Administrator’s Guide). Disable the Live Play to allow the clip playback to be Key Frame animated.
-
Play mode:
-
Synchronized: The clip will run synchronized with the scene playback. This is set in the Viz Configuration/Output Format options, described in the section Configuring Viz of the Viz Engine Administrator’s Guide.
-
Frames per second: Adjust for different speeds, set in the next parameter
-
-
Frame number: Enables the frame numbers to be manually animated. This is an alternative to playing the whole clip (available when Live Play is set to Off)
-
Frames per second: Set the frame rate (available when Play mode is Frames per second.
Note: There is no frame interpolation done when you change the frame rate from the default specified.
-
Loop Video: Enabling this option means the video will loop automatically.
-
Use decode thread: Enable to split the processing of the clip evenly between the machine’s processors. It is recommended to have this on (default). On multi-processor machines this will gain performance, but threading makes scheduling less predictable and may cause the Viz Engine frame rate to be less stable on a single CPU machine.
Tip: If Priority is set to High, for best results set Use Decode Thread to off.
-
Preload frame count: Works as a buffer to enable smoother playback of the clip. If using Live Play, the Preload frame count can help reducing spike-loads and avoid dropped frames
-
Frame skipping: With frame skipping enabled, Viz Engine will skip frames if it needs, to try and maintain real-time graphics playback. With frame skipping disabled the clip will play out in full, as fast as possible but will not try to maintain real-time playback. (Graphics will stagger on the output if the renderer drops out of real-time.) When using the video card’s ring buffer functionality the SoftClip frame skipping should be turned off
-
Force Opaque: When running videos where the codec leaves the alpha channel blank, the video rendering may become completely transparent. This option will fill the alpha channel, thus making the video completely opaque
-
Preferred CPU: This function enables the User to specify a particular processor to handle video play out. The recommended CPU value is based on the specifications of the running machine:
-
If it is a quad core processor the CPU value can be set to 4, but to avoid errors it is recommended to set the value to 2
-
If it is a machine with lower specifications then the recommended value is 1
-
The value -1 enables the machine operating system to select which CPU to use
-
-
Priority: Sets the priority of drawing the video to a custom level in Viz Engine giving it more or less processor priority
-
Clear before playback: Set to ON to clear the image before playback. Live Play must be set to Synchronized and the Frame number to be shown from the clip is smaller than the current frame number +1 (available when Live Play is set to Off)
-
Auto scale texture: This scales the video clip to the size of the underlying rectangle on which the video is placed in the container
-
Border crop: When using the auto scaling over, how much of the border to crop. Due to bilinear texture interpolation, you might see that color from the underlying texture is bleeding into the video texture area. Use this parameter to crop away the affected border pixels
To Use SoftClip
-
Add a group container to the Scene Tree.
-
Add the SoftClip plug-in.
-
Open the SoftClip editor.
-
Click the Browse... button to select and load a clip.
-
Loading a clip will make it visible in the Scene. By default, the SoftClip plug-in has the Live Play and Loop video settings enabled, hence, the clip will instantly start playing (and looping) in the render window.
-
-
Optional: Enable the Use decode thread option.
-
Disable the Live Play option to enable the Frame number setting.
-
Animate the Frame number setting (e.g. from frame 10 to 30).
Note: Viz Engine will not interpret between Key Frames, so if you choose to slow down an animation then the motion will not be smooth.
See Also