
Viz Artist
Version 3.10 | Published May 03, 2018 ©
Image Editor
The Image Editor makes it possible to modify Image items in the Graphic Hub database. Individual editors are also available for Materials (Material Editor) and Fontstyles (Fontstyle Editor).
The modifications that can be done in the Image editor are similar to the ones in other image editing software.
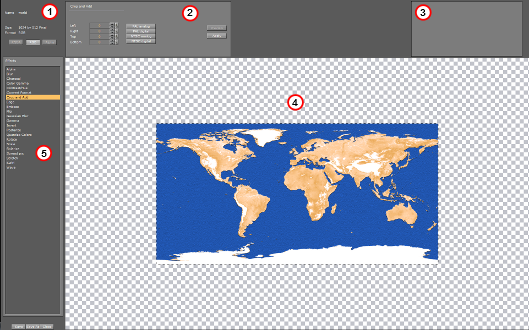
The Image Editor consists of:
-
Image General Information (1)
-
Effect Modifications (2)
-
Effect Preview (3)
-
Main Image Area (4)
-
Effects (5)
Double-click the image in the Server Panel to open the image in the Image editor. If the image is referenced in a Scene, a dialog box will show to confirm the action or not.
Note: Items that are opened in an editor, are locked in the database.
This section contains information on the following topics:
General Image Information
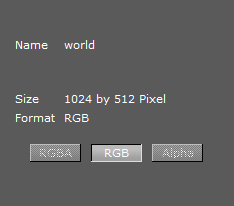
The upper left corner of the Image editor shows general information about the image:
-
Name: Shows the image name.
-
Size: Shows the image size in pixels.
-
Format: Shows the image format (RGBA, RGB, or Alpha).
Click the format buttons to view the image various formats, if available.
Note: All images are treated as RGB or alpha format. An imported image that has alpha can be viewed as either RGB or alpha. Modifications to an image are automatically applied to the RGB or alpha information.
Image Effects
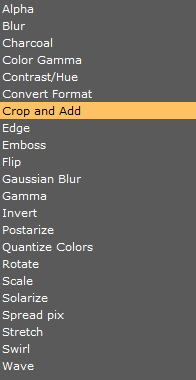
The following effects can be applied to an image. To view the effect properties and see changes made, see Apply and Preview Effects:
-
Alpha: Makes the image transparent.
Note: This option only applies for alpha format images.
-
Blur: Creates a blurred image.
-
Charcoal: Creates a posterized, smudged effect by redrawing the image. Major edges are boldly drawn, while mid tones are sketched using a diagonal stroke.
-
Radius: The smaller the radius the more details will be seen.
-
Sigma: Effects the sharpness of the image.
-
-
Color Gamma: Adjusts the color tones of the image.
-
Contrast/Hue: Adjusts the brightness, saturation, and hue settings for the image.
-
Convert Format: Changes the format of the image to one of the following:
-
RGB
-
RGBA
-
Alpha
-
Luminance
-
Luminance Alpha
Note: The current format is grayed out.
-
-
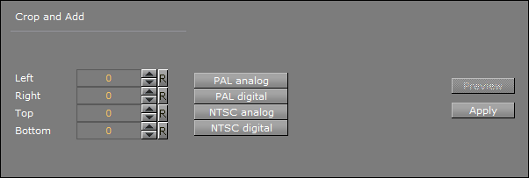
Crop and Add: The image can be cropped according to the values in the input boxes. The values can be entered manually, or the standard TV format buttons can be used.
-
Left: Crops the image the specified number of pixels from the left side of the image border.
-
Right: Crops the image the specified number of pixels from the right side of the image border.
-
Top: Crops the image the specified number of pixels from the top of the image border.
-
Bottom: Crops the image the specified number of pixels from the bottom of the image border.
-
PAL Analog: Crops the image to a resolution of 768x576 pixels.
-
PAL Digital: Crops or adds the image to a resolution of 720x576 pixels.
-
NTSC Analog: Crops or adds the image to a resolution of 640x486 pixels.
-
NTSC Digital: Crops or adds the image to a resolution of 720x486 pixels.
-
-
Edge: The Edge filter searches for borders between different colors and detects contours of objects:
-
Radius: A low value results in black, high-contrasted image with thin edges. A high value results in thick edges with low contrast and many colors in dark areas.
-
-
Emboss: Makes the color at a given location of the filtered image correspond to the rate of color change at that location in the original image.
-
Angle: Defines the direction of the embossment.
-
Value: Defines amount of effect.
-
-
Flip:
-
Flip Vertical: Flips the image upside down. To flip it back to its original settings, click the button again.
-
Flip Horizontal: Flips the image horizontally as if seen in reverse/through a mirror. To flip it back to its original settings, click the button again.
-
-
Gaussian Blur: The visual effect of this blurring technique is a smooth blur resembling that of viewing the image through a translucent screen. It adds low frequency detail and can produce a hazy effect to the image.
-
Range: Affects the blur spread (not much visible since same effect may be achieved by configuring ‘value’ parameter).
-
Sigma: Amount of blur.
-
-
Gamma: Gamma measures the brightness of mid tone values produced by a device (often a monitor). A higher gamma value yields an overall darker image.
-
Invert: Inverts the colors of an image. When inverting an image, the brightness value of each pixel in the channels is converted to the inverse value on the 256-step color values scale.
Example: A pixel in a positive image with a value of 255 is changed to 0, and a pixel with a value of 5 to 250.
-
Postarize: Affects saturation of the image.
-
Level (%): Effect intensity. At high values, image becomes completely black and white.
-
-
Quantize Colors: Reduces the number of colors in the image.
-
Rotate: Rotates the image according to the specified number of degrees.
-
Scale: Scales the image based on either size (percent) or width/height (pixels).
-
Solarize: Blends a negative and positive image, similar to exposing a photographic print briefly to light during production.
-
Spread Pix: Creates a dissolving effect for the image pixels .
-
Stretch: Stretches the image based on either width/height in pixels or percent.
-
Swirl: Swirls the image more sharply in the center than at the edges. Specifying the degree produces a swirl pattern.
-
Wave: Creates an undulating pattern on the image, like ripples on the surface of a pond.
-
Amplitude: Defines the height of the waves.
-
Wavelength: Defines the width of the waves, the distance from one wave crest to the next.
-
Apply and Preview Effects
Various effects can be selected from the Image Effects. The selected effect can then be modified in the Effect Modification area (1) and the result viewed in the main image area, or previewed (2).

The Effect Modification area has two common buttons, which apply to most effect settings:
-
Preview: Shows a preview of the changes in the image preview area (2).
-
Apply: Applies the changes to the image.
Note: Some effect modifications apply directly to the image in the main image area.
To Apply an Effect to an Image
-
Select an effect from the Image Effects list.
-
Make modifications to the effect as required in the Effect Modification area. In most cases use the Preview area to view the effect on the image.
-
Add other effects as required.
-
Click Save or Save as...