
Viz Artist
Version 3.10 | Published May 03, 2018 ©
Geometry Editor
When adding an Geometry to a Scene, a new Container is created. Geometries that have been created with external 3D programs and imported into Viz Artist can be modified in the Geometry editor.
Note: Face Orientation and Shading are only applicable if the reference is deactivated.
This section contains information on the following topic and procedure:
Geometry Editor Properties
-
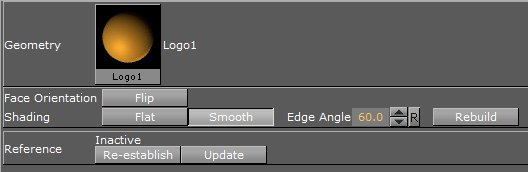
Geometry: Shows a thumbnail of the Geometry, and also its name. Click the thumbnail to select the Geometry in the database.
Note: This can only be done when the reference to the database is active.
-
Face Orientation: After importing Geometries that have been created by external 3D programs, it might happen that the polygons face orientation is wrong. By clicking the Flip button, the polygons are set correctly.
-
Shading: Imported polygon Geometries normally use shading for creating a smooth surface on the object, which is set together by a planar polygon mesh. The shading value in the Geometry editor sets a threshold between which edges are to be smoothed by shading and which are to be kept as sharp edges. All edges with an angle smaller than the defined value are smoothed by shading. Shading in Viz Artist is performed in the following way: A shade value is produced at each vertex of the polygonal mesh representing the surface of the object. This is done by creating a surface normal on each polygonal facet. The surface normal at each vertex is created by averaging the surface normals for the surrounding facets. The shade at each vertex can then be calculated. Once the shade at the vertices of the polygonal mesh are known, the shade at points interior to the polygonal facets are interpolated from the values at the vertices. This technique makes curved surfaces look “smooth shaded” even though based on a representation of planar facets. The interpolation of shade values is incorporated into the polygon scan conversion routine. Hence an increase in realism is obtained at far less performance cost than carrying out a pixel-by-pixel shading calculation over the whole original surface. Shading may be set to Flat, which means that all shading is disabled, or Smooth, which enables the Edge Angle option. After adjusting the Edge Angle, make sure to click the Rebuild button for the changes to take effect.
-
Reference: If using an imported or compound object in a Scene, there is a reference between the object in the Scene and the object in the database. If changes are applied to the object in the Scene, the object in the database including any Scenes where this object is used with an established reference, will reflect those changes, as it is the same object.
-
Deactivate: To create a unique copy of the object for the Scene, the reference link must be deactivated. Changes that are applied to a deactivated object do not lead to changes in the original object in the database.
-
Re-establish: Reactivates the reference and overwrites the object in the Scene with the object in the database. An active reference is practical when creating a set of Scenes with the same object. If for instance all the Scenes should have the same background and the background item is created as an object with active references, changes can easily be applied to all the Scenes that use that object.
-
Update: Reactivates the reference and overwrites the object in the database with the object in the Scene.
-
Status: Shows the current status of the reference.
Note: The reference is automatically deactivated if splitting the object. If the object is split, it must first be merged before the Re-establish and Update operations can be performed.
-
To Open the Geometry Editor
-
Click the icon representing the geometry either on the Container or in the Properties editor.