
Viz Artist
Version 3.10 | Published May 03, 2018 ©
Transfer Clips From Viz One
This section details how to transfer and download video clips from a configured Viz One.
To transfer and download a video clip from Viz One, Viz One must be integrated and configured with Viz Artist/Engine, see Viz One and Authentication in section Configuring Viz of the Viz Engine Administrator’s Guide. Further references are available in the Viz One Administrator's Guide.
To Transfer Viz One Clips
-
Do the procedure To Play a Video Clip as Texture or To Play a Video Clip as DVE. When, in the procedure, a video clip is to be added click
 .
. -
In the Viz One Uri drop down box, select a Viz One to import from.
-
Enter a search parameter (Viz One files are not shown until an entry is made).
-
Locate the required file. A preview of the clip is shown in the browser window.
-
Click Transfer. The video clip is transferred from Viz One and downloaded to the local video clip library (see Hard Drive Video Clips).
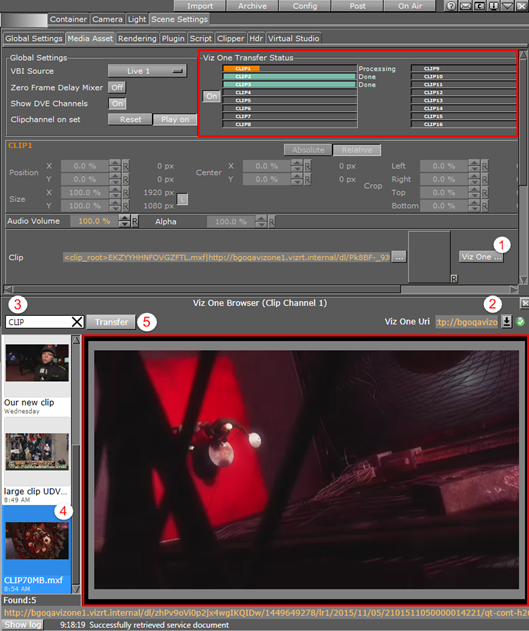
During transfer, the Transfer button (5) in the Viz One Browser will be inactive. To add several clips from Viz One simultaneously, add more Clip Channels. When correctly configured, the traffic light icon to the right of the drop-down menu will be green (2). If the Viz One integration has been incorrectly configured, the tool-tip for the traffic light icon will display a problem description.
When set to On, the transfer status for each clip channel will show as a progress bar in the Viz One Transfer Status pane. This pane’s visibility depends on the Mediaftp (File Transfer) and Fsmon (File System Monitor) services being installed and running, and that the Viz One (MessageQueue Server) is correctly configured. Please refer to the Viz Engine Administrator’s Guide for detailed information on how to configure and install these services.