
Viz Artist
Version 3.10 | Published May 03, 2018 ©
Key Frames
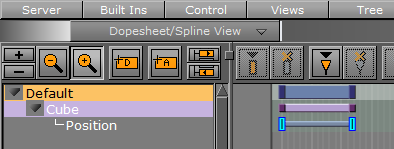
A Key Frame stores information about a property at a given time. Key Frames can be added to Channels and Action channels. If two Key Frames next to each other hold different values, the Key Frames are connected with a bar in the Dopesheet Editor.
When selecting a Key Frame in the Dopesheet editor or the Spline Editor, the corresponding Key Frame in the other editor will be selected too. Working with Key Frames in the Dopesheet enables the Key Frame Editors.
Example: The position of a cube can be at X=0 at field 0 and X=100 at field 50. In such a scenario, two Key Frames will be created, one at field 0 and one at field 50. Since the position of the cube is different in the two Key Frames, a bar is added between them, indicating that an animation takes place when the time-line moves from Key Frame A to Key Frame B:
This section contains information on the following procedures:
To Add a Key Frame
There are four ways to create a Key Frame:
-
Select the required Channel or Action Channel in the Stage Tree.
-
Set the Time-line Marker to when the Key Frame should be added.
-
Click
 (Add Key Frame).
Or:
-
Select the required Channel or Action Channel in the Stage Tree.
-
Set the Time-line Marker to when the Key Frame should be added.
-
Set the Key Frame:
-
Click
 in the Time-line Editor, or
 -
With the mouse pointer over the Scene Editor, press <Enter>.
Or:
-
-
Select the required Channel or Action Channel in the Stage Tree.
-
Set the Time-line Marker to when the Key Frame should be added.
-
In the Spline Editor, make sure to hold the pointer above the spline at the required time-line location (the spline should turn orange if doing this correctly).
-
Click the spline.
To Select One or More Key Frames
-
Click on a Key Frame to select it. This will clear the selection of any previously selected Key Frames.
-
Ctrl-Click on a previously selected Key Frame to clear the selection of it.
-
Ctrl-Click on Key Frames to have more than one selected.
-
Shift-Click on a segment between two Key Frames to select both.
-
Ctrl-Click on a segment to select all Key Frames.
Note: When several Key Frames are selected, actions like move or delete will affect all selected Key Frames.
To Move One or More Key Frames
-
Select one or more Key Frames.
Tip: You can also hold down the <S> key and use the rubber band to select multiple Key Frames.
-
Drag the Key Frames along the time-line in the Dopesheet Editor.
Or:
-
Select one or more Key Frames.
-
Drag the Key Frames along the time-line (horizontally) in the Spline Editor.
Note: Dragging a Key Frame vertically in the Spline Editor will change the value of the Key Frame, not the time-line value.
To Move a Key Frame to a Specific Time
-
Enable the Key Frame Editors.
-
Select a Key Frame.
-
In the Key Frame editor, enter the time (in fields) in the Time input box.
To Copy a Key Frame
-
Select one or more Key Frames.
-
Press <C> while dragging the Key Frames to the new position in the Dopesheet Editor.
To Rename a Key Frame
-
Enable the Key Frame Editors.
-
Select a Key Frame.
-
In the Key Frame editor, enter a descriptive Key Frame name in the Name text box, and press <Enter>.
Note: Special characters, such as space, are not allowed in Key Frame names.
To Delete a Key Frame
-
Select one or more Key Frames.
-
Click the
 (Delete Key Frame) button.
Or:
-
Select one or more Key Frames.
-
Press <Delete>.
Reverse the Order of Selected Key Frames
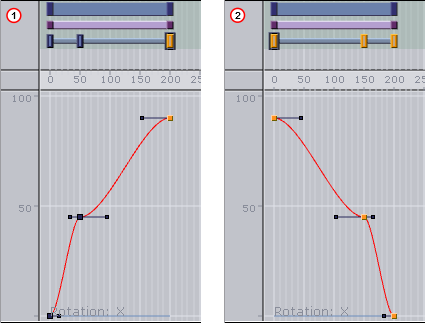
Reversing the order of Key Frames is like mirroring the Key Frames.
Example: Image 1 (below) illustrates a rotation animation, with Key Frames placed at fields 0, 50, and 200. The rotation value at field 0 is X=0, at field 50 X=45, and at field 200 X=90. After the Key Frames have been rotated, image 2 illustrates the animation with Key Frames placed at fields 0, 150, and 200. The rotation value at field 0 is X=90, at field 50 X=45, and at field 200 X=0.
To Reverse the Order of Key Frames
-
Select two or more Key Frames in the Dopesheet Editor.
-
While holding the mouse pointer over the Stage, Press <Ctrl+R>.