
Viz Artist
Version 3.10 | Published May 03, 2018 ©
Directors
To create an animation, there must be at least one Director in the Stage Tree. Directors are used to group a certain set of Stage items, such as Actors and Channels. It is possible to create Directors at the root level of the Stage Tree, or as Sub-Directors.
A Director can hold as many items as required, but to improve usability it is recommended to group certain items in different Directors, especially when working with complex animations. In addition to improved overview in the Stage Tree, multiple Directors make it possible to show only the animations contained within each Director. This opens the possibility to, for example, have multiple animation channels on one object, driven by multiple Directors.
Each Director can also hold controlling items such as stop points and actions that only affect the animations within the Director (see Basic Animation Functions).
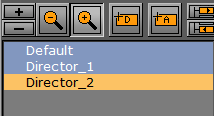
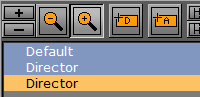
Note: The first Director created in the Stage is always called Default Director. Any subsequent Directors are called Director (rename as required).
Most actions on Actors are done when Directors. Actions affecting the time-line are performed directly in the Dopesheet Editor. Working with Directors in the Dopesheet editor enables the Director Editor.
This section contains information on the following topics:
Directors in the Stage Tree
Directors are shown in the Stage Tree with a gray blue background color.
To Create a Director
Note: The first Director created in the Stage is always called Default Director. Any subsequent Directors are called Director (rename as required).
-
Click the
 (Add Director) button
 Note: The new Director is added under the currently selected Director. If no Director is selected then its added at the end of the director tree.
Or
-
Drag the
(Add Director) icon to the Stage Tree:
Directors that are dragged to the Stage Tree can be positioned in various ways, and create either root or Sub-Directors.
-
 Sub-Director: Drop the
icon at the right side of a Director to create a Sub-Director
Sub-Director: Drop the
icon at the right side of a Director to create a Sub-Director -
 Root Director Below/Above: Drop the
icon at the left side of a Director to create a root Director at the same hierarchy level, either below or above the selected Director
Root Director Below/Above: Drop the
icon at the left side of a Director to create a root Director at the same hierarchy level, either below or above the selected Director
To Move a Director
-
Drag one or more Directors to a different place in the Stage Tree hierarchy
To Copy a Director
-
Press <Ctrl> and drag one or more Directors to a different place in the Stage Tree hierarchy
To Rename a Director
Note: Special characters, such as space, are not allowed in Director names.
-
Right-click a Director.
-
In the context menu, select Rename.
-
Type a new name.
-
Press <Enter>.
Or:
-
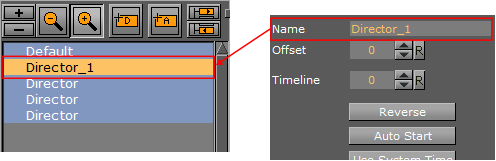
Select the required Director in the Stage Tree.
-
Open the Director Editor.
-
Type a descriptive name in the Name text box.
-
Press <Enter>.
To Delete a Director
-
Right-click a Director in the Stage Tree.
-
In the context menu, select Delete Director.
Or:
-
Drag the Director, or multiple Directors, to the trash can
Or:
-
Select a Director, or multiple Directors, and press <Delete>
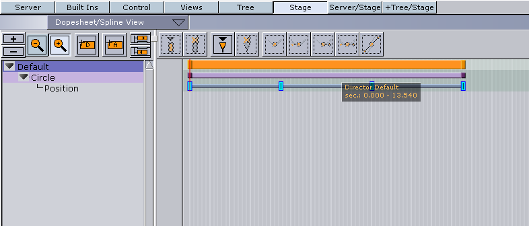
Directors in the Dopesheet Editor
Directors are shown in the Dopesheet Editor with a gray-blue color.
To Mark a Region Within a Director
-
In the Dopesheet Editor, press <T+Click> to create a start point in a Director.
-
Press <T+Click> again to create an end point in the Director.
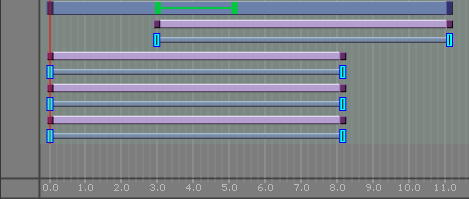
Drag the green start and end points to lengthen or shorten the selected region. In the Director only the Key Frames inside this region are affected.
To Move a Director in the Time-line
-
Click on the Director and drag to a different time.
To Speed Up or Slow Down a Director
-
Click on the start or the end of the Director.
-
Drag the start or end point to change the Director speed:
-
Speed up: Lengthen the Director
-
Slow Down: Shorten the Director.
-
Events in a Director
Events can be added to a Director to add control to an animation. Events that can be added to the Director are:
-
Stop: Stops the animation until continue animation is clicked. A Stop applies for the Director and all Sub-Directors
-
Tag: Shows a position along the time-line. This Event type does not stop the animation
-
Local Stop: Stops the animation until continue animation is clicked. A local stop only applies for the Director it is placed on, not its Sub-Directors.
-
Pause: Stops the animation for a specified amount of frames.
-
Next Scene: Mark a position where a Scene ends. The next Scene will start automatically.
Note: Viz Weather has an automatic play list option where the user does not need to start the next Scene. The Next Scene tag starts the next Scene automatically when the current Scene reaches the Next Scene Tag.
To Create a New Event
-
Click on a Director in the Stage Tree.
-
Set the Time-line Marker to the point where the new Event is to be added.
-
Add an Event:
-
Click the
 (Add Stop/Tag) button, or
 -
Press <S> and click in a Director where the new Event is to be added.
Note: The default new Event is a Stop Event.
-
-
If required, change the Event type.
To Change an Event Type
-
Enable the Event Editor in the Stage.
-
In the Director, select the Event to be change.

-
In the Event Editor, click an Event type button in the Type area to change status.
-
If Pause is selected: In the Value box, define the number of frames that the animation should pause for, before it continues.
To Move an Event along the Time-line
-
Select one or more Events.
-
Drag the selected Events along the Director Time-line.
Note: To select more than one Event press and hold <Ctrl> and click on each required Event.
or
-
Enable the Event Editor in the Stage.
-
Select an Event in the Director.
-
Move the selected Event:
-
In the Event Editor, enter the new position (in frames) in the Time input box, or
-
Click in the Time input box and drag left or right.
Note: This moves only the last selected Event in the Director.
-
To Name an Event
-
Enable the Event Editor in the Stage.
-
Select an Event in the Director Time-line.
-
In the Event Editor, enter a descriptive name in the Name text box.
-
Press <Enter>.
Note: Special characters, such as space, are not allowed in Event names.
To Delete an Event
-
Select the Event to be deleted.
-
Click the
 (Delete Stop/Tag) button.
or
-
Select one or more Events.
-
Press <Delete>.
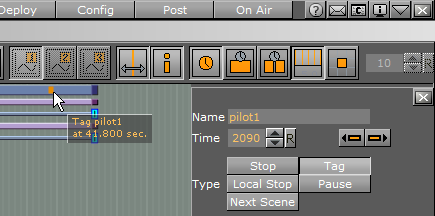
To Create a Tag (Preview Point) for External Applications
(for example Viz Trio and Viz Pilot)
-
Open the Stage
-
Select the default Director.
-
Position the Time Marker at the point where the Scene is to be previewed.
-
Click the
(Add Stop/Tag) button to add an Event. -
In the Event Editor, enter pilot1 (case sensitive) in the Name text box. The name pilot1 is the Tag name requested by control application, and is also the default preview point for an Object scene in Transition Logic-enabled scenes. For labeling more Tags, or preview points, continue with pilot2, pilot3, etc. Make sure Tag is selected in the Type area.
Note: Custom Tag Events can be used as well. However, those Tags Events are only selectable within the Viz Pilot Newsroom client.
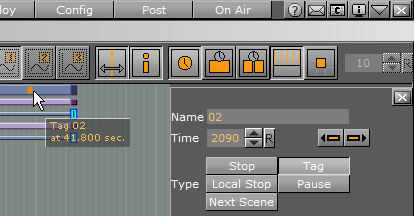
To Create a Tag (preview point) for Viz Trio
-
Open the Stage, and select the default Director.
-
Position the Time Marker at the point where the Scene is to be previewed.
-
Click the
(Add Stop/Tag) button to add an Event. -
In the Event Editor enter the Name as 01, 02, 03, etc. according to the value of the corresponding Field identifiers (01, 02, 03, etc.).
-
Setting these points will, when a tab field in Viz Trio is selected (01, 02, 03, etc.), preview the Scene in the local Viz Trio preview window.
-
Preview Callback Events
IMPORTANT! This event must only be triggered for the local preview in the External Control Application, and not for any external preview or program engines.
Viz Engine supports a script event called OnPreview upon loading a scene in an External Control Application, such as Viz Trio or Viz Pilot. This gives the designer additional capabilities for when the scene is loaded in the local preview, as it can be used to show or hide parts of the scene to make it clearer for the operator what will be shown later in the animation, or to write some instructions for the operator, while the scene should be taken on air without changes.
It may also be used to compensate for unavailable capabilities on a preview Engine. For example, if a scene plays a video in the background, which a VGA mode preview Engine cannot play, a back plate can be shown in the preview with a snapshot of the video. This will give the operator an idea of how the scene will look like when taken on air. It could also be used as an optimization, to save the local preview engine from loading large video files.
Note: Preview Callback Event support requires Viz version 3.8.1 or higher.
The OnPreview script event can be used in a scene or container script. If adding the script as a container script, make sure it is added to the same container as the Control Object plug-in. The script can also be loaded as both a scene and a container script, in which case both scripts will be invoked when the scene is loaded.
In Transition Logic scenes, the function can be placed in the scene script of the Master scene, or as a container script on the Control Object container in one or more of the Object scenes. In Transition Logic scenes, the scene script of the Master scene, and the container script on the root Control Object container of all Object scenes, is invoked.
A simple OnPreview script event handler could be like:
sub OnPreview(doPreview as Integer)
if doPreview then
println("4015 Container OnPreview")
end if
end sub
See Also