
Viz Artist
Version 3.10 | Published May 03, 2018 ©
Ncam AR Plugin for Unreal Editor 4
The Viz Engine integration with Ncam's AR plugin (NcamAR) for Epic's Unreal Editor 4 (UE4) provides an interface between the Viz Engine and UE4. This integration lets you combine the photo realistic rendering capabilities of UE4 with the seamless functionality of template-based graphics provided Vizrt. Here you find information on the technical aspects of installation and configuration, as well as instructions for end users:
Requirements
The following are the minimum requirements to use the Viz Engine integration with NcamAR plugin for UE4:
System Requirements
-
HP Z440 or HP Z840.
Hardware Requirements
-
Matrox X.mio3, DSX LE4 or X.mio3 IP video board.
-
Nvidia Quadro M4000.
Software Requirements
-
Windows 10 64-bit.
-
Viz Artist 64-bit Video version.
-
Epic Games Launcher (to install the Unreal Engine).
-
NcamAR UE4 plugin.
Refer to the following version compatibility table for an overview of supported versions of the different software components:
|
Viz Artist |
Unreal Engine 4 |
NcamAR |
|
3.9.0 |
4.16.1, 4.16.2, 4.16.3 |
2.0.0 |
Additional Licenses
-
NcamAR license
Installation
The NcamAR UE4 integration requires that Viz Artist and Engine is installed as platform type Video (see the Viz Engine Administrator’s Guide ) . For instructions on how to install the NcamAR UE4 plugin and Epic’s Unreal Engine 4, refer to the "NcamAR UE4/Vizrt Plugin Reference Manual" provided with the NcamAR installation package.
Configuration
These are the necessary configuration settings to activate the NcamAR UE4 integration in Viz Artist:
-
Configure the render options:
-
In Viz Configuration, select Render Options.
-
Activate the auxiliary rendering pipeline by setting Aux Rendering to Active.
-
Set Aux Camera to the camera number which is used to control the Camera Actor in UE4.
-
Set Render Scale to 1.2.
-
-
Activate the video input:
-
Go to the Video Input section .
-
Activate a Live, Clip or Stream input and set it to the same video format as the configured output format of the Viz Engine.
-
Use Cases
This section provides an overview of the supported use cases and their work flows. In addition, it outlines the scene set up and operation in Viz Artist.
Basic Workflow
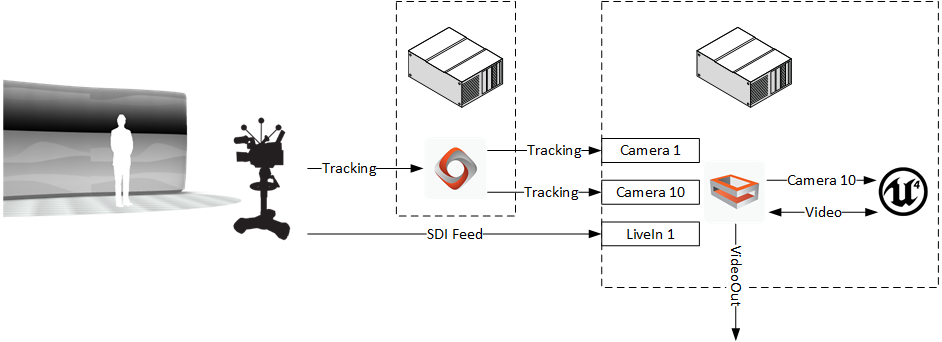
The following provides a simplified overview of the software and hardware components, as well as the signal flows in a typical setup for the Viz Engine integration with NcamAR.
On a typical setup, both render engines, Viz Engine and UE4, run at the same time and on the same machine, which is connected to a camera tracking system trough Vizrt's Tracking Hub. The image below illustrates the signal flow of the camera tracking data and video signal through the system.
-
The Tracking Hub receives the tracking data of a camera from a tracking system. Usually the incoming tracking data is mapped to two Viz Engine cameras inside the Tracking Hub, where one camera controls the rendering camera inside the Viz Engine (Viz-Camera) and the other the Camera Actor inside UE4 (Aux-Camera). This allows the user to adjust the delay between the two rendering engines using the Tracking Hub.
-
The Viz Engine receives a video signal from a camera over SDI as well as the tracking data of the Viz-Camera and Aux-Camera.The Viz Engine then applies the tracking data of the Viz-Camera to its internal rendering camera. Afterwards the Viz Engine forwards the video signal and the tracking data of the Aux-Camera to the NcamAR plugin inside UE4.
-
The NcamAR plugin uses the supplied tracking data to render a matching viewpoint of the scene in UE4. Next the UE4 renders the UE4-Gfx layer and overlays it onto (AR use case) or behind (VS use case) the video.
-
The NcamAR plugin sends the composed video signal (Video + UE4-Gfx) back to the Viz Engine, where additional graphic layers can be rendered on top of the received signal.
-
The Viz Engine sends the final rendering result to its SDI output.
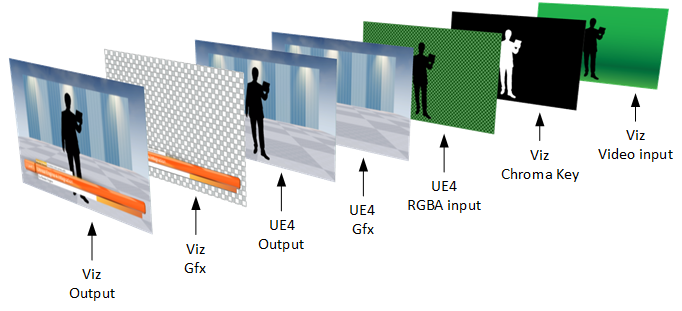
Augmented Reality (AR)
The AR use case adds an additional compositing layer to the scene that is loaded in the main layer of Viz Artist. This additional layer is referred to as the UE4-Gfx layer, and is overlaid onto the media asset that is set as scene background of the main layer scene in Viz Artist.
The image below illustrates the compositing steps and layers of the AR use case:
-
Viz Engine supplies a RGBA image of the video input with a full-screen key to the NcamAR plugin.
-
UE4 renders and overlays the UE4-Gfx layer onto the video image.
-
Viz Engine renders additional graphics and overlays them onto the UE4 output.
Virtual Studio (VS)
The VS use case adds an additional compositing layer to the scene that is loaded in the main layer of Viz Artist. This additional layer is referred to as the UE4-Gfx layer, and is placed behind the media asset that is set as scene foreground of the main layer scene in Viz Artist.
The image below illustrates the compositing steps and layers of the VS use case:
-
Viz Engine generates the key/alpha channel for the video input by using its internal chroma keyer.
-
Viz Engine supplies a fill and key RGBA image of the video input to the NcamAR plugin.
-
UE4 renders and overlays the UE4-Gfx (VS backdrop) layer behind the video image.
-
Viz Engine renders additional graphics and overlays them onto the UE4 output.
Scene Setup in Viz Artist
This section describes the scene setup in Viz Artist for the AR- and VS use cases.
AR Scene Setup
This section describes the scene setup in Viz Artist for the AR use case:
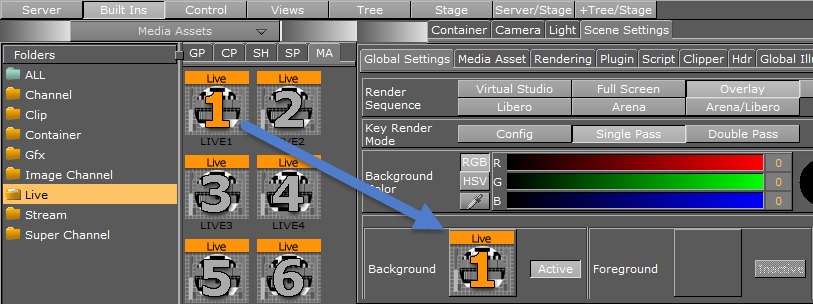
Set a video input as scene background:
-
Go to Built Ins-> Media Assets .
-
Select the Live, Clip or Stream folder.
-
In the Properties pane, go to Scene Settings-> Global Settings .
-
Select a Media Asset and drag it onto the Background Image drop-zone.
VS Scene Setup
This section describes the scene setup in Viz Artist for the VS use case:
-
Set a video input as scene background.
-
Go to Built Ins-> Media Assets .
-
Select the Live, Clip or Stream folder.
-
In the Properties pane, go to Scene Settings-> Global Settings .
-
Select a Media Asset and drag it onto the Foreground Image drop-zone.
-
-
Enable chroma keying of the video input:
-
Click on the Media Asset in the Media Asset Manager. This opens the Media Asset tab in the Scene Settings pane.
-
In the Keying Mode row, click the Chroma button.
-
Set the chroma keying configuration as described in the Viz Artist User's Guide.
-
Camera Control
This section contains information on how to setup the camera control in Viz Artist for setups that are connected to a camera tracking system, as well as information on how to use the NcamAR integration without a camera tracking system.
Camera Controlled by a Camera Tracking System
Enable remote control of the Viz-Camera and Aux-Camera:
-
Click Views and select the Camera tab.
-
Set the Control mode of the Viz-Camera (Camera 1) and the Aux-Camera (Camera 10) to Remote.
-
Set Distortion Mode for both cameras to Internal.
-
Set Parameter Mode for both cameras to Lensfile.
-
Set the Viz-Camera (Camera 1) as active camera.
![]()
Camera Controlled by Viz Artist
Enable internal control of the Aux-Camera.
-
Click Views and select the Camera tab.
-
Set the Control mode of the Aux-Camera (Camera 10) to Editor.
-
Set Distortion Mode of the Aux-Camera (Camera 10) to Inactive.
-
Set the Aux-Camera (Camera 10) as active camera.