
Viz Artist
Version 3.10 | Published May 03, 2018 ©
Snapshot
A snapshot can be taken of the current content in the Scene Editor.
When clicking the Snap button, the Server Panel will automatically be selected from the main menu, and the database content will show. The image will be placed in the folder/project that was last visited.
This section also contains information on the following procedure:
To Take a Snapshot
-
Snapshot RGB or RGBA:
-
RGB: Click the Snap button
-
RGBA: Press Shift (or Alt) and click the Snap button.
-
-
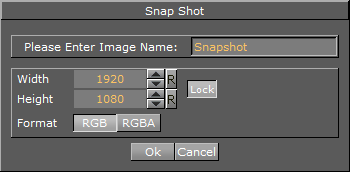
In the Snapshot dialog box that shows, enter the name, size, and format for the image.
-
Click Ok to save the image to the database.
Note: An RGBA image will use the key information as alpha.
Note: To save the image in another folder/project: first select the destination you want to use, then click the Snap button again.
Taking snapshot from a running video is allowed.
The procedure above is interactive. If required, you can alternatively instruct Viz to take a snapshot using the commands below. The examples below, calling renderer directly, assumes the Engine is in On-Air mode:
RENDERER*VIDEO*SNAPSHOT CREATE file:///c:/images/snapshot.png RENDERER*VIDEO*SNAPSHOT CREATE vizgh:///my/images/snapshot RENDERER*VIDEO*SNAPSHOT CREATE vizgh:///{159FC7E7-B724-4CC3-B474B7EE46CDA043}/snapshot-
Example 1 writes a PNG image to disk. The PNG file format is particularly useful when working with RGBA images or 4-channel data in general.
-
Example 2 saves the snapshot to the graphics-hub (GH) using a path.
-
Example 3 saves the snapshot to the GH using a GH Id (unique identifier).
See Also