
Viz Artist
Version 3.10 | Published May 03, 2018 ©
Advanced Animation Functions
This section details the creation of a Scene with the more advanced animation features in Viz Artist. As the basis, take the Scene created in Create a Basic Animation and improved on in Create an Advanced Animation.
This section contains the following topics:
Animating Channels
Repeat Animation Channels (Loop)
The loop operation makes it possible to repeat the animation of a channel either at the beginning or end of the channel time-line.

To Repeat the Animation of a Channel
-
Select a channel.
-
In the Channel Editor, enable the Loop In/Out buttons.
Note: Loop at the beginning is only available if the belonging actor has a defined offset value.
-
Define how many times the loop should run before coming to a halt. Either enter a number in the field or click the Infinite button.
When enabling loop, the looped animation shows as gray in the in the Dopesheet Editor
Repeat Animation Channels in Reverse (Swing)
The swing operation makes it possible to repeat the animation of a channel in reverse play either at the beginning or end of the channel time-line.
To Create a Swinging Animation
-
Select a channel
-
In the Channel Editor, enable the Swing In/Out buttons.
When enabling swing, the animation shows as gray in the in the Dopesheet Editor.
Combine Swing and Loop
It is possible to combine the swing and loop operations on a channel. The animation will then first be added in reverse play (swing) and then started once again from the beginning to the end (loop). This will save you a great amount of time if in need of a recurring animation, for example a bouncing ball. Animations with swings and loops show as gray in the in the Dopesheet Editor.
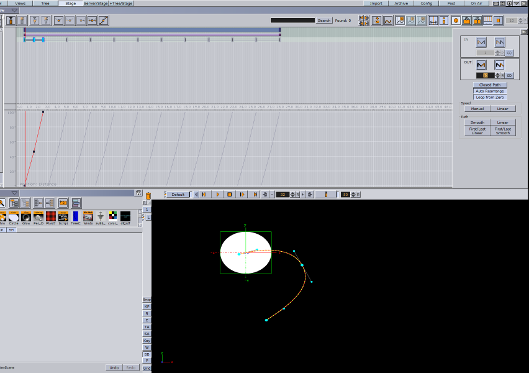
Path Control
The position animation follows a path you define by the Key Frames. A spline will be interpolated from the Key Frames. You can view and edit this spline in the Scene Editor.
To Edit the Spline in the Scene Editor
-
Enable the bounding box:
-
Click the BB button to the left of the Scene Editor, or
-
With the mouse pointer over the Scene Editor, press <B>.
-
-
In the scene tree, select the animated container.
-
Right-click in the Scene Editor and select Animation.
The path will be shown as a spline with the Key Frames marked on it.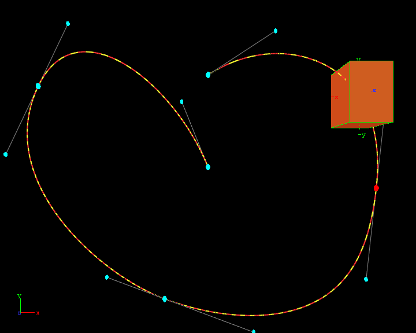
-
Drag the Key Frames around to modify the animation trajectory.
The red and yellow markings on the spline provide information about the speed the object is moving along its trajectory. One segment represents a field, the longer the segments are, the faster the object will travel.
As every Key Frame has handles (seen in blue) you can use them to modify the Key Frame’s trajectory. To do so select a handle and drag it around.
By default the handles are set to be locked and proportional. If you want to switch to a mirrored mode, press <Shift> while you drag the handle around. Pressing <Ctrl> will allow you to edit the single handle only.
An other option to set the handles is the object editor. Select the Key Frame you want to change the handles in and set either Single, Locked or Mirrored and change the values in Weight L and R.
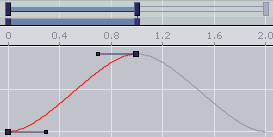
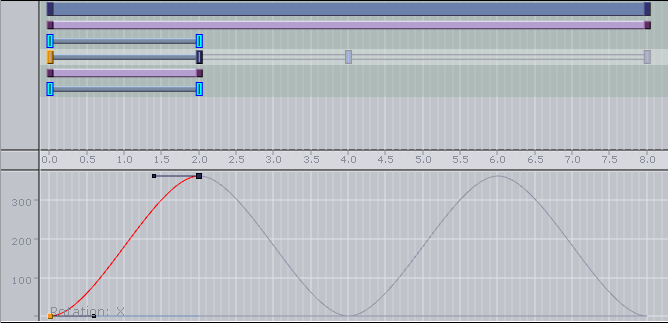
Spline Control
In the spline editor the distance spline is shown, which sets the current position of the container along the path. The y-axis in the spline editor is scaled to use the percentage of the trajectory, while the x-axis still uses the time. In the spline editor you can only change the position of a Key Frame along the time-line, but not its percentage of the total trajectory.
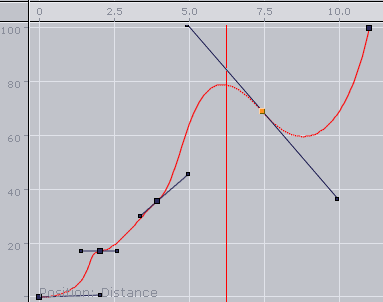
By default the handles at every Key Frame on the spline are set to be linear.
To Edit the Spline
-
Drag the handles around to change their positions.
By default the handles are set to move proportionally. So as you move the handle of a Key Frame the other one will move to. -
Press <Ctrl> while you drag a handle to modify only the selected one.
This “single handle mode” will be enabled for the Key Frame as long as you do not reset it by a click the Key Frame icons in the Stage Editor Bar.Example: If you, for example, modify the spline in such a way that the value decreases, the container will move backwards.
To Move Key Frames in the Spline
-
Select the required Key Frame and drag it.
Multiple Key Frames can be selected to move at once.
To Insert Key Frames from the Spline
-
Moving the cursor on the spline exactly where you would like to add the Key Frame.
-
Click on the required location to set the Key Frame.
To Delete a Key Frame from the Spline
-
Select the required Key Frame
-
Press <Delete> or click Delete Key Frame button in the Stage Editor Bar.
Multiple Key Frames can be selected to be deleted at once.
Animate Audio
An audio animation plays an audio clip in an animation.
To Enable Audio in an Animation
-
Apply the audio container function to a container in the Scene.
-
Add an actor for this container to the Stage Tree, if it is not present yet.
Tip: The easy way to do is to drag the container from the scene tree onto the Stage Tree.
-
Open the shortcut menu and select Audio followed and then Clip.
-
Select a Key Frame in this channel to open the object editor.
-
Switch to the Server/Stage view and drag an audio clip from the Server Panel onto the Clip drop zone in the object editor.
-
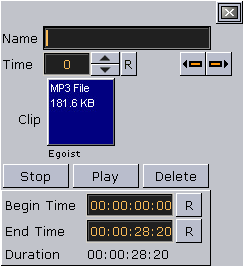
In the object editor for the Key Frames of the AudioClip channel, configure the following parameters, as necessary.
-
Name: Sets a name for the Key Frame. This name is for use only for external commands or scripts.
-
Time: Shows the time value in fields the Key Frame is placed. Editing this value will change to position of the Key Frame.
-
Clip: Drag an audio clip from the Server Panel onto this drop zone.
-
Stop: Stops playback.
-
Play: Plays the clip.
-
Delete: removes the clip.
-
Begin Time: Sets the begin time within the clip. Everything before this time will not be played in the animation. Another way to achieve this is to drag the Key Frame at the beginning of the clip.
-
End Time: Sets the end time within the clip. Everything after this time will not be played in the animation. Another way to achieve this is to drag the Key Frame at the end of the clip.
-
Duration: Shows the duration to be played.
-
Animate Cameras
You can animate cameras by adding an actor for a camera to the Stage Tree is by setting Key Frames in the Scene Editor.
To Animate a Camera
-
Set the Time-line Marker to when the Key Frame should be added to start with the animation of the camera.
-
Click the Add Key Frame button in the Stage Editor Bar.
-
Change one of the selected camera properties and set the next Key Frame. This will add an actor in the Stage Tree for the camera whose properties you have changed.
Another way to create camera animations is to enable position and/or direction tracking in the camera editor to animate the camera through a container transformation animation.
To Animate the Current Camera
-
Set a Key Frame in the current Camera channel.
-
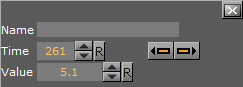
In the object editor edit the following parameters for the Key Frame as necessary.
-
Name Set a name for the Key Frame. This name is for use only for external commands or scripts.
-
Time Shows the time value in fields the Key Frame is placed. Editing this value will change to position of the Key Frame. If you click arrow buttons in the Stage Editor Bar the previous or next Key Frame will be selected.
-
Value Sets the camera you want to switch to.
The animation of the current Camera allows you to switch the camera through which to view at a given time.
-
To Create a Zoom Animation
If you click Spline button Stage Editor Bar or press <Shift+Q>, the whole spline which is currently shown will be zoomed to.
If you have selected an actor or a Director, the zoom will be adjusted to fit this entry.
When zooming the whole spline, both the time-axis for animation editor and the spline editor will be zoomed, as well as the value-axis in the spline editor.
Another way to zoom the time-axis is by pressing X to zoom in and Y or Z to zoom out. As an alternative you can use the mouse wheel.
If you press <Shift+Y> you will set the zoom along the time-axis to zoom the whole spline while <Shift+X> will set the zoom along the time-axis to show the whole animation.
In the spline editor you can zoom the value axis too. This is done by pressing A to zoom in or S to zoom out. If you press <Shift+A> you will zoom the whole spline along the value axis.
You can zoom also if you press one of the “zoom keys” and move the cursor around with the middle button pressed.
If you have changed the zoom level, you can switch back to standard zoom at any time by a click designated button in the Stage Editor Bar or if you press <Shift+W>.
As you maybe zoomed the view in such away you are no longer able to edit the spline comfortably, you can pan by moving around the cursor while the middle button is pressed.
Zooming along the time axis will zoom both the animation editor and the spline editor.
Animate Light
The only way to add an actor for a light to the Stage Tree is by setting Key Frames in the Scene Editor. To do so set the time-line value to the time you want to start with the animation of the light and set the first Key Frame. Now change one of the selected lights properties and set the next Key Frame. This will add an actor for the light which property you have changed to the Stage Tree.
An easier way the animate a light is to enable position and/or direction tracking in the light editor. To learn more about the light editor, see Light Editor .
Merging Animations
In Viz Artist, it is possible to merge container groups into one single compound object. If an animation has been defined for at least one of the containers, on merging a new Director will be created, given the name of the merged object in the scene tree. There will be a Sub-Director by the name of the original Director the animations were created in. The animations created for the single containers will be kept, but cannot be changed anymore unless you split the object into the containers it has been created from.
The animations will be kept also if you save the newly created object in the database.
Please be aware that you cannot add Sub-Directors to the Directors created automatically by merging.
Multi Select Animation
If two or more objects are selected multiple animations can be created in one step. This adds independent animations channels for each container within the selection.
-
Select the objects to be animated.
-
Create the animation, as required (see Create a Basic Animation).
An Actor is created for each selected animated object. Once the animation has been created each Actor can be edited separately.