
Viz Artist
Version 3.10 | Published May 03, 2018 ©
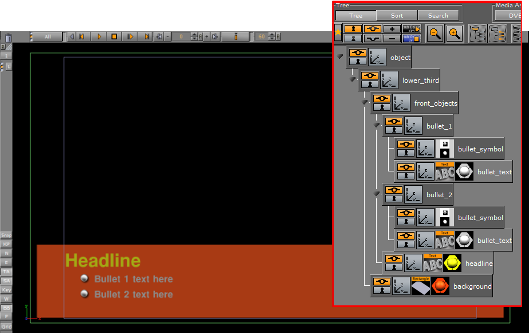
Create a Stand-alone Scene
This section details how to create a basic lower third as a stand-alone Scene. This scene can then be imported to a Viz Trio to create a template for pages which are used for playback.
IMPORTANT! When creating these transition effects also refer to the User Manuals for the required Control Applications: Viz Trio, Viz Pilot, Viz Weather, etc.
Note: For ease of use, the Scene example has been split up in several procedures. For the example to work, it is recommended to follow each procedure in the order given.
This section contains information on the following topics:
To Create a Scene
-
Add a group container to the Scene Tree.
-
Rename the group container to object.

-
Add second group container as a sub-container to the object container.
-
Name the second group container lower_third.
-
Save the new scene as stand_alone_scene (in this example).
Tip: For ease of use set the Scene Editor Title (TA) and Safe (SA) areas to ON.
To Add a Background

-
Add a Rectangle geometry as a sub-container of the lower_third container,
-
Rename it to background.
-
Position the rectangle object so that it covers the lower third of the screen:
-
Rectangle editor: Width 800 and Height 125.
-
Transformation editor: Position Y -160 and Position Z -100.
Note: Position Z: Since this item is a background item it should be a little bit behind the other objects on the Z-axis.
-
-
Add a material object to give the Rectangle a color.
To Add Text
Add a headline item and two text lines, lead by a bullet symbol.
-
Add a container as a sub-container to the lower_third container.
-
Name the container front_objects.
-
Add a Fontstyle as a sub-container of the front_objects container.
-
Name the Fontstyle container headline.
-
Open the Fontstyle text editor and:
-
Enter the word Headline in the text input field
-
Set the Horizontal orientation to Left.
-
-
Add a material to the headline container.
-
Open the transformation editor of the headline container.
-
Scale and Position the Fontstyle so that it is placed in the upper left corner of the lower third background.
-
Add a group container as a sub-container of the front_objects group.
-
Name the container bullet_1.
-
As sub-containers of bullet_1, add:
-
A Fontstyle: Name container bullet_text
-
Any Image or Object that can function as a bullet symbol: Name the container bullet_symbol
-
-
In bullet_text text editor:
-
Enter the text Bullet 1 text here
-
Set the horizontal orientation to Left.
-
-
Add a material to the bullet_text container.
-
Scale and Position the bullet_text and bullet_symbol containers.
-
Position the bullet_1 container under the Headline text.
-
Make a copy of the bullet_1 container as a sub-container of the front_objects group.
-
Rename the copy to bullet_2.
-
Adjust the Position Y of bullet_2.
-
In bullet_text text editor enter the text Bullet 2 text here
To Create an In and Out Animation
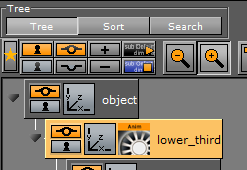
To make the whole lower third rotate in from the left side of the screen and then fade out, the lower_third container must be animated.
-
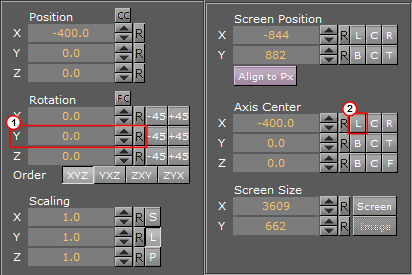
Open the Transformation Editor of the lower_third container.
-
Click the Axis Center X set left button
 (2).
(2). -
Change the Rotation Y value so the container moves out to the left side and is hidden (1).
-
Click Set Key (3).

-
Click the Rotation Y reset button
 (1) to set the Rotation value to zero.
 -
Click Set Key. An animation object should now be visible on the object container.
-
Play the animation in the Scene Editor.
-
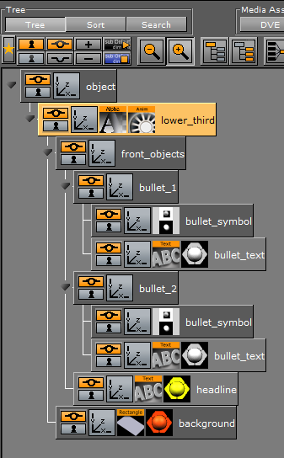
Add the Alpha plug-in to the lower_third container.
-
Built Ins -> Container plug-ins -> Global

-
-
Open the Alpha editor and:
-
Set the Alpha value to 100%.
-
Press the Set Key button.
-
Set the alpha value to 0.0%.
-
Press the Set Key button.
This has created an alpha animation in addition to the rotation animation.
-
-
Click the Stage button to see the animation channels.
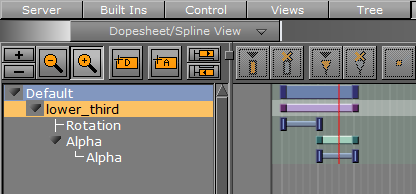
Note: It is possible to move the Key Frames to achieve a different timing. Either drag with the mouse or click on them and alter the time settings in the Key Frame Editors.
To Add Stop Tags
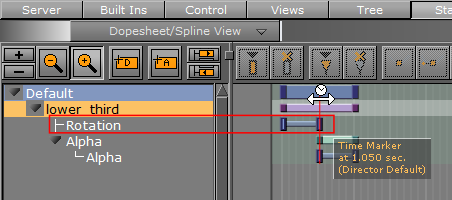
When the Scene is played out, the objects should rotate in from the left and then fade out. To stop the animation, after the rotate in, a stop point must be added before the animation can continue and fade out.
-
Move the time-line (the thin red vertical line) to the second key frame of the Rotation channel
Note: An exact spot is not needed as it can be adjusted afterwards.
-
Add a Stop keyframe to the Default Director.
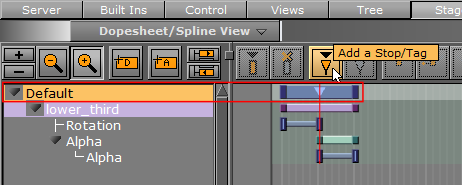
-
Drag the Stop point (or use the editor that opens when it is selected) so that it has the same time settings as the second keyframe on the Rotation channel.
-
Play the animation to check that the animation stops when the rotate in has finished.
-
Click the Continue button to continue with the Alpha fade.

To Add Key Functions to the Container
-
Add the Key plug-in to the background container.
-
Built Ins -> Container plug-ins -> Global

-
-
Click the Key plug-in icon to open its editor:
-
Set Alpha as Key only to On. This is to avoid a dirty key if the background has some level of transparency.
-
Set Render Mode to Blend.

-
-
Add a Key plug-in to the front_objects container.
-
Click the Key plug-in icon to open its editor:
-
Set Alpha as Key only to Off.
-
Set Render Mode to Add.
This is to avoid the foreground objects to cut a hole in the Key signal of the background object.
-
To Add Expose Properties
To make a Scene ready for import into Viz Trio, Control plug-ins must be added. The Control plug-ins enable the designer to expose scene properties to a Viz Trio user.
-
Add the Control Text plug-in to the headline and both bullet_text containers.
-
Built Ins -> Container plug-ins -> Control

Note: The Control Object plug-in is automatically added to the top most container in the Scene Tree, which should always be named object.

-
-
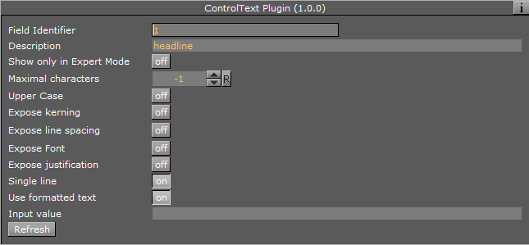
Click on a Control Text plug-in icon to open its editor:
-
Set the Field identifier. The Field identifier must be a numeric value and the value will be used to give the Viz Trio page a tab order.
-
Add a Description.
-
Repeat for the other two Control Text plug-ins.
Note: In this scene the headline container will typically get identifier 1, and the two bullet_text containers will get identifier 2 and 3.
Note: More properties can be exposed to the Viz Trio operator. If the Position, Rotation, and Scale properties are exposed the operator can hide or show an object and add material.
-
-
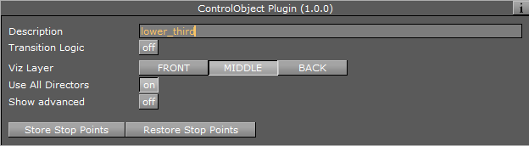
Click on the Control Object icon to open its editor.
-
Type a Description for the Viz Trio template (e.g. lower_third).
-
Add the Control Container plug-in to a container to be exposed (e.g. headline).

-
Click the Control Container plug-in icon to open its editor.
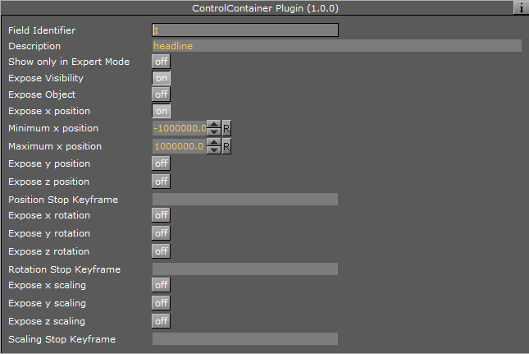
-
Type a Field Identifier.
Note: If there is another control plug-in on that container, like a Control Text or Control Image, use the same Field identifier.
-
X/Y/Z properties for a keyframe in an animation must be specified by a Stop Key Frame name.
-
To Edit Multiple items with a Single Value
-
Use the same Field Identifier for multiple control plug-ins to make two or more fields as a single item that will receive the same value.
This can, for example, be used with a bar that scales and a text label that shows its value. The scale value and the text can then be set in a single operation, which makes sure that there is no mismatch between the bar size and the written text value.