
Viz Artist
Version 3.10 | Published May 03, 2018 ©
Eclipse
![]()
This plug-in enables you to create an eclipse shape.
Note: This plug-in is located in: Built Ins -> Geom plug-ins -> Default
This section contains the following topics:
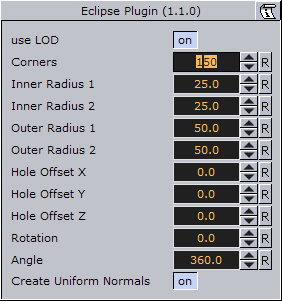
Eclipse Properties
-
Use LOD: LOD stands for “Level of Detail”. In depending of the camera <-> object distance a high or lower detailed object will be rendered with marginal quality casualties if this toggle is switched on.
-
Corners: It changes the number of triangles the object has. If you want a good quality increase the value. A value of 40 is a reasonably value.
-
Inner Radius 1 and 2: Changes the inner radius in X-Position (1) and the inner radius in Y-Position (2).
-
Outer Radius 1 and 2: Changes the outer radius in X-Position (1) and the outer radius in Y-Position (2).
-
Hole Offset X, Y and Z: Moves the inner hole to X, Y, Z-position. With this parameter you can shape great objects like a volcano.
-
Rotation: Rotates the eclipse. The result is visible if you change the angle less than 360°.
-
Angle: Change this to create a view like a cake respectively a divided circle.
-
Create Uniform Normals: It adapts the varying normals to the majority of normals in same direction.
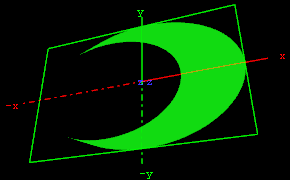
To Create an Eclipse
-
Create a new group and add the eclipse plug-in to it.
-
Add material to the group container.
-
Open the eclipse plug-in editor, and adjust the following values:
-
Set Inner Radius 1 and 2 to 40.0
-
Set Hole Offset X to 20.0
-
-
Open the group container’s transformation editor and adjust the Rotation values.