
Viz Artist
Version 3.10 | Published May 03, 2018 ©
Material Editor
The Material editor is used to create and modify materials with customized colors and Lights effects.
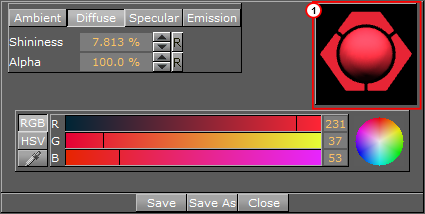
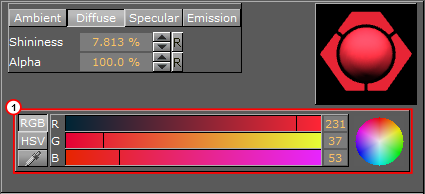
The icon in the upper right corner of the Materials Editor (1) shows the current state of the Material. The color for a lit object is shown on the sphere within the icon, while the three parts around the sphere show the plain color for an object that is not lit. For information about the various effects and types of lights that can be applied to a material, see Light Editor.
When a Material has been added to a Container, the Container-specific Material can be modified in the Material Editor that opens in the Properties Panel. Only the Container-specific Material will be modified, the original Material in the Graphic Hub database will not be affected (see Working with Material and Material Advanced Items).
This section contains information on the following topics:
To Create a New Material
-
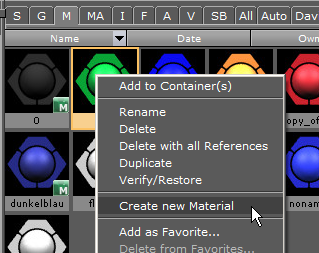
Click Server.
-
Click the M (Materials) tab.
-
Right-click and select Create new material.
-
Enter a name for the new Material
-
Click OK.
-
In the Server Panel double-click the new Material to open the Material Editor.
-
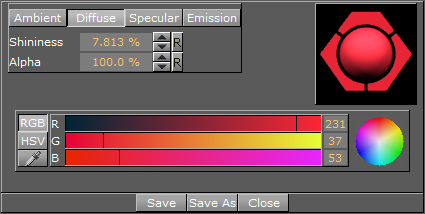
Adjust the material Color properties and Schemes as necessary.

-
Save any changes:
-
Save: Saves the material in the Graphic Hub.
-
Save As: Creates a new Material in the Graphic Hub. In the Save As dialog box that opens, type a name for the Material and select a destination folder.
-
Close: Closes the Material editor without saving the changes.
-
Material Color Properties and Schemes
This section contains information on the following topics:
Material Color Properties
-
Shininess: The shininess defines how spread out the highlighted area is. The lower the value, the more spread out the shine; the higher the value, the more focused the shine on a single point. However, if Specular is black (all values 0) then shininess does not have any visible effect.
-
Alpha: The alpha value can be set directly on a material to adjust the level of transparency.
Viz Artist uses schemes to describe the colors of a material. -
Ambient: The area which is not directly lit by any light source. Ambient light surrounds the object and the color looks the same on every side. Since the light does not come from any direction, but instead from “all” directions, the color/light spreads evenly over the object.
-
Diffuse: The object’s “core color” observed under “normal” lightening conditions. Shows the color of an object when illuminated by a directional light source. It spreads evenly over the object. Light normally has some level of diffusion.
-
Specular: Shows the color that shows when light comes from a particular direction and bounces back from the surface in a mirrored direction. The specular color is in fact the direct reflection of a directional light source. This is the typical effect of shiny metal and plastic. Specular color can be understood as a kind of shininess color.
-
Emission: Emissive color is produced by an object’s natural glow. The object itself is the light source illuminating the color. The emissive color is unaffected by any other light sources and does not produce any light for other objects in the scene.
Material Base Color
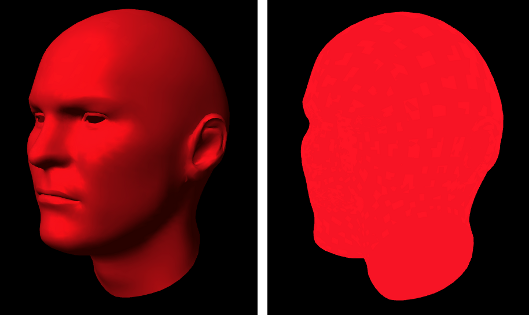
If the Material icon in the Property area (1) is disabled it causes the object’s base color to be shown. This is a color without any shading and it is not influenced by light, which means that it is visible even if there are no active light sources. Its initial color is created through a conversion of the material RGB components, but the values can be modified afterwards.
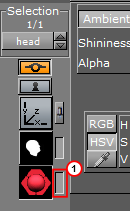
Material Enabled and Disabled
To Change a Material Color
-
In the color selection area (1) select RGB or HSV.
-
In the color selection area, click a color bar, or the color circle, and drag to change the color.
Tip: For RGB only: Right-click on the color sliders and drag to lock all three sliders, so that all values can be changed at once.
or
-
Click on the eye dropper icon in the color field.
-
Move the cursor to pick a color from anywhere on the screen.
-
Click to accept the new color.
or
-
Click a numeric input box and enter a color numeric value.
Tip: Click and hold in the input box and drag left or right to adjust the value.
Tip: Click in the input box and use the up and down arrow keys to adjust the value by a factor of 1. Press and hold the <Alt> key and use the up and down arrow keys to adjust the value by a factor of 10.