
Viz Artist
Version 3.10 | Published May 03, 2018 ©
Container Folder Media Assets
The following Media Assets are located in the Container folder of the Built Ins panel:
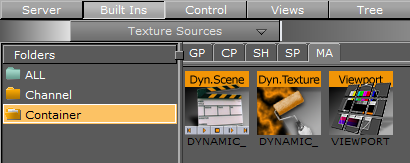
Dynamic Scene Media Asset
![]()
The Dynamic Scene is a Media Asset that is able to render a different scene, local scene or parts of a local scene into a texture and show the texture in the current scene being rendered.
Showing a different scene as ‘a window’ in the current scene can be used in a virtual studio scene where you would like to ‘open a window’ (as a texture) and render a different scene (e.g. a weather forecast).
You can also use it to show parts of a local scene if you want to animate the camera and at the same time show static items in the scene. The animating camera can be a different camera (two) and be used to show dynamic images in camera one’s view. This way you can show more than one camera at the same time.
For visual effects, the whole scene or parts of it can be grabbed into an image, and have shaders applied to the whole scene or parts of it.
To transition from one scene (A) to another (B) both scenes are rendered into dynamic images and a third scene is used to hold both dynamic images to create a transition between them (see Create Transition Effects).
Note: This Media Asset is located in: Built Ins -> Media Assets -> Container
This section contains information on the following topics:
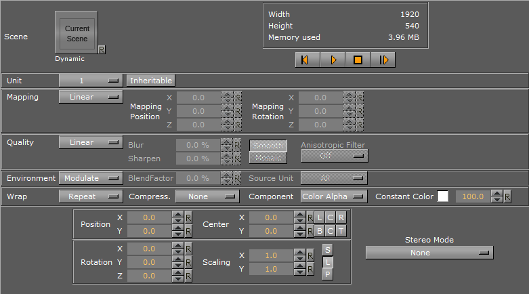
Dynamic Scene Texture Properties
-
Scene: Placeholder for the rendered scene. If it is empty, the current scene will be rendered.
Dynamic Scene Dynamic Properties
-
Format: Sets the format to be used for the dynamic image. If the format has alpha key it must be used on the render scenes or it will show as black.
-
Width / Height: Sets the width and height of the image. The Video option will take the current output size. When selecting Custom you may set any size; however, it is always better (when possible) to use power of 2 images.
-
Update Mode: Sets when the scene in the dynamic image will be rendered.
-
Change: When anything changes in the scenes it will be rendered.
-
Always: It will be render each frame regardless if there was any change.
-
Command: When the render command will be sent the scene will be rendered.
-
Grab: Renders the scene on command and can then be copied to another image.
-
-
View Type: Sets the view port to Camera or Light. If Camera is selected and Camera ID is set to zero (0), it will take the current camera. If Light is selected it will use the light according to the Light ID.
-
Draw Self: Creates an endless mirror effect.
-
Crop: Enables different crop modes.
-
Off: The entire view port will be rendered.
-
Manual: Enables you to set the size and position of the rendered scenes.
-
Auto: The size and position of the rendered scene will be set by the bounding box holding the dynamic scene (acts as a mask).
-
-
Size / Position: Sets the size and position of the dynamic image.
-
Resize Texture: Should the image be resized automatically to reflect the size of the scene being rendered.
-
Back/Play/Stop/Forward: Controls the playback of the scene.
Dynamic Texture Media Asset
![]()
Dynamic Texture is a feature that generates dynamic textures on-the-fly. It can be used as an alternative to importing textures to save texture memory usage. Another advantage of using a dynamic texture is that you will have a texture that is not pixelated as you zoom in or out of it.
Note: This Media Asset is located in: Built Ins -> Media Assets -> Container
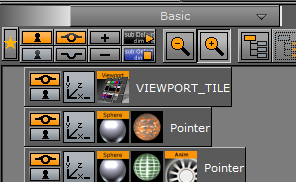
Viewport Tile Media Asset
![]()
IMPORTANT! This Media Asset is considered legacy. Please use GFX Channel Media Assets when designing new scenes in Viz Artist.
The Viewport Tile renders a Scene into a part of the current viewport with the need for a texture, like a GFX Channel Media Asset.
-
Advantage: The rendering can be slightly faster in specific use-cases
-
Disadvantages:
-
Viewport tile does not support post processing effects such as lens distortion and defocus.
-
The Viewport Tile is always orthogonal to the camera.
Viewport tiles can also be interactive and make use of the regular mouse and multi-touch events. However, Viewport tiles can not be nested. A Scene with a Viewport tile, which contains a Scene, can not be used as a Scene in another Viewport tile.
-
Note: This Media Asset is located in: Built Ins -> Media Assets -> Container
This section contains information on the following topics:
Viewport Tile Properties
-
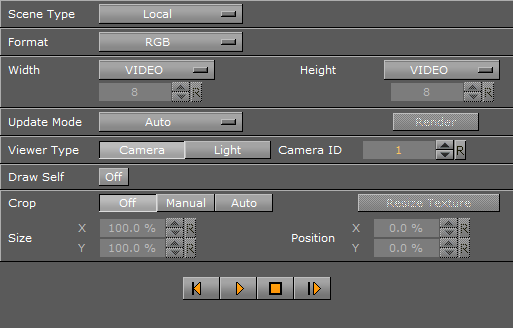
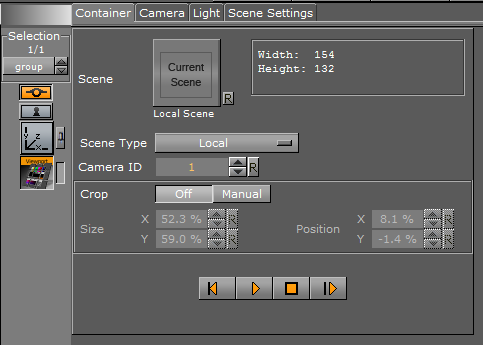
Scene: Placeholder for the rendered scene.
-
Scene Type:
-
Local: Renders the current scene.
-
Other: Renders the Scene put in the Scene drop zone (drag and drop a scene).
-
Main Layer: Renders the scene of the main layer.
-
-
Camera ID: Select a camera for the Viewport Tile scene.
-
Crop:
-
Off: No cropping.
-
Manual: Define the new viewport Size and Position with the parameters X and Y.
-
-
Play controls: Used to play, stop, etc. the animations of the Viewport Tile scene.
To Render a Scene in a Viewport Tile
-
Add the Viewport Tile to the Scene Tree.
-
Open the Viewport Tile editor and add a Scene to the Scene placeholder.
-
Open the Transformation Editor
-
Set the Screen Size (width and height) of the Viewport Tile.
-
Open the Viewport Tile editor
-
Click the Play button.