
Viz Artist
Version 3.10 | Published May 03, 2018 ©
Video Clips
This section details where video clips are stored, the transfer and download from Viz One and video clip playback.
This section contains the following topics:
Video Clip Storage
This section details where video clip can be stored and accessed for use in Viz Artist.
This section contains the following topics:
Hard Drive Video Clips
All Viz Artist/Engine machines, as well as Vizrt clients with preview, for example, Viz Trio or Viz Weather, come with a mapped video drive (D:). This drive is configured for faster access and speeds. This is where all video clips should be stored.
IMPORTANT! It is not recommended to store video clips on the C:\ drive, as this is where the operating system is installed.
A second or third video clip directory can be added in Local Settings (see section Configuring Viz of the Viz Engine Administrator’s Guide), which can be used for:
-
With any Viz Artist/Engine configuration for the selection of a secondary video clip directory if a directory fails.
If the file path for a video clip is set to ‘<clip_root>’, and the first directory falls over the same video file will be searched for and used, from the next directory in the Clip directory list.
If, when multiple Clip directories are selected, the Clip Name box is used to search for a video, the search will default to the last used directory.
Viz One Video Clips
Video clips can also be transferred and downloaded from a Viz One. To do this Viz One must be integrated with a Viz Engine. See Viz One (see section Configuring Viz of the Viz Engine Administrator’s Guide).
Video items
Video clips are also stored in the Graphic Hub (see Working with Video Items).
Dual Channel and Trio One Box Configuration
When more than one directory path is selected, for example, D:\AEClips; D:\DecoClips, etc., in the Clip Name box change the file path to ‘<clip_root>’. The file name is then searched for, in the selected directories (selected in the Viz Configuration), one after the other, for stored video clips with the same name.
Example: Search for a video clip named ‘next_tuesday.avi’ in D:\AEClips\AFL\Promos. In the Clip Name box change ‘D:\AEClips\AFL\Promos’ to ‘<clip_root>’ The filename shown in Viz Artist should be <clip_root>\next_tuesday.avi.
Variables used in file-name expansion
|
Variable |
Definition |
|
<base_scene_name> |
Expands to the scene name |
|
<absolute_scene_name> |
Expands to the complete path of the loaded scene |
|
<absolute_scene2_name> |
Expands to the complete path of the second loaded scene |
|
<clip_root> |
Expands to the clip_root |
|
<hostname> |
Expands to the hostname |
|
<if0> |
Expands to the IPV4 network address of the first network interface |
|
<if1> |
Expands to the IPV4 network address of the second network interface |
|
<if2> |
Expands to the IPV4 network address of the third network interface |
Playback of Clips with VBI
VBI (Vertical blanking interval) is the interval of time between the last line of a given field/frame and the beginning of the next field/frame, during which the incoming data stream is not shown on a monitor.
Video clips which contain VBI information, can be played back in two ways:
-
One: Use a video clip which contains the embedded VBI information, or
-
Two: Use a separate video clip which contains the VBI data. This separate video clip must be named [clipname]_vbi.avi and conform to the size limitations detailed in the procedure below
To Playback Clips with VBI in a Separate File
Note: The links in this procedure all refer out to the Viz Engine Administrator Guide.
-
Make sure that VBI is set to On for both the Clip Channel (Video Input: Clip Input) and the Video Output (Matrox).
-
For each clip channel, make sure that the Video Input and Output Format resolutions are the same.
The VBI clip contains only VBI information. The size of the clip must match the maximal total lines for VBI in this resolution:-
NTSC: 32
-
PAL: 34
-
720p: 19
-
1080i: 30
-
1080p: 35
-
Using VBI embedded in a full size clip is not supported as separate clip. This is only supported when played as the main clip.
Video Clip Playback
Video clip playback should be used sparingly. The size and formats of some video clips can affect the Viz Engine render performance. To build a Scene with video clips (in Viz Artist that supports clip playback) there are also three plug-in options that can also be used:
This section contains the following topics:
Video Clip Playback General Guidelines and Considerations
For video clip playback methods, consider these general guidelines:
|
Use-case |
Playback Method |
|
If no 3D effects or animation control - and only limited 2D effects - on the clips are needed |
|
|
For full screen (e.g. background) clips |
|
|
If video must be mapped onto a texture in the scene or requires minor adjustments |
|
|
For non-standard image format/resolution/codec |
|
|
If more than two small clips are required |
|
|
For low resolution and short animations |
Image Clip plug-in. |
IMPORTANT! Always test the performance of the different solutions and work with the solution that gives the best quality versus performance ratio. A performance test should always take place on a machine with the same specifications as those used for production playback.
-
The selected video clip must have the same frame rate as the clip channel. You can mix different Output Formats and Video Input Formats with different resolutions, but you must make sure to use either progressive or interlaced for Input and Output. You can play, for example, a 720p clip with an Output format of 1080p, but you can not mix and 720p with a 1080i format:
-
Video Input: Clip Channel 1: HD 1080i
-
Output Format: 1080i
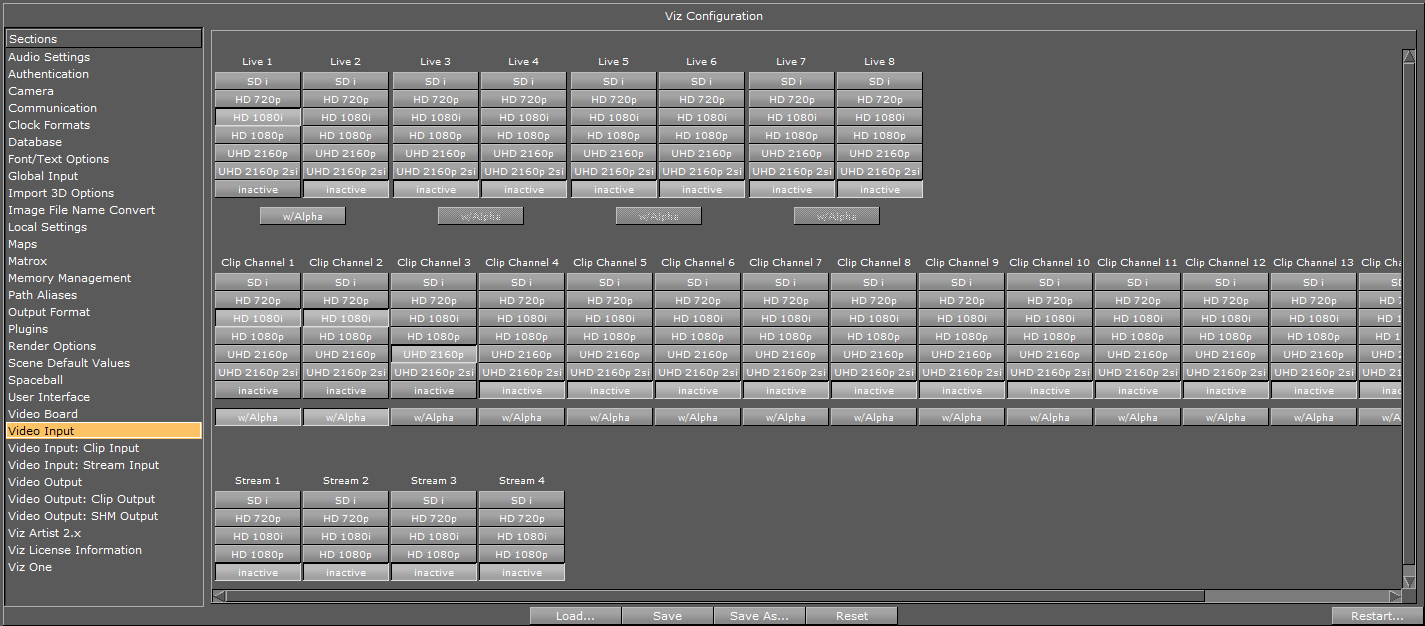
Each available Clip Channel can be configured for independent resolutions, providing the designer quick access to a range of options. These settings are configured in the Video Input section in Viz Config. Please refer to the Video Input section under Configuring Viz of the Viz Engine Administrator’s Guide.Tip: The Media Asset Manager provides a useful tool-tip when hovering the mouse pointer over Clip Channel media assets, displaying the resolution configured for the Clip Channel in use.
-
-
Make sure that the correct container and codec is selected (see Supported Codecs).
-
Video clip playback can be applied through either DVE or Texture.
-
To be able to use a Live input channel, a Clip channel or a Stream channel, they first have to be set to active in Video Input (under section Configuring Viz of the Viz Engine Administrator’s Guide).
-
If alpha is required for a video clip, click Config and configure the alpha in Video Input (see section Configuring Viz of the Viz Engine Administrator’s Guide). Enable w/Alpha when alpha is required in video clips. Either two clips, or one clip that contains both the fill and key, are required. If there is only one clip, that contains the fill (without a key), the key will be created dynamically and be fully opaque. For the naming convention of two clips, the alpha/key clip must have the same name with an attached _key before the file extension, this means if the main/fill clip is named example.mxf, the alpha/key clip must be named as follows: example_key.mxf.
-
The Matrox Clip Player supports TDIR (Time Delay Instant Replay), which enables Viz Engine to play back clips while they are still being written by Viz One. When a clip is played, with TDIR support enabled, looping is not enabled for this clip. Viz Engine determines automatically if it needs to set TDIR support on, or if the clip is already fully loaded.
-
BG Graphics are always the lowest in the stack, even below zero, and FG graphics are assigned a default of 100. Please note that priority can not be assigned to BG Graphics.
See Also
-
For Dual Channel and Trio OneBox set up see Dual Channel and Trio One Box Configuration.
To Play a Video Clip as Texture
-
Click on Built Ins.
-
Click on Media Assets (MA).
-
<Right-click> on a Clip Channel, and select Add Clip<1> as Texture (1).
-
The Texture button in the Scene Tree panel (Media Asset Manager) is automatically selected (2)
-
The selected Clip Channel is added to the Scene Tree and a new Container is created (click Tree to view)
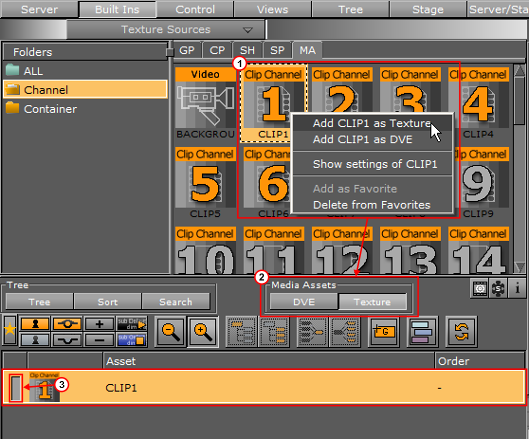
Tip: The Clip<1> Channel can be made active or inactive. Toggle the active/ inactive button (3).
Tip: The Clip<1> Channel can also be dragged to the Scene Tree, where it is added as a Texture in a new Container.
-
-
Click on Clip<1> Channel, in the Scene Tree panel (Media Asset Manager) Texture view, to open its properties panel.
Tip: <Right-click> the Clip<1> icon in its Container. Select Show settings of Clip<1>.
Tip: Click the
 icon in the Scene Tree to view Media Asset properties at any time
 -
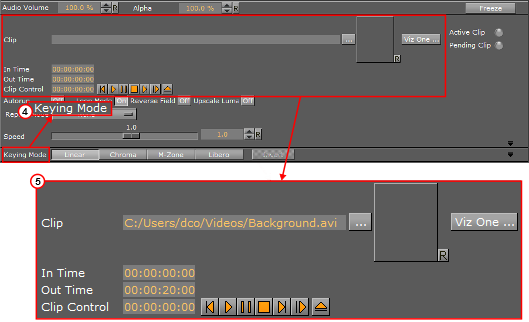
Select the required Keying Mode (4 (see Keying Mode)).
-
Add a video clip:
-
In the Clip Name (5) line, click
 , or
, or -
Drag a Video Clip item from the Server Panel, or
-
Click
 , and select a video clip to import
 Note: To transfer and download videos from Viz One, Viz One must be integrated and configured with Viz Artist/Engine.
-
-
Configure the video clip playback as required.
-
Click
 (5 (Play)) to test the video clip.
 Note: Matrox Card Only: A green ‘traffic light’ shows that the video clip has loaded successfully. A gray ‘traffic light’ shows that no video clip has been loaded. A red ‘traffic light’ shows that there was an error when the video clip was loaded.
Note: Click the expand button to show addition information. If the clip loaded successfully, clip details are shown. If the clip did not load successfully, additional errors are shown.
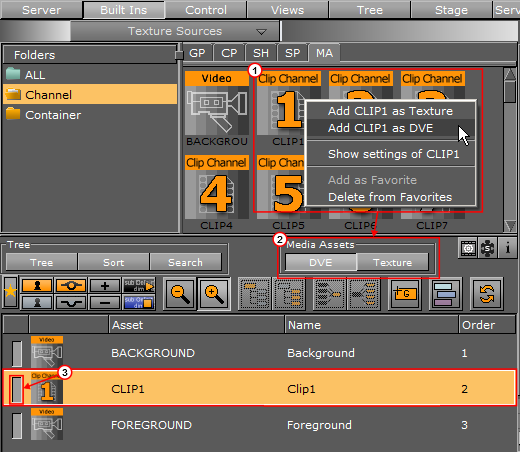
To Play a Video Clip as DVE
-
Click on Built Ins.
-
Click on Media Assets (MA).
-
<Right-click> on the required Clip Channel.
-
Select Add Clip<1> as DVE (1).
-
The DVE button in the Scene Tree panel (Media Asset Manager) is automatically selected (2).
Tip: The Clip<1> Channel can be made active or inactive. Toggle the active/ inactive button (3).
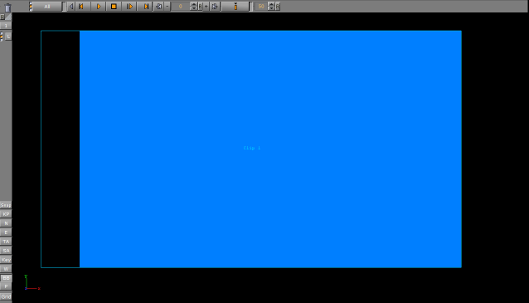
The Scene Editor shows a blue rectangle, which shows that the live input channel is correctly configured for live video.
-
-
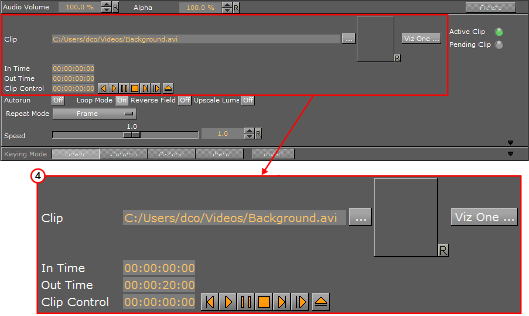
Click on the Clip<1> Channel to open its properties panel.
-
Adjust the parameters in the DVE control panel, as required.
-
Add a video clip:
-
In the Clip Name (5) line, click
, or -
Drag a Video Clip item from the Server Panel, or
-
Click
, and select a video clip to import Note: To transfer and download videos from Viz One, Viz One must be integrated and configured with Viz Artist/Engine.
-
-
Configure the video clip playback as required.
-
Click
(4 (Play)) to test the video clip. Note: Matrox Card Only: A green ‘traffic light’ shows that the video clip has loaded successfully. A gray ‘traffic light’ shows that no video clip has been loaded. A red ‘traffic light’ shows that there was an error when the video clip was loaded.
Note: Click the expand button to show addition information. If the clip loaded successfully, clip details are shown. If the clip did not load successfully, additional errors are shown.
Video Clip Animation in the Stage
Video can also be played out as part of an animation. This is useful when video clips are required to interact with animation.
To Animate a Video Clip
-
Before a video clip can be animated, it must first be applied as a Texture or DVE. See:
-
Click Stage.
-
Click the New Director button.
-
Right-click on the Director.
-
Select Clip > Clip1 > Clip
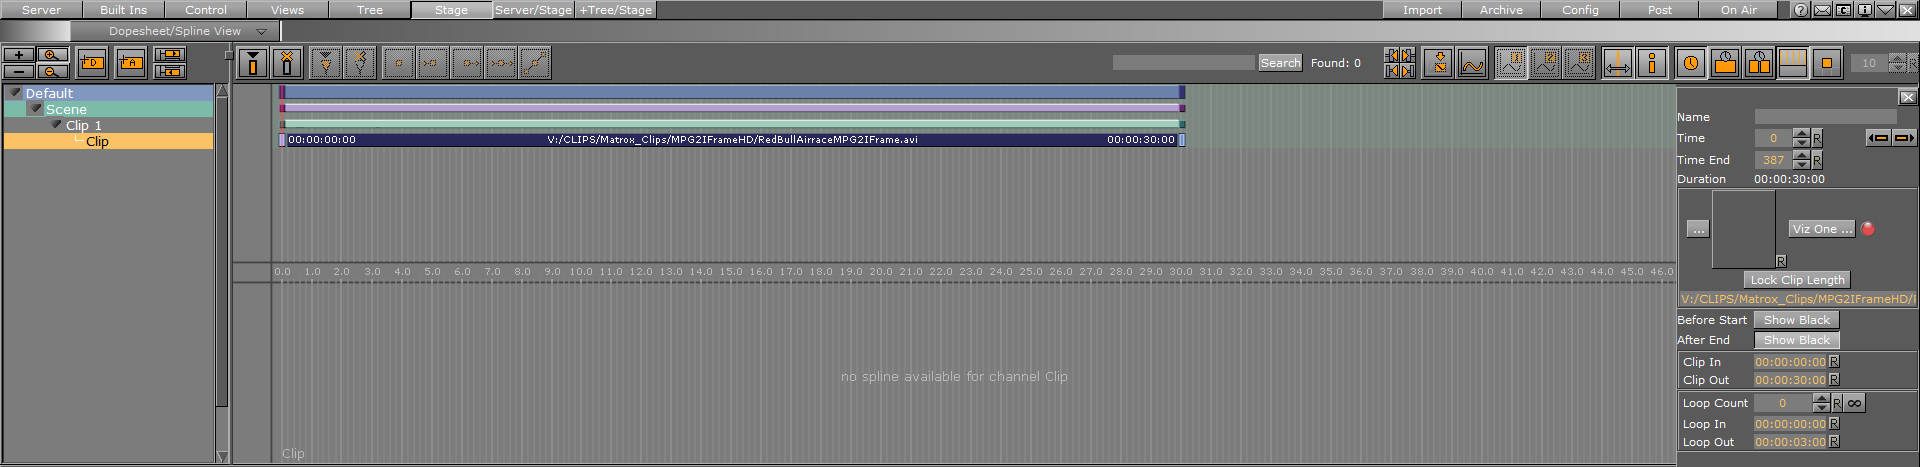
-
In the Clip1 channel, click in the dark blue area (2). The Clip Key Frame Editor opens on the far right.
-
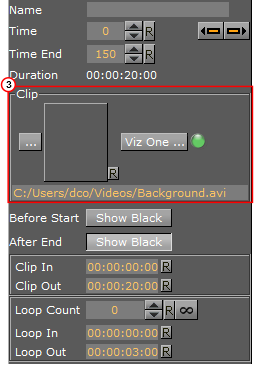
Add a video clip (3):
-
In the Clip Name (5) line, click
, or -
Drag a Video Clip item from the Server Panel, or
-
Click
, and select a video clip to import -
Click
 to specify a certain time/length for your clip. This is useful when loading clips from an external control application via Viz One. In this case, the lock clip length will act as a placeholder, but not change the clip length automatically after loading.
 Note: To transfer and download videos from Viz One, Viz One must be integrated and configured with Viz Artist/Engine.
Note: Matrox Card Only: A green ‘traffic light’ shows that the video clip has loaded successfully. A gray ‘traffic light’ shows that no video clip has been loaded. A red ‘traffic light’ shows that there was an error when the video clip was loaded.
Note: This does not necessarily have to be the clip enabled in the previous procedures. It can be any video clip that Viz Artist can play.
IMPORTANT! If there is a conflict, the last clip selected, whether in the Stage or the Scene Settings, will be the one to play, with overriding effect.
-
-
Configure the Clip Key Frame Editor as required.
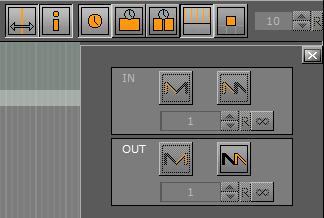
To Play a Single Clip in the Stage with Stage Loop
-
Set a clip in the stage as described in To Animate a Video Clip.
-
Click Clip, in the Stage Tree.
-
Set the clip to loop a specific number of times or infinite.
To Play Multiple Clips in One Channel
-
Add a clip to the stage as described in To Play a Single Clip in the Stage with Stage Loop.
-
Set the time indicator to a position after the first clip Key Frame
-
Click
 to add a Key Frame.
 -
Select a clip for the new Key Frame (see To Animate a Video Clip).
Show black rules for pauses between clips:
|
Black Rules |
Frames Shown |
|
Both clips NS |
Frame 1 of Clip 2 will be shown |
|
Clip 1 AE, Clip 2 NS |
Frame 1 of Clip 2 will be shown |
|
Clip 1 NS, Clip 2 BS |
Last frame of Clip 1 will be shown |
|
Clip 1 AE, Clip 2 BS |
Black will be shown |
|
Key:NS: Nothing setBS: Show black before start setAE: Show black after end set |
If Pending is Active (which is recommended) subsequent clips are loaded into the pending clip player and are swapped at the correct time. This feature enables the clips to concatenate seamlessly. However, when pending support is set to Inactive, black frames will be shown until the clip is ready to be played (see Pending under section Configuring Viz of the Viz Engine Administrator’s Guide).
To Play Multiple Clips in One Channel with Stage Loop
-
Set multiple clips in the stage as described in To Play Multiple Clips in One Channel.
-
Set the clips to loop. Click the corresponding entry in the Stage Tree.
All Key Frames including the pauses in between and before will be taken into account during play back, for example, pause - clip 1- pause - clip 2 will loop as such.
To Play Single and/or Multiple Clips in Multiple Channels
This is a combination of the use cases described above, with the clips used on several channels.
Video Clip Queue
Video clips can also be queued, providing automatic playback of a series of clips. If no clip is playing at the moment of clip queue creation, playback of the first clip in the queue will start immediately. All other clips are played in the sequence they were added to the list. By default, every clip needs to be played out manually, although it is not required to set their names again. This behavior can be overridden by clicking the Autorun button, setting it to On.

The current state of the auto-play flag is stored with every queued clip, and can thus be used on demand.
Commands (n is the clip channel):
Video Clip Queue Commands
|
Command |
Description |
|
[...]*CLIPIN*n*NAME CUE name in out |
Adds clip with name to the queue, using in and out as trim in and out points. The parameters in and out are optional and can be omitted. |
|
[...]*CLIPIN*n*QUEUE LIST |
Lists all the clips currently queued. |
|
[...]*CLIPIN*n*QUEUE INSERT name in out position |
Inserts clip name using in and out at position in the queue. |
|
[...]*CLIPIN*n*QUEUE REPLACE name in out position |
Replaces the clip at position with the new one using name, in and out. |
|
[...]*CLIPIN*n*QUEUE DELETE position |
Deletes the clip at position in the queue. |
|
[...]*CLIPIN*n*QUEUE MOVE source target |
Moves the clip from position source to position target in the queue. |
|
[...]*CLIPIN*n*QUEUE FLUSH |
Removes any and all clips from the play-list. |
Example Clip Queue commands:
-
RENDERER*VIDEO*CLIPIN*n*NAME CUE
-
MANI_SCENE*VIDEO*CLIPIN*n*NAME CUE