
Viz Artist
Version 3.10 | Published May 03, 2018 ©
Keying Mode Configuration
The Keying mode parameters are split into six panels.
This section contains the following topics and procedures:
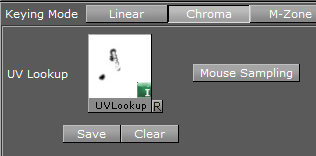
UV Lookup
-
UV Lookup: Drag a UV Look up image to the place holder. Click
 to reset the UV Lookup image box
 Note: A UV lookup image is a luminance image of size 256x256.
-
Mouse Sampling: Collect the chroma information out of a video signal, at the position of the mouse pointer.
Hold the left mouse button and move the mouse around to add the colors at the mouse pointer location to the chroma key table. To remove the colors from the chroma key table, hold down <Alt> while repeating this procedure.IMPORTANT! Chroma Key picking is not supported if the same input source is used in different scenes loaded as layers within a scene, or if GPU Direct is enabled in Viz Config.
-
Save: Save a modified UV LookUp image
-
Clear: Remove the current UV LookUp texture from the current scene (no colors are removed from the image)
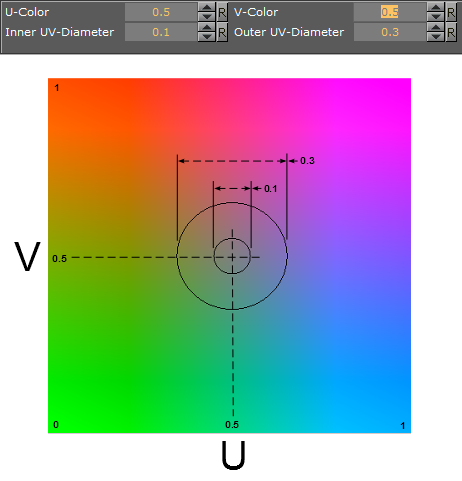
U-Color/V-Color
-
U-Color and V-Color: Set the background color in the YUV color space. The point set by these two parameters is the reference for the next parameters, which determine the colors to remove.
-
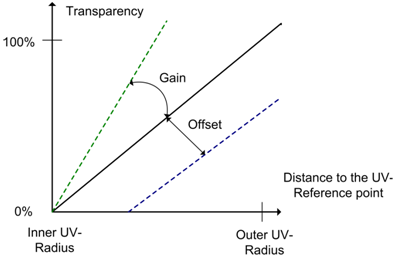
Inner UV-Diameter/ Outer UV-Diameter: All colors between the point defined by the U and V-Color and the Inner UV-Diameter are removed completely and for all colors between the Inner UV-Diameter and the Outer UV-Diameter the transparency will be set to a value between 0% and 100%.
Color Correction
Color Correction is especially helpful to remove chroma bleed.

-
Color Correction: blue or green colors can be removed completely from the image:
-
Off: Color Correction is not in use
-
Blue: The parameters for Cyan and MagentaGain are active
-
Green: The parameters for Cyan and YellowGain are active
High Gain values for all these parameters mean that nearly all tones of this color will stay unchanged. Low Gain values signify that this tone will be removed completely from the image.
-
-
Brightness: Set the gain value of the Chroma Key area as required, in relation to the background. Useful, for instance, for tuning the video going through the chroma keyer if the light in the studio changes in a virtual studio setup. Value 1 means keep the original intensity, below 1 means darker, above 1 brightens.
Restore Dark Colors/Shadows

-
Restore Dark Colors/Shadows: When set to Active all pixels with a luminance lower than complete restoration to the key/alpha will be make the pixel 100% opaque.
A pixel with a luminance between Complete Restoration to and Zero Restoration from the key value is interpolated between 0 and 100%. This key is compared with the results of the Chroma Key and the higher value will be used. The key value of a pixel where the luminance is higher than Zero Restoration from will stay unchanged. Gain can be used to darken dark colors even more, if it is set below 1.0. Gain is only applied to pixels with luminance between 0 and Zero Restoration To.Tip:Gain is useful in a virtual studio, where the set design uses dark colors in a shadow, but when seen through the camera the shadow is lighter, in color, than the floor. A darker shadow will make the final composition more believable.
Restore Bright Colors

-
Restore Bright Colors: When set to Active all pixels with a luminance higher than complete restoration to the key/alpha will be making the pixel 100% opaque.
For a pixel with a luminance between Complete Restoration to and Zero Restoration from, the key value is interpolated between 0 and 100%. This key is compared with the results of the Chroma Key and the higher value will be used. The key value of a pixel where the luminance is lower than Zero Restoration from will stay unchanged. Gain can be used to make bright colors show even brighter. Gain is only applied to pixels with a luminance between 1 and Zero Restoration To.
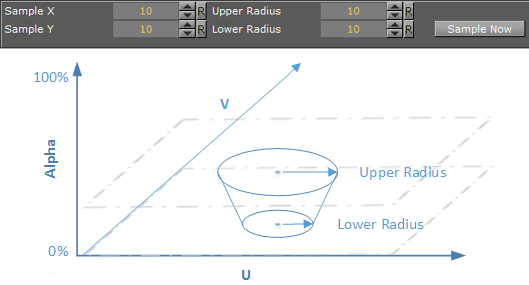
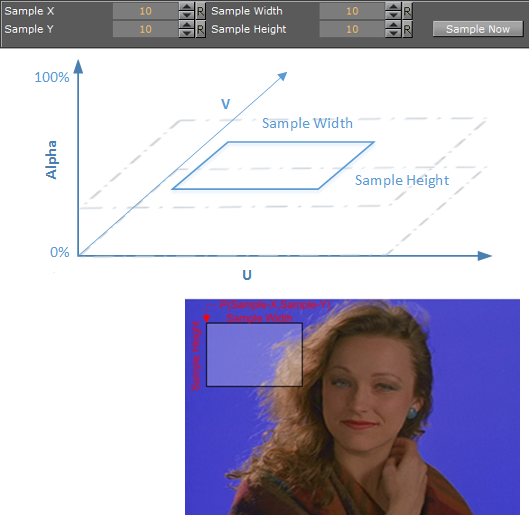
Sample
The Sample functions define a section in the video input, which can make the Chroma Key results more accurate.
Press Sample Now to start the self-configuration.
-
Sample With UV Lookup:
-
Set the Sample X/Y coordinates: The x/y position on the screen to select the picking color. Not used
-
Set the Upper Radius/Lower Radius
-
-
Sample Without UV Lookup:
-
Set the Sample X/Y coordinates: The x/y position on the screen to select the picking color
-
Set the Sample Width/Height.
-
To Configure Keying Mode
-
Click Built Ins.
-
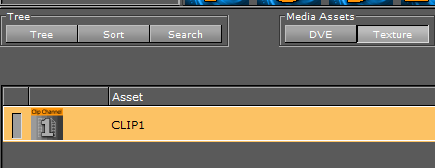
Click the Media Assets tab.
-
In the Properties panel click the Scene Settings tab
-
Click the Global Settings tab.
-
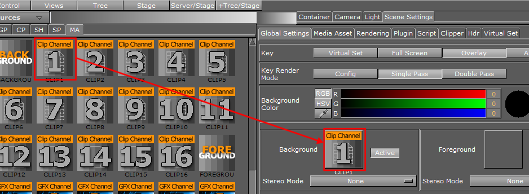
Select a Media Asset and drag it onto the Background Image or Foreground Image drop-zone.
-
Click on the Media Asset in the Media Asset Manager (this opens the Media Asset tab in the Scene Settings panel).
-
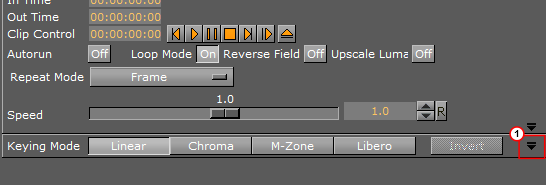
In the Keying Mode row, click the relevant button to enable a keying method. Options are:
-
Linear Key
-
Chroma Key
-
M-zone Key
-
Libero Key
Note: To use the M-zone key, the Chroma Keyer plug-in must also be used. Drag the Chroma Keyer plug-in to the container which holds the video texture in the Scene Tree.
-
-
In the Keying Mode row, click the arrow (1) to open up the Keying Mode Configuration.
-
Configure the U-Color and V-Color (set the background color in the YUV color space). The point set by these two parameters is the reference for the next parameters, which determine the colors to remove.
All colors between the point defined by the U-Color and V-Color and the Inner UV-Diameter will be removed completely, and all colors between the Inner UV-Diameter and the Outer UV-Diameter the transparency will be set to a value between 0% and 100%. -
Configure the Sample X/Y coordinates and the Sample Width/Height (Upper Radius/Lower Radius with UV Lookup). These parameters define a section of the background in the video-input. Press Sample Now to start the self-configuration.
-
Configure Color Correction. This can help to completely remove the blue or green colors from the image.
-
Configure the Luminance Control:
-
Restore Dark Colors/Shadows: All pixels with a luminance lower than complete restoration to the key/alpha will be make the pixel 100% opaque.
-
Restore Bright Colors: All pixels with a luminance higher than Complete Restoration to the key/alpha will be making the pixel 100% opaque.
-