
Viz Artist
Version 3.10 | Published May 03, 2018 ©
Window Mask
![]()
Window Mask limits the area into which a Sub-Container of the Window Mask plug-in is rendered to a user-defined rectangular section of the output.
It is possible to add a tracking object. If a tracking object is used, it’s bounding box is projected onto the screen and the resulting rectangle is used as a mask.
Note: This plug-in is located in: Built Ins -> Container plug-ins -> Global
This section also contains information on the following topics:
Window Mask Properties
-
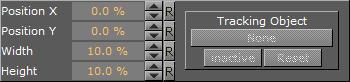
Position X, Position Y: Specifies the upper left corner of the rectangle. The values are scaled in such a way that (0, 0) refers to the upper left and (100, 100) to the bottom right corner of the screen.
-
Width, Height: Specifies the dimensions of the rectangle in percentages of the screen dimensions.
-
Tracking Object: Provides an alternative to setting the position and dimensions manually. When you drag a container from the scene tree onto this drop zone, the rectangle will automatically be adjusted to match the position and size of that container. Inactive will toggle tracking on and off. To remove the container click on Reset.
To Use the Window Mask
-
Add a Rectangle geometry to the scene tree, and add material to it.
-
Open the Rectangle editor and set Width to 200.0.
-
Open the transformation editor and set Position Y to -36.
-
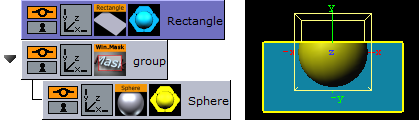
Add a new group, and add the Window Mask plug-in to it.
-
Add a Sphere geometry as a Sub-Container of the group container, and add material to it.
-
Open the Window Mask editor and drag and drop the Rectangle container onto the Tracking Object drop zone.
-
This should give you a sphere that is partly masked due to the rectangle object.
-