
Viz Artist
Version 3.10 | Published May 03, 2018 ©
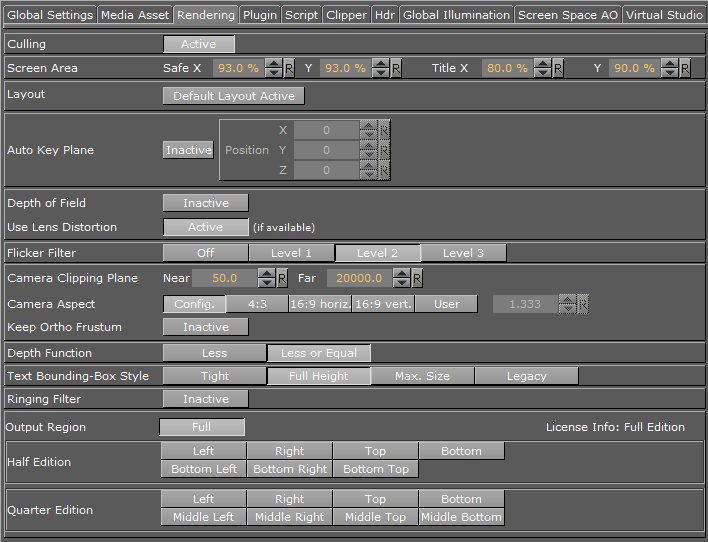
Rendering Panel
In the Rendering panel, basic rendering parameters can be modified.
This section contains information on the following topics and procedures:
Rendering Properties
-
Culling: With Culling Active for a Scene it saves performance. Objects whose bounding box is outside the camera view are not rendered. This is of great importance to performance in large scenes and virtual studio. Normally Culling should be Active.
-
Screen Area:
-
Safe X/Y: Set the size of the Safe area X and Y values in percent of the screen resolution. Single click the R button on the X or Y to reset to its default value. Double-click the R button to reset both values to default values.
-
Title X/Y: Set the size of the Title area X and Y values in percent of the screen resolution. Single click the R button on the X or Y to reset to its default value. Double-click the R button to reset both values to default values.
-
-
Layout: The Video Wall Distributor defines a layout of the Viz Engine on air to be part of a cluster of Viz Engines:
-
Default Layout Active: Click to use the video wall layout, as set in the Video Wall Distributer.
-
Use Layout: Click to make the Video Wall layout inactive
Note: Both these parameters are set in the Video Wall Distributor.
-
-
Auto Key Plane: Makes it possible to define the X, Y and Z Position, that serves as a threshold between objects with and without key. The position can be set according to a tracking device carried by a person on the set, or it can be controlled by an operator.
The auto key position decides which objects or parts of objects in the Scene that are to be part of the key signal. Only objects positioned between the auto key position and the camera will be rendered with the key signal.
A typical setup for a Virtual Studio would be that the scene background is put into a separate channel of the external keyer.
The objects of the background do not have a key function attached. The objects that are meant to be in front of the person on the set are placed in another channel/layer of the external keyer and have a key function attached.
If the person on the set moves against the camera, the auto key function disables the key function of those objects that now are placed behind the person, thereby moving them into the background layer of the external keyer.
To learn more about this, see the separate Viz Virtual Studio documentation. -
Depth of Field: Emulates the behavior of a real camera where objects further away from the focal plane show blurred and objects close to the focal plane show sharp. The respective parameters can be set in the camera settings under the Focus settings (see Camera Editor).
-
Use Lens Distortion: Lens distortion can be applied to a Scene when a Lens Distortion file has been added to Viz Engine, and Render Scale is set to 1.2
Note: When Lens Distortion is active, the Glow plug-in and Cube Mapped images will not work correctly. The shadow mapping technique can be used together with lens-distortion, see also Shadow Maps.
-
Flicker filter: Makes it possible to change the level of the flicker filter from Off and up to Level 3. The flicker filter is used to remove/reduce flickering from a scene. If a flicker filter is applied and the scene still flickers, try using the next level.
-
Camera Clipping Plane: Sets the range of the virtual camera. Near sets the close range while Far defines the far range. Only containers within this range will be rendered.
Note: The camera range is where the Zbuffer is within. So if Zbuffer problems arise, they may be solved by editing the camera clipping plane settings.
-
Camera Aspect: Sets the camera aspect.
-
Config: makes the camera aspect equal to the settings in the Output Format panel, described in the section Configuring Viz of the Viz Engine Administrator’s Guide.
-
4:3, 16:9 Horizontal and 16:9 Vertical makes the camera aspect independent of the aspect for the rest of the scene.
-
User: Enables the user to set a user defined camera aspect ratio. When building a Scene with a customized aspect ratio for a Video Wall, set the user-defined camera aspect to the same value as the Aspect, described in the section Configuring Viz of the Viz Engine Administrator’s Guide (Output Format -> User Defined -> Aspect (which is set dynamically based on the other values). When building a Scene with a customized aspect ratio for other, e.g. hand-held/mobile devices or online publishing, set the Keep Editing Aspect (Render Options described in the section Configuring Viz of the Viz Engine Administrator’s Guide) parameter to Editor as this will not have an affect on the On-Air or Viz Engine output (see also To Design Graphics with a User Defined Aspect Ratio).
-
-
Keep Orthog. Frustum: When active, takes the original frustum stored and does not allow its re-computation after changes have been made to the camera parameters in the orthogonal mode.
-
Depth Function: OpenGL-specific. Specifies the function used to compare each incoming pixel depth value with the depth value present in the depth buffer. Equal: passes if the incoming depth value is equal to the stored depth value. Less or Equal: passes if the incoming depth value is less than or equal to the stored depth value.
-
Text Bounding Box Style:
-
Tight: The bounding box is drawn tight around all text used in this Scene. This means just the height of the actual text used
-
Full Height: The bounding box is higher. The bounding box is calculated for characters that need some space underneath, for example the letter ‘g’, and for characters that need more space above, such as a parenthesis, even if these characters are not used within the text in the scene. The Full Height setting does not work for special characters like such as 'Ä', which is even higher in some fonts (please refer to Font/Text Options described in the section Configuring Viz of the Viz Engine Administrator’s Guide).
-
Max. Size: For Scenes imported from version 2.8 so that the various plug-ins which depend on font bounding boxes are compatible in version 3.5 and on, such as Max Size and Autofollow; it also includes a small trailing space between the letter and the bounding box.
-
Legacy: Produces the exact same bounding box as version 2.8.
-
-
Ringing Filter: Reduces the ringing artifacts on the SDI output and applies only to SD formats. The ringing filter can be set to Off (see Render Options (set Force Ringing Filter Off to Active) described in the section Configuring Viz of the Viz Engine Administrator’s Guide. The default Ringing Filter is located in Scene Default Values (described in the section Configuring Viz of the Viz Engine Administrator’s Guide).
-
Output Region: Becomes inactive if you design a Half or Quarter Edition scene. To revert to a full screen scene, click Full.
-
Half Edition: If you have a full Viz Artist license, but want to design a scene for another license that has only a Half Edition, select which portion of the scene you want to design your scene in. Options are:
-
Left
-
Right
-
Top
-
Bottom
-
Bottom Left
-
Bottom Right
-
Bottom Top
-
-
Quarter Edition: If you have a full Viz Artist license, but want to design a scene for another license that has only a Quarter Edition, select which portion of the scene you want to design your scene in. Options are:
-
Left
-
Right
-
Top
-
Bottom
-
Middle Left
-
Middle Right
-
Middle Top
-
Middle Bottom
-
To Design Graphics with a User Defined Aspect Ratio
-
Start Viz Artist.
-
Click Config (or press <F11>).
-
If you plan to render graphics in many different aspects (e.g. still images for online publishing) you should select the Render Options section and set Keep Editing Aspect to Editor.
-
This will make sure your graphics are rendered according to the scene’s configured camera aspect (and not be affected by the Output Format aspect)
-
-
In the Output Format section set the format that best fits the screen resolution and aspect (e.g. 16:9).
-
Viz Artist is resolution independent and its workspace is optimized for designing in 16:9 and 4:3 aspects.
-
When designing graphics with a user defined aspect, only set the Output Format to size the aspect of your Scene Editor and adjust the camera aspect further to define it according to your scene’s required and final aspect.
-
-
Close Viz Artist.
-
Start Viz Artist.
-
Click the Server button.
-
From the Properties Panel click the Scene Settings tab.
-
Under the Rendering Panel tab set Camera Aspect to User.
-
Enter your aspect ratio in the field beside the User field.
-
To calculate your aspect ratio simply divide width with height (e.g. 1600:900=1.778)
-