
Viz Artist
Version 3.10 | Published May 03, 2018 ©
Working with Items
This section contains information on the following topics:
Common Item Procedures
These are procedures which are common to all item types.
This section contains information on the following topics:
To View items in a Folder
-
Open the item panel from the Content Switcher:
Item
Tab
Keystroke (hold the pointer over the Server Panel)
Scenes
S
<Ctrl+1>
Geometries
O
<Ctrl+2>
Materials
M
<Ctrl+3>
Materials Advance
MA
<Ctrl+4>
Images
I
<Ctrl+5>
Fonts
F
<Ctrl+6>
Audio Clips
A
<Ctrl+7>
-
Select a folder in the Server Tree.
Note: Select All in the Content Switcher to view all item types in the folder selected.
To Rename an item
-
Select the item to be renamed.
-
Open the rename text field:
-
Right-click the item and select Rename from the context menu, or
-
Press <F2>.
-
-
In the text field that appears, type a new descriptive name.
-
Press <Enter>.
Note: Special characters, such as space, are not allowed in item names.
Note: If renaming a linked item, only the name of the selected item will change, not the linked one (see Linked Items).
To Delete an item
-
Select the item to be deleted.
-
Delete the item:
-
Drag the item to the trash can, or
-
Right-click the item and select Delete from the context menu, or
-
Press <Delete>.
-
-
Click on Yes to confirm.
Tip: To delete multiple items select the items to be deleted and drag to the Trash Can.
Note: If deleting a linked item, only the link to the folder will be removed. The item itself will remain in the database (see Linked Items).
Note: Referenced Items cannot be deleted. Referenced items are used by other items.
To Delete an item with all References
Deletes the selected item and all its referenced items. Referenced Items are not deleted if they are referenced by other items.
Note: Referenced items are deleted if they are referenced to ONLY the selected item. If they are also referenced to others, then they will not be deleted.
-
Locate the item to be deleted.
-
Right-click the item and select Delete with all references from the context menu.
-
Click on Yes to confirm.
To Create an item Copy in a New Folder
Use this procedure to create an independent copy of an item(s) in a new folder:
Note: To select more than one item press and hold <Ctrl> and click on each required item or press and hold <Shift> to select a range or items.
-
Select the item(s) to be copied.
-
Press <Ctrl> and drag the item(s) to the target folder.
or
-
Select the item(s) to be copied.
-
Select Copy from the Server Menu or <Ctrl+C>.
-
Open the folder where the target item(s) are to go.
-
Select Paste-Dup from the Server Menu or <Ctrl+Shift+V>
To Create an item Copy in the Same Folder
Use this procedure to create an independent copy of an item in the same folder:
-
Right-click the source item.
-
In the context menu that shows, select Duplicate.
-
In the dialog box that opens, type a descriptive name for the new item.
-
Click the Ok button.
or
-
Select the item(s) to be copied.
-
Select Copy from the Server Menu or <Ctrl+C>.
-
Select Paste-Dup. from the Server Menu or <Ctrl+Shift+V>
-
In the dialog box that opens, type a descriptive name for the new item.
-
Click the Ok button.
To Move an item to a New Folder
Note: To select more than one item press and hold <Ctrl> and click on each required item.
-
Drag the item or items from the Item List onto the target folder in the Server Tree.
or
-
Select the source item(s).
-
Select Cut from the Server Menu, or <Ctrl+X>
-
Open the folder where the target item(s) are to go.
-
Select Paste-Dup. from the Server Menu, or <Ctrl+Shift+V>.
To Create a Linked item
-
Select the source item.
-
Press <Alt> and drag the item to the target folder.
or
-
Select the source item.
-
Select Copy from the Server Menu, or <Ctrl+C>
-
Select the folder where the target item is to go.
-
Select Paste-Link from the Server Menu, or <Ctrl+V>.
Active Items
Items that are currently in work are active items. Active items are locked or checked out.
Items with locked icon
An active item has a small icon in the lower left corner of the thumbnail in the Item List which changes to show different states:
-
 Locked: If a user connected to the database opens an item, the item will be locked for all other users and marked with the keyhole icon. A locked item means that the item can be opened and viewed by all users, but only modified or saved by the user that has locked it. The item will be unlocked when the user closes the item or disconnects from the database.
 -
 Checked Out: If a user, connected to the database, checks out an item, the item will be locked for all other users and marked with the stop icon. A checked out item means that the item can be opened and viewed by all users, but only modified and saved by the user that has checked it out. To cancel the check out, the item must be checked in.
 Note: The item will stay checked out (locked) even if the user closes the item or disconnects from the database.
-
 Locked and Checked Out: For a locked and checked out item, the icon represents a combined keyhole and stop sign.
This section contains information on the following procedures:
To Lock an item
-
An item is automatically locked when a user opens the item. It is not possible to perform this operation manually.
To Check Out items
-
Select the item or items.
-
Check out the items:
-
Right-click an item and click on Check Out in the context menu (one item only), or
-
Hold the pointer over the Server Panel and use the keyboard shortcut <Ctrl+O>, or
-
Select Check Out Files... from the Server Menu.
-
To Check In items
-
Select the item or items.
-
Check in the items:
-
Right-click the item and click Check In from the context menu (one item only), or
-
Press the keyboard shortcut <Ctrl+I> while holding the pointer over the Server Panel, or
-
Select Check In Files... from the Server Menu.
-
To Lock and Check Out items
-
Items are automatically locked when a user opens the item. You cannot lock items manually.
Linked Items
Every item in the database is shown in one or more folders.

A linked item has a small link icon attached to the lower left corner of the thumbnail in the Item List. A linked item will show, logically, in multiple folders, although only one item is physically saved in the Graphic Hub database.
To view the UUID of the linked item, open the Properties Panel and select the File Info tab. The UUID of the one saved item is the same for all linked items, while information such as path, and name may vary.
If modifying the item in one of the folders, for example cropping an image, all the linked items will reflect these changes.
To create a linked item see To Create a Linked item.
Referenced Items
A referenced item is an item which is connected to and used by another item, by a reference only.
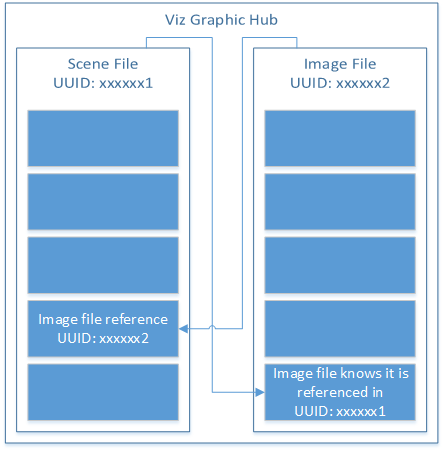
Some items are, or can be, made up of other items, i.e. Geometries. A Geometry item can be made up of other items. These other items are not physically part of the Geometry item, but are used by reference. Because the Geometry item uses another item as part of its output, any changes to the referenced item will result in changes the Geometry item itself. The item which is referenced cannot be modified without a warning message. If the referenced item is modified then the item which is referencing that item will be modified too - it will look and act differently. A referenced item cannot be deleted. The item which holds the reference has to be deleted before the referenced item can be deleted from the Graphic Hub. An item can reference many other items.