
Viz Artist
Version 3.10 | Published May 03, 2018 ©
Image FX
![]()
Image FX is a tool that enables you to create a wide variety of transitions between one or more images. The plug-in uses many different effect models that can be customized through parameters. Some properties use advanced mathematical formulas to create the effects, and not all of them can be explained meaningfully in normal words. Because of this, not all properties can be explained completely here, you will have to “play” with some properties to see the effects they create in a given situation (what some properties are set to will have impact on the effect that other properties give).
The images are split into a number of user-defined sections and every section is controlled independently based on progress maps. Any number of images of any Viz Artist supported format can be controlled using ImageFx. All images will be resized (if needed) to the first image size. The image transition order can be modified on the fly and images may be added to the sequence using external commands.
Note: This plug-in is located in: Built Ins -> Geom plug-ins -> Default
This section also contains information on the following topics:
Image FX Properties
At the top of the editor you will find a set of buttons to switch the properties.
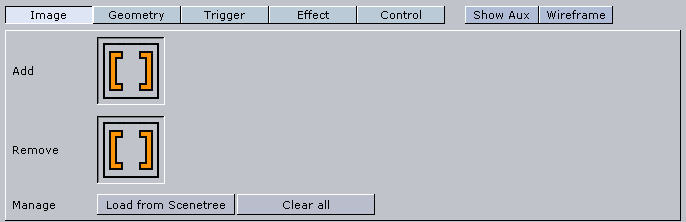
Image

-
Add and Remove: Images dropped onto the Add/Remove drop zone will be added/removed as sub-containers of the plug-in container in the scene tree.
-
Load from Scenetree: Loads images that are added directly as sub-containers to the ImageFX plug-in container.
-
Clear all: Removes all sub-containers to the ImageFX plug-in container.
Geometry
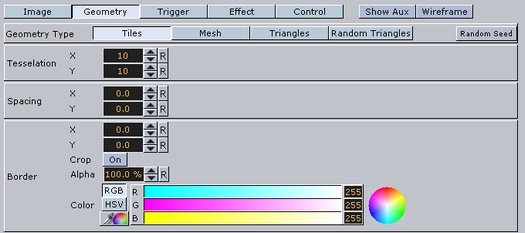
The image is split into a number of stand-alone sections that can be modified independently.
-
Geometry Type: Select here which kind of geometry you want the images to be split up in.
-
Tiles: GL quads, the number of quads are X tessellation times Y tessellation.
-
Mesh: (vertices) GL quad strip, the number of vertices are (X tessellation +1) times (Y tessellation +1). Modification can apply to every vertex in the mesh.
-
Triangles: GL triangles, the number of triangles are X tessellation times Y tessellation times 2. Modification can apply to one triangle (3 vertices).
-
Random Triangles: GL triangles, triangles are generated using random points. Number of triangles is a minimum of X tessellation times the Y tessellation. Modification can apply to one triangle (3 vertices).
-
Random Seed: Is relevant if you have chosen random triangles. It specifies a seed for the random number generator. Even though Viz Artist use random numbers, the layout of a specific random seed will always look the same. Press the wireframe button and click the new random seed button and you will see the effect.
-
-
Tesselation: Sets the degree of detail (enable wireframe to view the effect).
-
Spacing: Sets a spacing between the geometrical parts in the image.
-
Border: If spacing has some value, this parameter will draw a border with the width defined here between single sections.
-
Crop: Enables/disables cropping of the border.
-
Alpha: Sets an alpha value for the border.
-
Color: Sets a color for the border.
Trigger
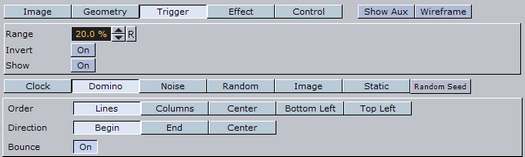
In the trigger section you can select between different progress maps that defines how every section of the image is to be triggered by the global progress. Each section of the image receives its base value, the global progress is a value that changes as you animate by using one of the options in the control menu. Since every section gets a different base value, it will be triggered differently by the global progress.
Example: In a domino effect which starts at the bottom left the section at the bottom left will receive a value of 100 and the section at the top right will receive a value of 1. As the progress moves section with high values will be influences, fast then sections with low values. If we continue with the above example with a fade effect, the bottom left section will fade out when progress is 20 but the top right section will only fade out when progress is 100.
The options for progress maps are:
-
Clock: Sets the values for the sections that are computed based on a clock hand movement. It has the following properties:
-
Center: Sets the center for the clock hand movement.
-
Start Angle: Sets the starting angle for the clock hand.
-
Whirl: Applies a whirl effect to the movement.
-
Direction: Sets the direction for the clock hand movement.
-
-
Domino: Sets the values for the sections that are computed based on a domino movement. It has the following options:
-
Order: Sets the order in which the tiles will be moved. Choose between Lines (Line by line movement), Columns (Column by column movement, Center (From center and outwards movement), Bottom Left (Bottom left tiles first and then diagonal movement towards top right corner) or Top Left (Top left tiles first and then diagonal movement towards bottom right).
-
Direction: Sets the starting point of the movement.
-
-
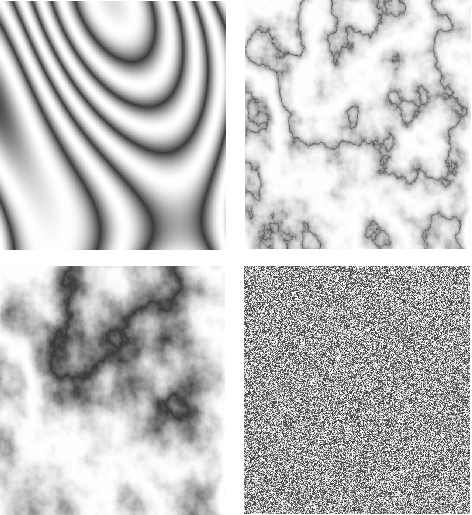
Noise: Sets the values for the sections that are computed based on user-defined noise map created using noise algorithms (perlin noise).
-
The settings create a noise texture and the image transformations are based on this image.
-
When you edit the noise properties it is a good idea to enable the show button. This will let you see the image that are created and you will see changes you do instantly.
-
Wave, Cloud, Marble and Noise are predefined noise parameter settings. It is normally a good idea to start with one of these and thereafter edit until you get the required effect. The four images below show how the four noise parameters look like when the show option is enabled:
-
Turbulence 1 to 3: Sets the noise level. The settings must be played with to see what kind of effect you get as they influence each other. So what effect one gives depends on the state of the other.
-
Frequency: Defines something that can be described as the “wave length” of the noise function. A large number gives a small wave length which will create a lot of changes to the image, while a small number will create a smoother image.
-
Exponent: Controls the ratio between the white areas and the black areas without changing the shape significantly. Exponent zero give a full white picture, and as the value will grow, the black area will become larger and larger.
-
Scale X/Y: Are quite similar to the usual texture scale, but they are working with reverse logic. In the usual texture scaling, increasing the scale is like zooming into the image, but in Image FX it works like zooming out. Also the units are different, but beside this, they are quite similar.
-
-
Random: The values for the sections are computed randomly.
-
Image: The values for the sections are computed based on pixel values of an image you drag onto the drop zone. What the function does is to create links between the animated image tiles and the pixels of the image and then use the luminance level of each pixel to set the base value for the tiles. By default 100% luminance sets high base value and 0% sets a low base value. This option allows you to generate any progress map you want by using other tools.
-
Static: All sections receive the same value. The complete image will move out and the other will move in.
-
Random Seed: Is relevant if you have chosen random order. It specifies a seed for the random number generator. Even though Viz Artist use random numbers, the animation for a specific random seed will always look the same.
Effect
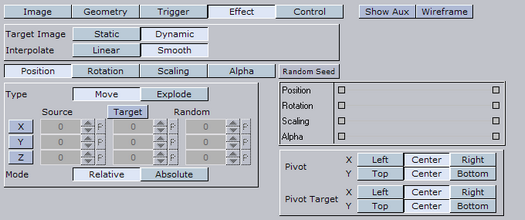
The trigger section defined the order in which the tiles would be influenced by the global process. The effect section allows you define what kind of effect/transition that will be used.
-
Target Image
-
Static: The target image is not effected at all the by the effect. A typical example would be a reveal effect where target image is “hidden” behind main image and a transition effect on the main image will reveal the target image.
-
Dynamic: The target image is controlled by the effect. A typical example would be main image flying out of the frame and at the same time target image flying in. If a dynamic target image is used, its effect can be either being the invert of main image or can be defined separately.
-
-
Interpolate
-
Linear: A linear interpolation will be used for the transformations.
-
Smooth: A smooth interpolation will be used for the transformations.
-
-
Position > Move: You can specify a position for the source image, for the target image and a random position.
-
For the source image, which is the image that is currently shown, you specify a source position. This is the position that the image tiles will move to when the animation runs.
-
If no target position is specified, the target image will animate from the source position to the initial position of the source image.
-
If you specify a target value the target image will move from that position and onto the initial position of the source image.
-
Switch on X, Y and Z to alter the values.
-
Absolute: All sections will move to the same end position.
-
Relative: The sections will maintain their original relationship.
-
-
Position > Explode: Final positions for the sections are calculated based on a user-controlled explode algorithm. The tiles of the image are treated as particles in an explosion and they are moved in one to three axis depending on what you specify. All tiles are thrown out of a emitter that can be defined to have any opening angle, so the particles can be sent within a narrow angle, like a canon fire, or in all direction like a explosion. The parameters are:
-
Duration: Sets the duration for the movement of the tiles/particles.
-
Opening Angle: Sets the opening angle for the emitter. Remember to choose more than one axis to get any clear effect.
-
Angle Rotate X: Rotates the emitter hole on the X-axis.
-
Angle Rotate Y: Rotates the emitter hole on the Y-axis.
-
Force sets the degree of force that throws the particles out in space.
-
Force Spread %: Randomizes the initial impels of the tiles. Spread 0 % means all items have the same impulse, 100% means a high degree of randomness.
-
Gravity: Sets a gravity force for the environment.
-
Use Axis: Select which axes or axis to use.
-
-
Rotation: The sections are rotated.
-
Scaling: The sections are scaled.
-
Alpha: The alpha value of the sections are changed from Alpha Start to Alpha End.
To all options (except alpha) a certain degree of user-controlled randomness can be added.
-
Random Seed: Is relevant if you have a random property. It specifies a seed for the random number generator. Even though Viz Artist use random numbers, the animation for a specific random seed will always look the same.
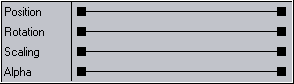
The final effect of transformation can be a combination of effects where the timing between the different effects can be tuned using the mini-stage. Move the start and end Key Frames to time the effects.
Example: A position explode effect can be combined with a rotation effect so the sections will rotate as they explode. An alpha effect can be added to fade out the sections at the end.
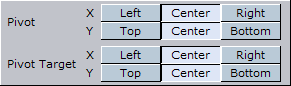
The pivot properties have relevance when you use rotation on the tiles. The settings decide where the rotation center should be on the tiles. To see the effect, create a low tesselation transition with tiles and a 180 degree X or Y rotation. Change the pivot properties for Y pivot if you have an X rotation or the X pivot if you have an Y rotation and see the effect.
Control
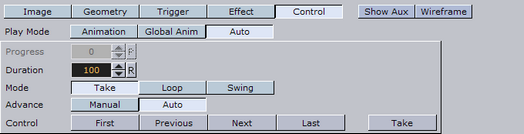
The global progress value that is used to animate the sections can be controlled in different ways:
-
Auto: When using auto mode ImageFx will start the effect as soon as the “Take” button is invoked. Useful for external control to run a sequence of images.
-
Animation: The global progress value is animated and the effect follows the stage progress. In this mode you can combine the effect animation with other animations.
-
Global Animation: When using a sequence of images the complete progress will animate all images.
To Add, Load and Remove Images
-
Add the images you want to create transitions between by dragging them from the Server Panel and dropping them onto the Add drop zone.
-
The added images will be visible in the scene tree as sub-containers of the ImageFX plug-in container.
-
-
To add images directly as sub-containers to the plug-in container you must click the Load from Scenetree button to make the plug-in recognize the added images.
-
Remove images by dragging them from the Server Panel and onto the Remove drop zone, or simply remove them directly from the scene tree.
-
To remove all, click the Clear all button.